1 / 393
Novatus User
2 / 393
Table of contents
Welcome
.
.
.
.
.
.
.
.
.
.
.
.
.
.
.
.
.
.
.
.
.
.
.
.
.
.
.
.
.
.
.
.
.
.
.
.
.
.
.
.
.
.
.
.
.
.
.
.
.
.
.
.
.
.
.
.
.
.
.
.
.
.
.
.
.
.
.
.
.
.
.
.
.
.
.
.
.
.
.
.
.
.
.
.
.
.
.
.
.
.
.
.
.
.
.
.
.
.
.
.
.
.
.
.
.
.
.
.
.
.
.
.
.
.
.
.
.
.
.
.
.
.
.
.
.
.
.
.
.
.
.
.
.
.
.
7
Technical Requirements
.
.
.
.
.
.
.
.
.
.
.
.
.
.
.
.
.
.
.
.
.
.
.
.
.
.
.
.
.
.
.
.
.
.
.
.
.
.
.
.
.
.
.
.
.
.
.
.
.
.
.
.
.
.
.
.
.
.
.
.
.
.
.
.
.
.
.
.
.
.
.
.
.
.
.
.
.
.
.
.
.
.
.
.
.
.
.
.
.
.
.
.
.
.
.
.
.
.
.
.
.
.
.
.
.
.
.
.
.
.
9
Mobile Devices
.
.
.
.
.
.
.
.
.
.
.
.
.
.
.
.
.
.
.
.
.
.
.
.
.
.
.
.
.
.
.
.
.
.
.
.
.
.
.
.
.
.
.
.
.
.
.
.
.
.
.
.
.
.
.
.
.
.
.
.
.
.
.
.
.
.
.
.
.
.
.
.
.
.
.
.
.
.
.
.
.
.
.
.
.
.
.
.
.
.
.
.
.
.
.
.
.
.
.
.
.
.
.
.
.
.
.
.
.
.
.
.
.
.
.
.
.
.
.
.
.
.
10
Login
.
.
.
.
.
.
.
.
.
.
.
.
.
.
.
.
.
.
.
.
.
.
.
.
.
.
.
.
.
.
.
.
.
.
.
.
.
.
.
.
.
.
.
.
.
.
.
.
.
.
.
.
.
.
.
.
.
.
.
.
.
.
.
.
.
.
.
.
.
.
.
.
.
.
.
.
.
.
.
.
.
.
.
.
.
.
.
.
.
.
.
.
.
.
.
.
.
.
.
.
.
.
.
.
.
.
.
.
.
.
.
.
.
.
.
.
.
.
.
.
.
.
.
.
.
.
.
.
.
.
.
.
.
.
.
.
.
.
.
16
Getting Started
.
.
.
.
.
.
.
.
.
.
.
.
.
.
.
.
.
.
.
.
.
.
.
.
.
.
.
.
.
.
.
.
.
.
.
.
.
.
.
.
.
.
.
.
.
.
.
.
.
.
.
.
.
.
.
.
.
.
.
.
.
.
.
.
.
.
.
.
.
.
.
.
.
.
.
.
.
.
.
.
.
.
.
.
.
.
.
.
.
.
.
.
.
.
.
.
.
.
.
.
.
.
.
.
.
.
.
.
.
.
.
.
.
.
.
.
.
.
.
.
.
.
.
18
User Preferences
.
.
.
.
.
.
.
.
.
.
.
.
.
.
.
.
.
.
.
.
.
.
.
.
.
.
.
.
.
.
.
.
.
.
.
.
.
.
.
.
.
.
.
.
.
.
.
.
.
.
.
.
.
.
.
.
.
.
.
.
.
.
.
.
.
.
.
.
.
.
.
.
.
.
.
.
.
.
.
.
.
.
.
.
.
.
.
.
.
.
.
.
.
.
.
.
.
.
.
.
.
.
.
.
.
.
.
.
.
.
.
.
.
.
18
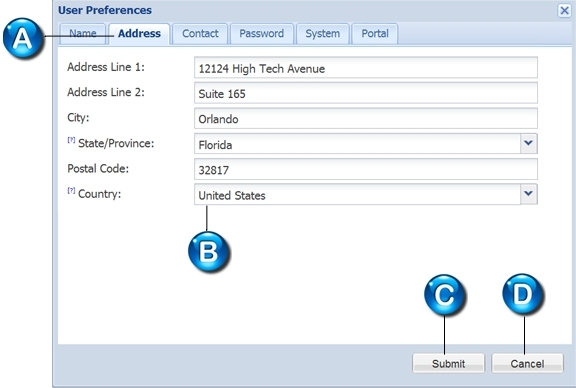
Entering Your Name
.
.
.
.
.
.
.
.
.
.
.
.
.
.
.
.
.
.
.
.
.
.
.
.
.
.
.
.
.
.
.
.
.
.
.
.
.
.
.
.
.
.
.
.
.
.
.
.
.
.
.
.
.
.
.
.
.
.
.
.
.
.
.
.
.
.
.
.
.
.
.
.
.
.
.
.
.
.
.
.
.
.
.
.
.
.
.
.
.
.
.
.
.
.
.
.
.
.
.
.
.
.
.
.
19
Entering Your Address
.
.
.
.
.
.
.
.
.
.
.
.
.
.
.
.
.
.
.
.
.
.
.
.
.
.
.
.
.
.
.
.
.
.
.
.
.
.
.
.
.
.
.
.
.
.
.
.
.
.
.
.
.
.
.
.
.
.
.
.
.
.
.
.
.
.
.
.
.
.
.
.
.
.
.
.
.
.
.
.
.
.
.
.
.
.
.
.
.
.
.
.
.
.
.
.
.
.
.
.
20
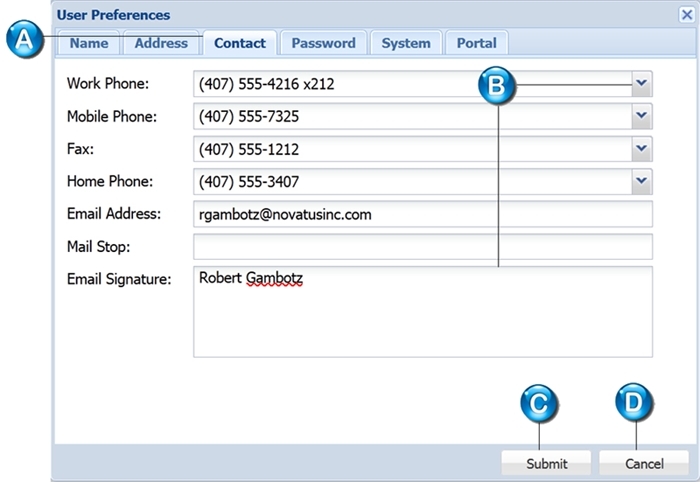
Entering Contact Information
.
.
.
.
.
.
.
.
.
.
.
.
.
.
.
.
.
.
.
.
.
.
.
.
.
.
.
.
.
.
.
.
.
.
.
.
.
.
.
.
.
.
.
.
.
.
.
.
.
.
.
.
.
.
.
.
.
.
.
.
.
.
.
.
.
.
.
.
.
.
.
.
.
.
.
.
.
.
.
.
.
.
.
.
.
.
.
.
.
.
21
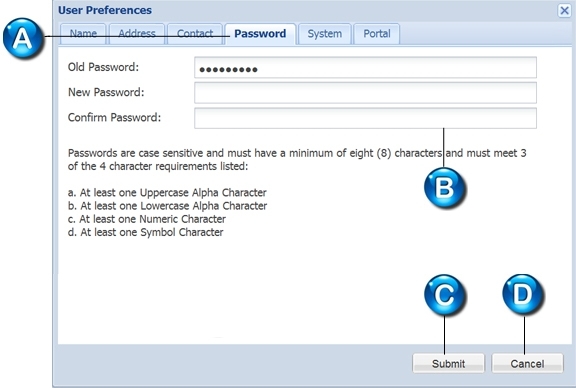
Changing Your Password
.
.
.
.
.
.
.
.
.
.
.
.
.
.
.
.
.
.
.
.
.
.
.
.
.
.
.
.
.
.
.
.
.
.
.
.
.
.
.
.
.
.
.
.
.
.
.
.
.
.
.
.
.
.
.
.
.
.
.
.
.
.
.
.
.
.
.
.
.
.
.
.
.
.
.
.
.
.
.
.
.
.
.
.
.
.
.
.
.
.
.
.
.
.
.
22
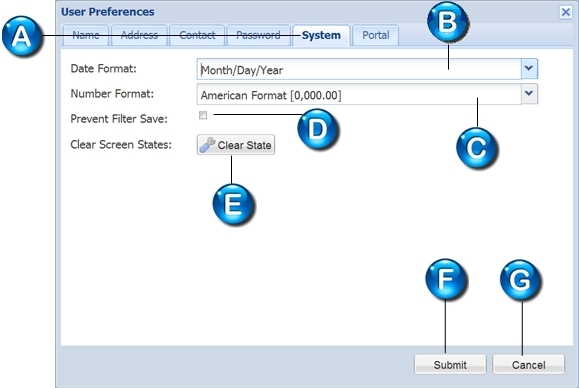
Customizing System Settings
.
.
.
.
.
.
.
.
.
.
.
.
.
.
.
.
.
.
.
.
.
.
.
.
.
.
.
.
.
.
.
.
.
.
.
.
.
.
.
.
.
.
.
.
.
.
.
.
.
.
.
.
.
.
.
.
.
.
.
.
.
.
.
.
.
.
.
.
.
.
.
.
.
.
.
.
.
.
.
.
.
.
.
.
.
.
.
.
23
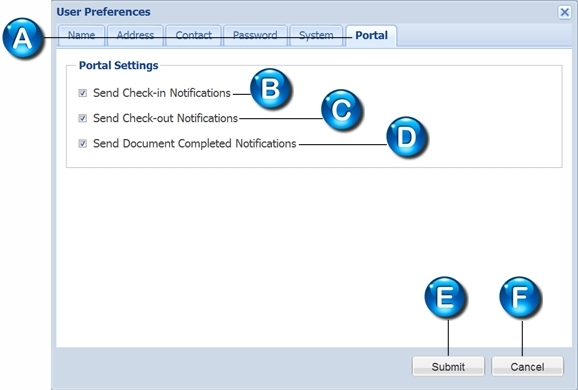
Setting Portal Notifications
.
.
.
.
.
.
.
.
.
.
.
.
.
.
.
.
.
.
.
.
.
.
.
.
.
.
.
.
.
.
.
.
.
.
.
.
.
.
.
.
.
.
.
.
.
.
.
.
.
.
.
.
.
.
.
.
.
.
.
.
.
.
.
.
.
.
.
.
.
.
.
.
.
.
.
.
.
.
.
.
.
.
.
.
.
.
.
.
.
.
.
.
.
25
Program Components
.
.
.
.
.
.
.
.
.
.
.
.
.
.
.
.
.
.
.
.
.
.
.
.
.
.
.
.
.
.
.
.
.
.
.
.
.
.
.
.
.
.
.
.
.
.
.
.
.
.
.
.
.
.
.
.
.
.
.
.
.
.
.
.
.
.
.
.
.
.
.
.
.
.
.
.
.
.
.
.
.
.
.
.
.
.
.
.
.
.
.
.
.
.
.
.
.
.
.
.
.
.
.
.
.
.
26
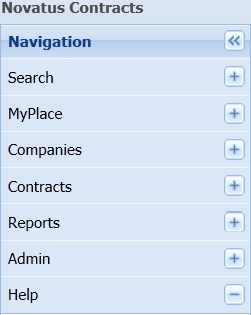
Navigation Pane
.
.
.
.
.
.
.
.
.
.
.
.
.
.
.
.
.
.
.
.
.
.
.
.
.
.
.
.
.
.
.
.
.
.
.
.
.
.
.
.
.
.
.
.
.
.
.
.
.
.
.
.
.
.
.
.
.
.
.
.
.
.
.
.
.
.
.
.
.
.
.
.
.
.
.
.
.
.
.
.
.
.
.
.
.
.
.
.
.
.
.
.
.
.
.
.
.
.
.
.
.
.
.
.
.
.
.
.
.
.
26
Portlets
.
.
.
.
.
.
.
.
.
.
.
.
.
.
.
.
.
.
.
.
.
.
.
.
.
.
.
.
.
.
.
.
.
.
.
.
.
.
.
.
.
.
.
.
.
.
.
.
.
.
.
.
.
.
.
.
.
.
.
.
.
.
.
.
.
.
.
.
.
.
.
.
.
.
.
.
.
.
.
.
.
.
.
.
.
.
.
.
.
.
.
.
.
.
.
.
.
.
.
.
.
.
.
.
.
.
.
.
.
.
.
.
.
.
.
.
.
.
.
.
.
.
.
.
.
.
27
Browse and Input Screens
.
.
.
.
.
.
.
.
.
.
.
.
.
.
.
.
.
.
.
.
.
.
.
.
.
.
.
.
.
.
.
.
.
.
.
.
.
.
.
.
.
.
.
.
.
.
.
.
.
.
.
.
.
.
.
.
.
.
.
.
.
.
.
.
.
.
.
.
.
.
.
.
.
.
.
.
.
.
.
.
.
.
.
.
.
.
.
.
.
.
.
.
.
.
27
Buttons
.
.
.
.
.
.
.
.
.
.
.
.
.
.
.
.
.
.
.
.
.
.
.
.
.
.
.
.
.
.
.
.
.
.
.
.
.
.
.
.
.
.
.
.
.
.
.
.
.
.
.
.
.
.
.
.
.
.
.
.
.
.
.
.
.
.
.
.
.
.
.
.
.
.
.
.
.
.
.
.
.
.
.
.
.
.
.
.
.
.
.
.
.
.
.
.
.
.
.
.
.
.
.
.
.
.
.
.
.
.
.
.
.
.
.
.
.
.
.
.
.
.
.
.
.
.
29
Links
.
.
.
.
.
.
.
.
.
.
.
.
.
.
.
.
.
.
.
.
.
.
.
.
.
.
.
.
.
.
.
.
.
.
.
.
.
.
.
.
.
.
.
.
.
.
.
.
.
.
.
.
.
.
.
.
.
.
.
.
.
.
.
.
.
.
.
.
.
.
.
.
.
.
.
.
.
.
.
.
.
.
.
.
.
.
.
.
.
.
.
.
.
.
.
.
.
.
.
.
.
.
.
.
.
.
.
.
.
.
.
.
.
.
.
.
.
.
.
.
.
.
.
.
.
.
.
.
.
.
29
Icons
.
.
.
.
.
.
.
.
.
.
.
.
.
.
.
.
.
.
.
.
.
.
.
.
.
.
.
.
.
.
.
.
.
.
.
.
.
.
.
.
.
.
.
.
.
.
.
.
.
.
.
.
.
.
.
.
.
.
.
.
.
.
.
.
.
.
.
.
.
.
.
.
.
.
.
.
.
.
.
.
.
.
.
.
.
.
.
.
.
.
.
.
.
.
.
.
.
.
.
.
.
.
.
.
.
.
.
.
.
.
.
.
.
.
.
.
.
.
.
.
.
.
.
.
.
.
.
.
.
.
30
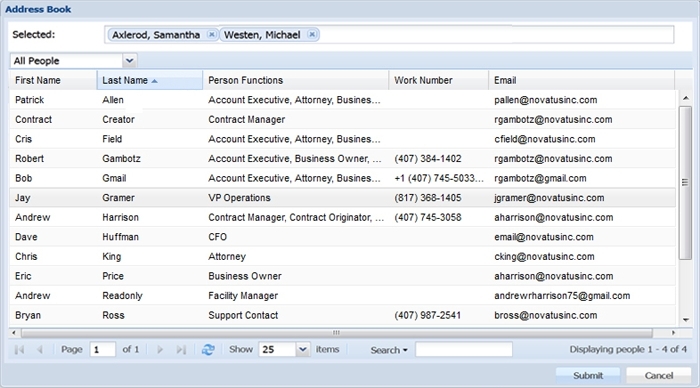
Address Book
.
.
.
.
.
.
.
.
.
.
.
.
.
.
.
.
.
.
.
.
.
.
.
.
.
.
.
.
.
.
.
.
.
.
.
.
.
.
.
.
.
.
.
.
.
.
.
.
.
.
.
.
.
.
.
.
.
.
.
.
.
.
.
.
.
.
.
.
.
.
.
.
.
.
.
.
.
.
.
.
.
.
.
.
.
.
.
.
.
.
.
.
.
.
.
.
.
.
.
.
.
.
.
.
.
.
.
.
.
.
.
.
.
.
32
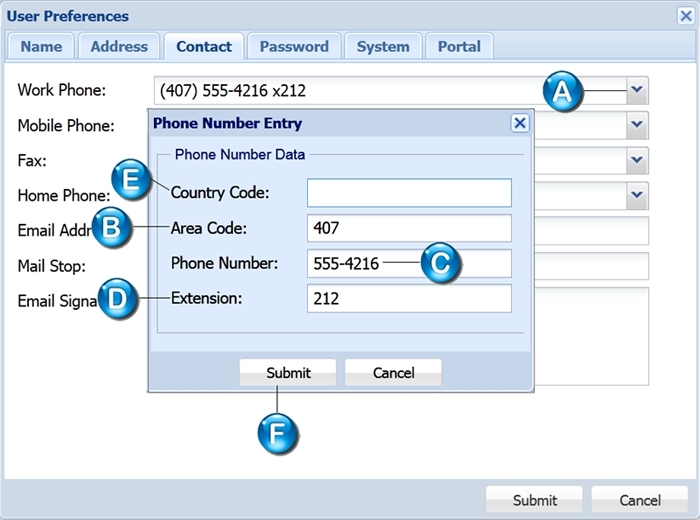
Phone Number Entry Window
.
.
.
.
.
.
.
.
.
.
.
.
.
.
.
.
.
.
.
.
.
.
.
.
.
.
.
.
.
.
.
.
.
.
.
.
.
.
.
.
.
.
.
.
.
.
.
.
.
.
.
.
.
.
.
.
.
.
.
.
.
.
.
.
.
.
.
.
.
.
.
.
.
.
.
.
.
.
.
.
.
.
.
.
.
.
.
.
33
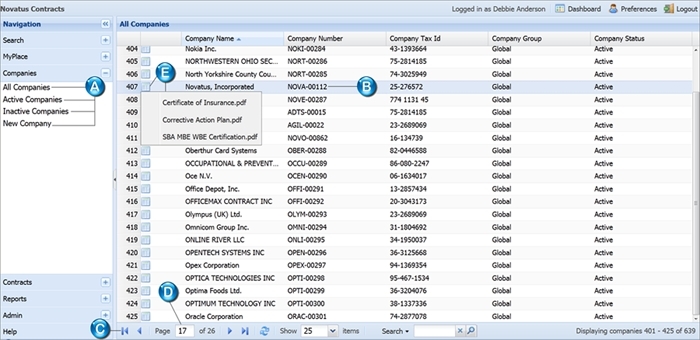
Company Browse Screens
.
.
.
.
.
.
.
.
.
.
.
.
.
.
.
.
.
.
.
.
.
.
.
.
.
.
.
.
.
.
.
.
.
.
.
.
.
.
.
.
.
.
.
.
.
.
.
.
.
.
.
.
.
.
.
.
.
.
.
.
.
.
.
.
.
.
.
.
.
.
.
.
.
.
.
.
.
.
.
.
.
.
.
.
.
.
.
.
.
.
.
.
.
.
.
.
.
.
35
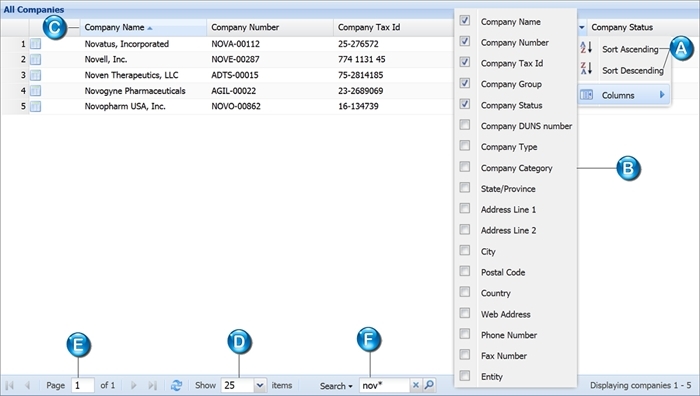
Viewing a Company Browse Screen
.
.
.
.
.
.
.
.
.
.
.
.
.
.
.
.
.
.
.
.
.
.
.
.
.
.
.
.
.
.
.
.
.
.
.
.
.
.
.
.
.
.
.
.
.
.
.
.
.
.
.
.
.
.
.
.
.
.
.
.
.
.
.
.
.
.
.
.
.
.
.
.
.
.
.
.
35
Customizing a Company Browse Screen
.
.
.
.
.
.
.
.
.
.
.
.
.
.
.
.
.
.
.
.
.
.
.
.
.
.
.
.
.
.
.
.
.
.
.
.
.
.
.
.
.
.
.
.
.
.
.
.
.
.
.
.
.
.
.
.
.
.
.
.
.
.
.
.
.
.
.
.
.
36
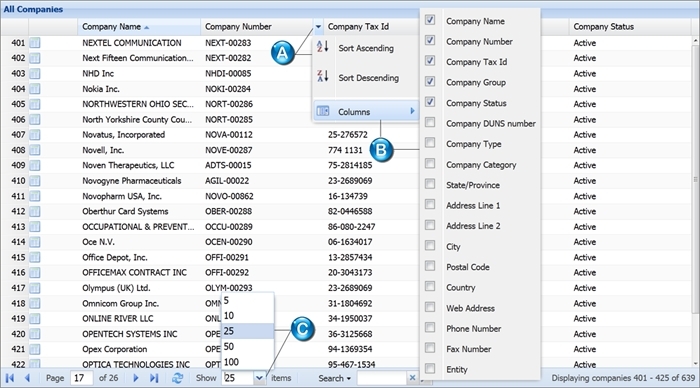
Filtering Data in a Company Browse Screen
.
.
.
.
.
.
.
.
.
.
.
.
.
.
.
.
.
.
.
.
.
.
.
.
.
.
.
.
.
.
.
.
.
.
.
.
.
.
.
.
.
.
.
.
.
.
.
.
.
.
.
.
.
.
.
.
.
.
.
.
.
.
.
37
Contract Browse Screens
.
.
.
.
.
.
.
.
.
.
.
.
.
.
.
.
.
.
.
.
.
.
.
.
.
.
.
.
.
.
.
.
.
.
.
.
.
.
.
.
.
.
.
.
.
.
.
.
.
.
.
.
.
.
.
.
.
.
.
.
.
.
.
.
.
.
.
.
.
.
.
.
.
.
.
.
.
.
.
.
.
.
.
.
.
.
.
.
.
.
.
.
.
.
.
.
.
.
.
.
38
Viewing a Contract Browse Screen
.
.
.
.
.
.
.
.
.
.
.
.
.
.
.
.
.
.
.
.
.
.
.
.
.
.
.
.
.
.
.
.
.
.
.
.
.
.
.
.
.
.
.
.
.
.
.
.
.
.
.
.
.
.
.
.
.
.
.
.
.
.
.
.
.
.
.
.
.
.
.
.
.
.
.
.
.
.
39
Customizing a Contract Browse Screen
.
.
.
.
.
.
.
.
.
.
.
.
.
.
.
.
.
.
.
.
.
.
.
.
.
.
.
.
.
.
.
.
.
.
.
.
.
.
.
.
.
.
.
.
.
.
.
.
.
.
.
.
.
.
.
.
.
.
.
.
.
.
.
.
.
.
.
.
.
.
.
40
Filtering Data in a Contract Browse Screen
.
.
.
.
.
.
.
.
.
.
.
.
.
.
.
.
.
.
.
.
.
.
.
.
.
.
.
.
.
.
.
.
.
.
.
.
.
.
.
.
.
.
.
.
.
.
.
.
.
.
.
.
.
.
.
.
.
.
.
.
.
.
.
.
.
41
Hierarchical Relationships
.
.
.
.
.
.
.
.
.
.
.
.
.
.
.
.
.
.
.
.
.
.
.
.
.
.
.
.
.
.
.
.
.
.
.
.
.
.
.
.
.
.
.
.
.
.
.
.
.
.
.
.
.
.
.
.
.
.
.
.
.
.
.
.
.
.
.
.
.
.
.
.
.
.
.
.
.
.
.
.
.
.
.
.
.
.
.
.
.
.
.
.
.
.
.
.
.
.
.
42
Company and Contract Profiles
.
.
.
.
.
.
.
.
.
.
.
.
.
.
.
.
.
.
.
.
.
.
.
.
.
.
.
.
.
.
.
.
.
.
.
.
.
.
.
.
.
.
.
.
.
.
.
.
.
.
.
.
.
.
.
.
.
.
.
.
.
.
.
.
.
.
.
.
.
.
.
.
.
.
.
.
.
.
.
.
.
.
.
.
.
42
Contract Type and Agreement Type
.
.
.
.
.
.
.
.
.
.
.
.
.
.
.
.
.
.
.
.
.
.
.
.
.
.
.
.
.
.
.
.
.
.
.
.
.
.
.
.
.
.
.
.
.
.
.
.
.
.
.
.
.
.
.
.
.
.
.
.
.
.
.
.
.
.
.
.
.
.
.
.
.
.
.
.
.
.
43
Contract Family
.
.
.
.
.
.
.
.
.
.
.
.
.
.
.
.
.
.
.
.
.
.
.
.
.
.
.
.
.
.
.
.
.
.
.
.
.
.
.
.
.
.
.
.
.
.
.
.
.
.
.
.
.
.
.
.
.
.
.
.
.
.
.
.
.
.
.
.
.
.
.
.
.
.
.
.
.
.
.
.
.
.
.
.
.
.
.
.
.
.
.
.
.
.
.
.
.
.
.
.
.
.
.
.
.
.
.
.
.
.
.
.
45
Linked Data
.
.
.
.
.
.
.
.
.
.
.
.
.
.
.
.
.
.
.
.
.
.
.
.
.
.
.
.
.
.
.
.
.
.
.
.
.
.
.
.
.
.
.
.
.
.
.
.
.
.
.
.
.
.
.
.
.
.
.
.
.
.
.
.
.
.
.
.
.
.
.
.
.
.
.
.
.
.
.
.
.
.
.
.
.
.
.
.
.
.
.
.
.
.
.
.
.
.
.
.
.
.
.
.
.
.
.
.
.
.
.
.
.
.
.
.
.
.
46
Search
.
.
.
.
.
.
.
.
.
.
.
.
.
.
.
.
.
.
.
.
.
.
.
.
.
.
.
.
.
.
.
.
.
.
.
.
.
.
.
.
.
.
.
.
.
.
.
.
.
.
.
.
.
.
.
.
.
.
.
.
.
.
.
.
.
.
.
.
.
.
.
.
.
.
.
.
.
.
.
.
.
.
.
.
.
.
.
.
.
.
.
.
.
.
.
.
.
.
.
.
.
.
.
.
.
.
.
.
.
.
.
.
.
.
.
.
.
.
.
.
.
.
.
.
.
.
.
.
.
.
.
.
.
.
.
.
.
48
Performing a Basic Search
.
.
.
.
.
.
.
.
.
.
.
.
.
.
.
.
.
.
.
.
.
.
.
.
.
.
.
.
.
.
.
.
.
.
.
.
.
.
.
.
.
.
.
.
.
.
.
.
.
.
.
.
.
.
.
.
.
.
.
.
.
.
.
.
.
.
.
.
.
.
.
.
.
.
.
.
.
.
.
.
.
.
.
.
.
.
.
.
.
.
.
.
.
.
.
.
.
48
Performing a Search Query
.
.
.
.
.
.
.
.
.
.
.
.
.
.
.
.
.
.
.
.
.
.
.
.
.
.
.
.
.
.
.
.
.
.
.
.
.
.
.
.
.
.
.
.
.
.
.
.
.
.
.
.
.
.
.
.
.
.
.
.
.
.
.
.
.
.
.
.
.
.
.
.
.
.
.
.
.
.
.
.
.
.
.
.
.
.
.
.
.
.
.
.
.
.
.
.
.
49
Running a Saved Search Query
.
.
.
.
.
.
.
.
.
.
.
.
.
.
.
.
.
.
.
.
.
.
.
.
.
.
.
.
.
.
.
.
.
.
.
.
.
.
.
.
.
.
.
.
.
.
.
.
.
.
.
.
.
.
.
.
.
.
.
.
.
.
.
.
.
.
.
.
.
.
.
.
.
.
.
.
.
.
.
.
.
.
.
.
.
.
.
.
.
.
51
Deleting a Search Query
.
.
.
.
.
.
.
.
.
.
.
.
.
.
.
.
.
.
.
.
.
.
.
.
.
.
.
.
.
.
.
.
.
.
.
.
.
.
.
.
.
.
.
.
.
.
.
.
.
.
.
.
.
.
.
.
.
.
.
.
.
.
.
.
.
.
.
.
.
.
.
.
.
.
.
.
.
.
.
.
.
.
.
.
.
.
.
.
.
.
.
.
.
.
.
.
.
.
.
.
.
.
53
Performing a Document Search
.
.
.
.
.
.
.
.
.
.
.
.
.
.
.
.
.
.
.
.
.
.
.
.
.
.
.
.
.
.
.
.
.
.
.
.
.
.
.
.
.
.
.
.
.
.
.
.
.
.
.
.
.
.
.
.
.
.
.
.
.
.
.
.
.
.
.
.
.
.
.
.
.
.
.
.
.
.
.
.
.
.
.
.
.
.
.
.
.
54
My Place
.
.
.
.
.
.
.
.
.
.
.
.
.
.
.
.
.
.
.
.
.
.
.
.
.
.
.
.
.
.
.
.
.
.
.
.
.
.
.
.
.
.
.
.
.
.
.
.
.
.
.
.
.
.
.
.
.
.
.
.
.
.
.
.
.
.
.
.
.
.
.
.
.
.
.
.
.
.
.
.
.
.
.
.
.
.
.
.
.
.
.
.
.
.
.
.
.
.
.
.
.
.
.
.
.
.
.
.
.
.
.
.
.
.
.
.
.
.
.
.
.
.
.
.
.
.
.
.
.
.
.
.
.
56
Dashboard
.
.
.
.
.
.
.
.
.
.
.
.
.
.
.
.
.
.
.
.
.
.
.
.
.
.
.
.
.
.
.
.
.
.
.
.
.
.
.
.
.
.
.
.
.
.
.
.
.
.
.
.
.
.
.
.
.
.
.
.
.
.
.
.
.
.
.
.
.
.
.
.
.
.
.
.
.
.
.
.
.
.
.
.
.
.
.
.
.
.
.
.
.
.
.
.
.
.
.
.
.
.
.
.
.
.
.
.
.
.
.
.
.
.
.
.
.
.
.
.
.
.
.
.
.
58
Adding a Portlet
.
.
.
.
.
.
.
.
.
.
.
.
.
.
.
.
.
.
.
.
.
.
.
.
.
.
.
.
.
.
.
.
.
.
.
.
.
.
.
.
.
.
.
.
.
.
.
.
.
.
.
.
.
.
.
.
.
.
.
.
.
.
.
.
.
.
.
.
.
.
.
.
.
.
.
.
.
.
.
.
.
.
.
.
.
.
.
.
.
.
.
.
.
.
.
.
.
.
.
.
.
.
.
.
.
.
.
.
.
.
.
58
Using the Query Search Portlet
.
.
.
.
.
.
.
.
.
.
.
.
.
.
.
.
.
.
.
.
.
.
.
.
.
.
.
.
.
.
.
.
.
.
.
.
.
.
.
.
.
.
.
.
.
.
.
.
.
.
.
.
.
.
.
.
.
.
.
.
.
.
.
.
.
.
.
.
.
.
.
.
.
.
.
.
.
.
.
.
.
.
.
.
.
.
60
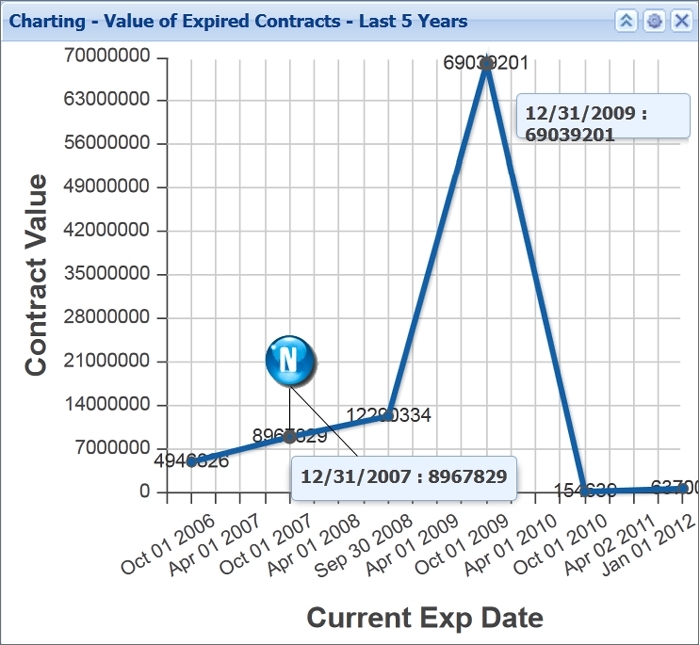
Using the Charting Portlets
.
.
.
.
.
.
.
.
.
.
.
.
.
.
.
.
.
.
.
.
.
.
.
.
.
.
.
.
.
.
.
.
.
.
.
.
.
.
.
.
.
.
.
.
.
.
.
.
.
.
.
.
.
.
.
.
.
.
.
.
.
.
.
.
.
.
.
.
.
.
.
.
.
.
.
.
.
.
.
.
.
.
.
.
.
.
.
.
.
.
.
.
.
62
Generating a Pie Chart
.
.
.
.
.
.
.
.
.
.
.
.
.
.
.
.
.
.
.
.
.
.
.
.
.
.
.
.
.
.
.
.
.
.
.
.
.
.
.
.
.
.
.
.
.
.
.
.
.
.
.
.
.
.
.
.
.
.
.
.
.
.
.
.
.
.
.
.
.
.
.
.
.
.
.
.
.
.
.
.
.
.
.
.
.
.
.
.
.
.
.
.
.
.
63
Generating a Bar Chart
.
.
.
.
.
.
.
.
.
.
.
.
.
.
.
.
.
.
.
.
.
.
.
.
.
.
.
.
.
.
.
.
.
.
.
.
.
.
.
.
.
.
.
.
.
.
.
.
.
.
.
.
.
.
.
.
.
.
.
.
.
.
.
.
.
.
.
.
.
.
.
.
.
.
.
.
.
.
.
.
.
.
.
.
.
.
.
.
.
.
.
.
.
.
66
Generating a Time Line
.
.
.
.
.
.
.
.
.
.
.
.
.
.
.
.
.
.
.
.
.
.
.
.
.
.
.
.
.
.
.
.
.
.
.
.
.
.
.
.
.
.
.
.
.
.
.
.
.
.
.
.
.
.
.
.
.
.
.
.
.
.
.
.
.
.
.
.
.
.
.
.
.
.
.
.
.
.
.
.
.
.
.
.
.
.
.
.
.
.
.
.
.
70
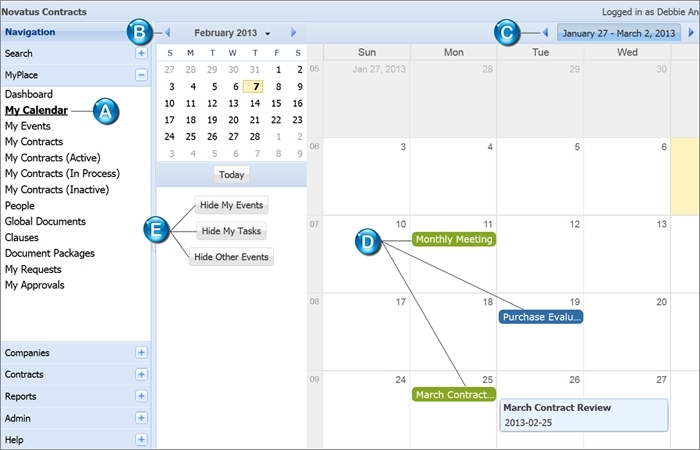
Viewing My Calendar
.
.
.
.
.
.
.
.
.
.
.
.
.
.
.
.
.
.
.
.
.
.
.
.
.
.
.
.
.
.
.
.
.
.
.
.
.
.
.
.
.
.
.
.
.
.
.
.
.
.
.
.
.
.
.
.
.
.
.
.
.
.
.
.
.
.
.
.
.
.
.
.
.
.
.
.
.
.
.
.
.
.
.
.
.
.
.
.
.
.
.
.
.
.
.
.
.
.
.
.
.
.
.
.
.
.
.
72
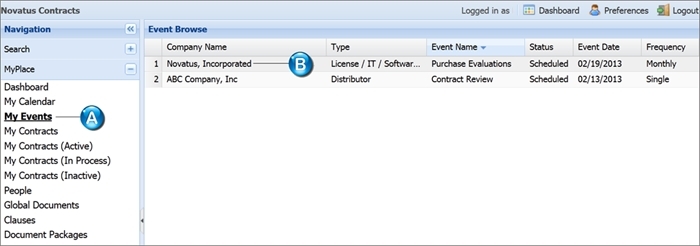
Viewing My Events
.
.
.
.
.
.
.
.
.
.
.
.
.
.
.
.
.
.
.
.
.
.
.
.
.
.
.
.
.
.
.
.
.
.
.
.
.
.
.
.
.
.
.
.
.
.
.
.
.
.
.
.
.
.
.
.
.
.
.
.
.
.
.
.
.
.
.
.
.
.
.
.
.
.
.
.
.
.
.
.
.
.
.
.
.
.
.
.
.
.
.
.
.
.
.
.
.
.
.
.
.
.
.
.
.
.
.
.
.
.
.
74
3 / 393
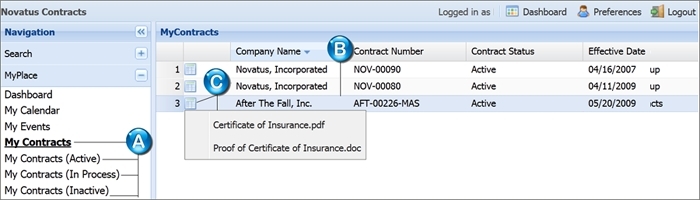
Viewing My Contracts
.
.
.
.
.
.
.
.
.
.
.
.
.
.
.
.
.
.
.
.
.
.
.
.
.
.
.
.
.
.
.
.
.
.
.
.
.
.
.
.
.
.
.
.
.
.
.
.
.
.
.
.
.
.
.
.
.
.
.
.
.
.
.
.
.
.
.
.
.
.
.
.
.
.
.
.
.
.
.
.
.
.
.
.
.
.
.
.
.
.
.
.
.
.
.
.
.
.
.
.
.
.
.
.
.
.
74
Viewing the Address Book
.
.
.
.
.
.
.
.
.
.
.
.
.
.
.
.
.
.
.
.
.
.
.
.
.
.
.
.
.
.
.
.
.
.
.
.
.
.
.
.
.
.
.
.
.
.
.
.
.
.
.
.
.
.
.
.
.
.
.
.
.
.
.
.
.
.
.
.
.
.
.
.
.
.
.
.
.
.
.
.
.
.
.
.
.
.
.
.
.
.
.
.
.
.
.
.
.
.
75
Viewing Global Documents
.
.
.
.
.
.
.
.
.
.
.
.
.
.
.
.
.
.
.
.
.
.
.
.
.
.
.
.
.
.
.
.
.
.
.
.
.
.
.
.
.
.
.
.
.
.
.
.
.
.
.
.
.
.
.
.
.
.
.
.
.
.
.
.
.
.
.
.
.
.
.
.
.
.
.
.
.
.
.
.
.
.
.
.
.
.
.
.
.
.
.
.
.
.
.
.
.
76
Clauses
.
.
.
.
.
.
.
.
.
.
.
.
.
.
.
.
.
.
.
.
.
.
.
.
.
.
.
.
.
.
.
.
.
.
.
.
.
.
.
.
.
.
.
.
.
.
.
.
.
.
.
.
.
.
.
.
.
.
.
.
.
.
.
.
.
.
.
.
.
.
.
.
.
.
.
.
.
.
.
.
.
.
.
.
.
.
.
.
.
.
.
.
.
.
.
.
.
.
.
.
.
.
.
.
.
.
.
.
.
.
.
.
.
.
.
.
.
.
.
.
.
.
.
.
.
.
.
.
.
.
77
Viewing Contract Library Clauses
.
.
.
.
.
.
.
.
.
.
.
.
.
.
.
.
.
.
.
.
.
.
.
.
.
.
.
.
.
.
.
.
.
.
.
.
.
.
.
.
.
.
.
.
.
.
.
.
.
.
.
.
.
.
.
.
.
.
.
.
.
.
.
.
.
.
.
.
.
.
.
.
.
.
.
.
.
.
.
.
.
77
Copying & Pasting a Contract Clauses
.
.
.
.
.
.
.
.
.
.
.
.
.
.
.
.
.
.
.
.
.
.
.
.
.
.
.
.
.
.
.
.
.
.
.
.
.
.
.
.
.
.
.
.
.
.
.
.
.
.
.
.
.
.
.
.
.
.
.
.
.
.
.
.
.
.
.
.
.
.
.
78
Adding a Contract Clause
.
.
.
.
.
.
.
.
.
.
.
.
.
.
.
.
.
.
.
.
.
.
.
.
.
.
.
.
.
.
.
.
.
.
.
.
.
.
.
.
.
.
.
.
.
.
.
.
.
.
.
.
.
.
.
.
.
.
.
.
.
.
.
.
.
.
.
.
.
.
.
.
.
.
.
.
.
.
.
.
.
.
.
.
.
.
.
.
.
.
.
.
.
.
80
Editing a Contract Clause
.
.
.
.
.
.
.
.
.
.
.
.
.
.
.
.
.
.
.
.
.
.
.
.
.
.
.
.
.
.
.
.
.
.
.
.
.
.
.
.
.
.
.
.
.
.
.
.
.
.
.
.
.
.
.
.
.
.
.
.
.
.
.
.
.
.
.
.
.
.
.
.
.
.
.
.
.
.
.
.
.
.
.
.
.
.
.
.
.
.
.
.
.
.
.
81
Deleteing a Contract Clause
.
.
.
.
.
.
.
.
.
.
.
.
.
.
.
.
.
.
.
.
.
.
.
.
.
.
.
.
.
.
.
.
.
.
.
.
.
.
.
.
.
.
.
.
.
.
.
.
.
.
.
.
.
.
.
.
.
.
.
.
.
.
.
.
.
.
.
.
.
.
.
.
.
.
.
.
.
.
.
.
.
.
.
.
.
.
.
.
.
.
82
Viewing Document Packages
.
.
.
.
.
.
.
.
.
.
.
.
.
.
.
.
.
.
.
.
.
.
.
.
.
.
.
.
.
.
.
.
.
.
.
.
.
.
.
.
.
.
.
.
.
.
.
.
.
.
.
.
.
.
.
.
.
.
.
.
.
.
.
.
.
.
.
.
.
.
.
.
.
.
.
.
.
.
.
.
.
.
.
.
.
.
.
.
.
.
.
.
.
83
My Contract Requests
.
.
.
.
.
.
.
.
.
.
.
.
.
.
.
.
.
.
.
.
.
.
.
.
.
.
.
.
.
.
.
.
.
.
.
.
.
.
.
.
.
.
.
.
.
.
.
.
.
.
.
.
.
.
.
.
.
.
.
.
.
.
.
.
.
.
.
.
.
.
.
.
.
.
.
.
.
.
.
.
.
.
.
.
.
.
.
.
.
.
.
.
.
.
.
.
.
.
.
.
.
.
.
.
.
.
84
Viewing My Contract Requests
.
.
.
.
.
.
.
.
.
.
.
.
.
.
.
.
.
.
.
.
.
.
.
.
.
.
.
.
.
.
.
.
.
.
.
.
.
.
.
.
.
.
.
.
.
.
.
.
.
.
.
.
.
.
.
.
.
.
.
.
.
.
.
.
.
.
.
.
.
.
.
.
.
.
.
.
.
.
.
.
.
.
.
.
.
.
85
Requesting a Contract Document
.
.
.
.
.
.
.
.
.
.
.
.
.
.
.
.
.
.
.
.
.
.
.
.
.
.
.
.
.
.
.
.
.
.
.
.
.
.
.
.
.
.
.
.
.
.
.
.
.
.
.
.
.
.
.
.
.
.
.
.
.
.
.
.
.
.
.
.
.
.
.
.
.
.
.
.
.
.
.
.
.
.
85
My Contract Approvals
.
.
.
.
.
.
.
.
.
.
.
.
.
.
.
.
.
.
.
.
.
.
.
.
.
.
.
.
.
.
.
.
.
.
.
.
.
.
.
.
.
.
.
.
.
.
.
.
.
.
.
.
.
.
.
.
.
.
.
.
.
.
.
.
.
.
.
.
.
.
.
.
.
.
.
.
.
.
.
.
.
.
.
.
.
.
.
.
.
.
.
.
.
.
.
.
.
.
.
.
.
.
.
.
.
89
Viewing My Contract Approvals
.
.
.
.
.
.
.
.
.
.
.
.
.
.
.
.
.
.
.
.
.
.
.
.
.
.
.
.
.
.
.
.
.
.
.
.
.
.
.
.
.
.
.
.
.
.
.
.
.
.
.
.
.
.
.
.
.
.
.
.
.
.
.
.
.
.
.
.
.
.
.
.
.
.
.
.
.
.
.
.
.
.
.
.
.
90
Processing a Contract Request
.
.
.
.
.
.
.
.
.
.
.
.
.
.
.
.
.
.
.
.
.
.
.
.
.
.
.
.
.
.
.
.
.
.
.
.
.
.
.
.
.
.
.
.
.
.
.
.
.
.
.
.
.
.
.
.
.
.
.
.
.
.
.
.
.
.
.
.
.
.
.
.
.
.
.
.
.
.
.
.
.
.
.
.
.
91
Companies
.
.
.
.
.
.
.
.
.
.
.
.
.
.
.
.
.
.
.
.
.
.
.
.
.
.
.
.
.
.
.
.
.
.
.
.
.
.
.
.
.
.
.
.
.
.
.
.
.
.
.
.
.
.
.
.
.
.
.
.
.
.
.
.
.
.
.
.
.
.
.
.
.
.
.
.
.
.
.
.
.
.
.
.
.
.
.
.
.
.
.
.
.
.
.
.
.
.
.
.
.
.
.
.
.
.
.
.
.
.
.
.
.
.
.
.
.
.
.
.
.
.
.
.
.
.
.
.
.
94
Company Profile
.
.
.
.
.
.
.
.
.
.
.
.
.
.
.
.
.
.
.
.
.
.
.
.
.
.
.
.
.
.
.
.
.
.
.
.
.
.
.
.
.
.
.
.
.
.
.
.
.
.
.
.
.
.
.
.
.
.
.
.
.
.
.
.
.
.
.
.
.
.
.
.
.
.
.
.
.
.
.
.
.
.
.
.
.
.
.
.
.
.
.
.
.
.
.
.
.
.
.
.
.
.
.
.
.
.
.
.
.
.
.
.
.
.
.
94
Using the Company Profile Action Bar
.
.
.
.
.
.
.
.
.
.
.
.
.
.
.
.
.
.
.
.
.
.
.
.
.
.
.
.
.
.
.
.
.
.
.
.
.
.
.
.
.
.
.
.
.
.
.
.
.
.
.
.
.
.
.
.
.
.
.
.
.
.
.
.
.
.
.
.
.
.
.
.
.
.
95
Company Links
.
.
.
.
.
.
.
.
.
.
.
.
.
.
.
.
.
.
.
.
.
.
.
.
.
.
.
.
.
.
.
.
.
.
.
.
.
.
.
.
.
.
.
.
.
.
.
.
.
.
.
.
.
.
.
.
.
.
.
.
.
.
.
.
.
.
.
.
.
.
.
.
.
.
.
.
.
.
.
.
.
.
.
.
.
.
.
.
.
.
.
.
.
.
.
.
.
.
.
.
.
.
.
.
.
.
.
.
.
.
.
.
96
Company Contracts
.
.
.
.
.
.
.
.
.
.
.
.
.
.
.
.
.
.
.
.
.
.
.
.
.
.
.
.
.
.
.
.
.
.
.
.
.
.
.
.
.
.
.
.
.
.
.
.
.
.
.
.
.
.
.
.
.
.
.
.
.
.
.
.
.
.
.
.
.
.
.
.
.
.
.
.
.
.
.
.
.
.
.
.
.
.
.
.
.
.
.
.
.
.
.
.
.
.
.
.
97
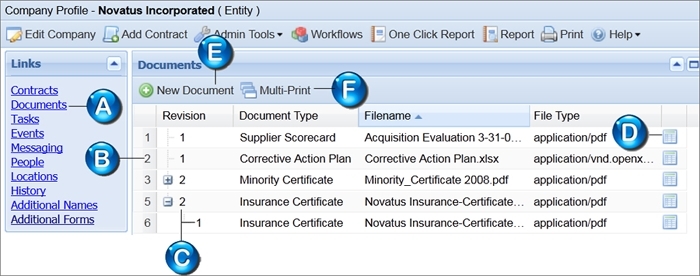
Documents
.
.
.
.
.
.
.
.
.
.
.
.
.
.
.
.
.
.
.
.
.
.
.
.
.
.
.
.
.
.
.
.
.
.
.
.
.
.
.
.
.
.
.
.
.
.
.
.
.
.
.
.
.
.
.
.
.
.
.
.
.
.
.
.
.
.
.
.
.
.
.
.
.
.
.
.
.
.
.
.
.
.
.
.
.
.
.
.
.
.
.
.
.
.
.
.
.
.
.
.
.
.
.
.
.
.
.
.
.
.
.
.
.
.
98
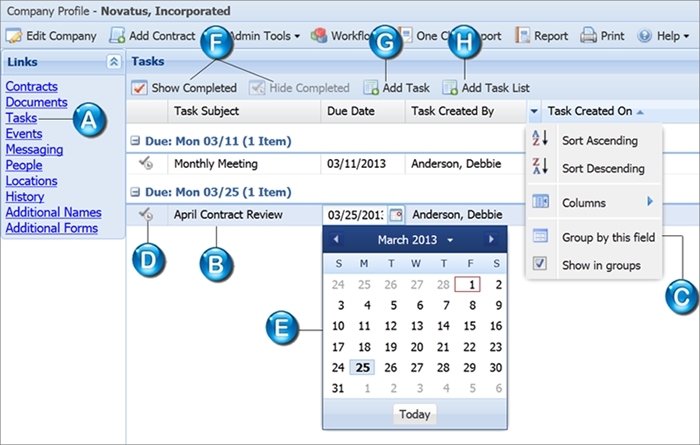
Tasks
.
.
.
.
.
.
.
.
.
.
.
.
.
.
.
.
.
.
.
.
.
.
.
.
.
.
.
.
.
.
.
.
.
.
.
.
.
.
.
.
.
.
.
.
.
.
.
.
.
.
.
.
.
.
.
.
.
.
.
.
.
.
.
.
.
.
.
.
.
.
.
.
.
.
.
.
.
.
.
.
.
.
.
.
.
.
.
.
.
.
.
.
.
.
.
.
.
.
.
.
.
.
.
.
.
.
.
.
.
.
.
.
.
.
.
.
.
.
.
.
.
.
.
.
99
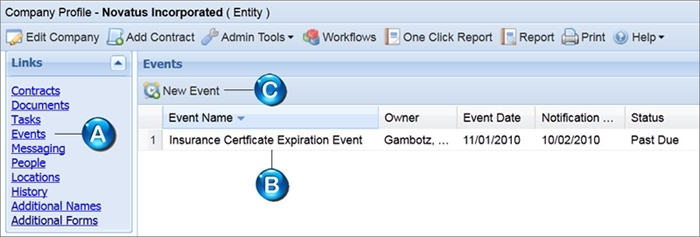
Events
.
.
.
.
.
.
.
.
.
.
.
.
.
.
.
.
.
.
.
.
.
.
.
.
.
.
.
.
.
.
.
.
.
.
.
.
.
.
.
.
.
.
.
.
.
.
.
.
.
.
.
.
.
.
.
.
.
.
.
.
.
.
.
.
.
.
.
.
.
.
.
.
.
.
.
.
.
.
.
.
.
.
.
.
.
.
.
.
.
.
.
.
.
.
.
.
.
.
.
.
.
.
.
.
.
.
.
.
.
.
.
.
.
.
.
.
.
.
.
.
100
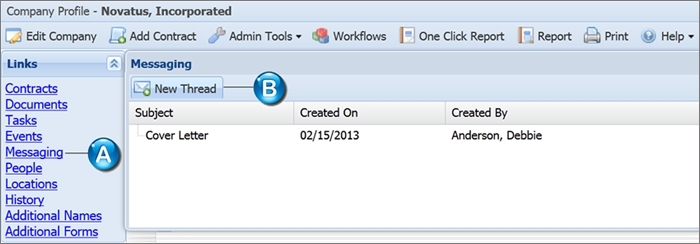
Messaging
.
.
.
.
.
.
.
.
.
.
.
.
.
.
.
.
.
.
.
.
.
.
.
.
.
.
.
.
.
.
.
.
.
.
.
.
.
.
.
.
.
.
.
.
.
.
.
.
.
.
.
.
.
.
.
.
.
.
.
.
.
.
.
.
.
.
.
.
.
.
.
.
.
.
.
.
.
.
.
.
.
.
.
.
.
.
.
.
.
.
.
.
.
.
.
.
.
.
.
.
.
.
.
.
.
.
.
.
.
.
.
.
.
101
People
.
.
.
.
.
.
.
.
.
.
.
.
.
.
.
.
.
.
.
.
.
.
.
.
.
.
.
.
.
.
.
.
.
.
.
.
.
.
.
.
.
.
.
.
.
.
.
.
.
.
.
.
.
.
.
.
.
.
.
.
.
.
.
.
.
.
.
.
.
.
.
.
.
.
.
.
.
.
.
.
.
.
.
.
.
.
.
.
.
.
.
.
.
.
.
.
.
.
.
.
.
.
.
.
.
.
.
.
.
.
.
.
.
.
.
.
.
.
.
104
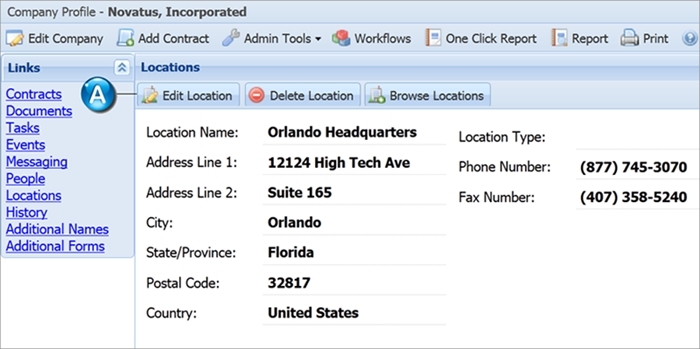
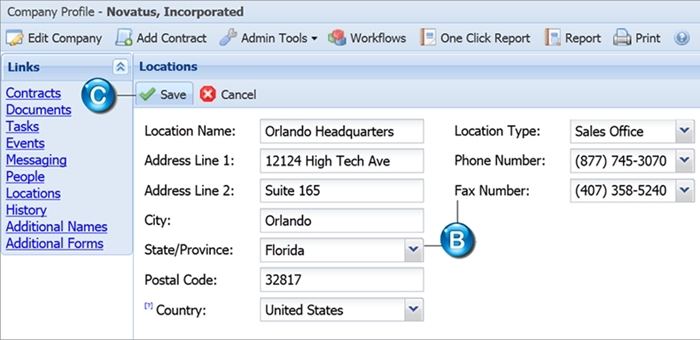
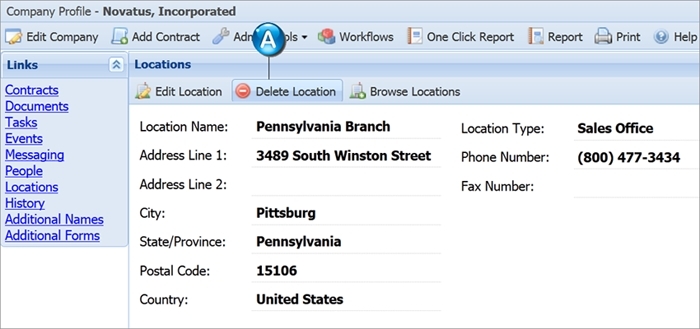
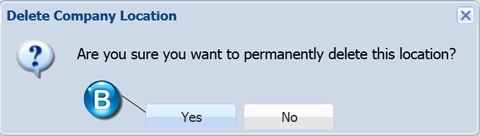
Locations
.
.
.
.
.
.
.
.
.
.
.
.
.
.
.
.
.
.
.
.
.
.
.
.
.
.
.
.
.
.
.
.
.
.
.
.
.
.
.
.
.
.
.
.
.
.
.
.
.
.
.
.
.
.
.
.
.
.
.
.
.
.
.
.
.
.
.
.
.
.
.
.
.
.
.
.
.
.
.
.
.
.
.
.
.
.
.
.
.
.
.
.
.
.
.
.
.
.
.
.
.
.
.
.
.
.
.
.
.
.
.
.
.
.
.
104
Relationships
.
.
.
.
.
.
.
.
.
.
.
.
.
.
.
.
.
.
.
.
.
.
.
.
.
.
.
.
.
.
.
.
.
.
.
.
.
.
.
.
.
.
.
.
.
.
.
.
.
.
.
.
.
.
.
.
.
.
.
.
.
.
.
.
.
.
.
.
.
.
.
.
.
.
.
.
.
.
.
.
.
.
.
.
.
.
.
.
.
.
.
.
.
.
.
.
.
.
.
.
.
.
.
.
.
.
.
.
105
History
.
.
.
.
.
.
.
.
.
.
.
.
.
.
.
.
.
.
.
.
.
.
.
.
.
.
.
.
.
.
.
.
.
.
.
.
.
.
.
.
.
.
.
.
.
.
.
.
.
.
.
.
.
.
.
.
.
.
.
.
.
.
.
.
.
.
.
.
.
.
.
.
.
.
.
.
.
.
.
.
.
.
.
.
.
.
.
.
.
.
.
.
.
.
.
.
.
.
.
.
.
.
.
.
.
.
.
.
.
.
.
.
.
.
.
.
.
.
.
.
105
Additional Names
.
.
.
.
.
.
.
.
.
.
.
.
.
.
.
.
.
.
.
.
.
.
.
.
.
.
.
.
.
.
.
.
.
.
.
.
.
.
.
.
.
.
.
.
.
.
.
.
.
.
.
.
.
.
.
.
.
.
.
.
.
.
.
.
.
.
.
.
.
.
.
.
.
.
.
.
.
.
.
.
.
.
.
.
.
.
.
.
.
.
.
.
.
.
.
.
.
.
.
.
.
106
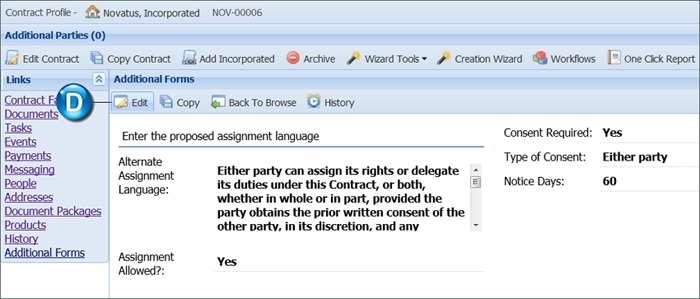
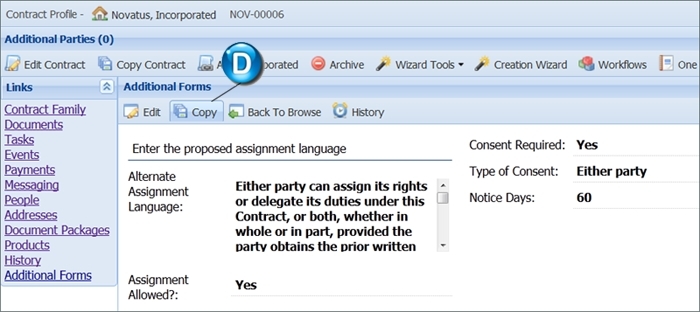
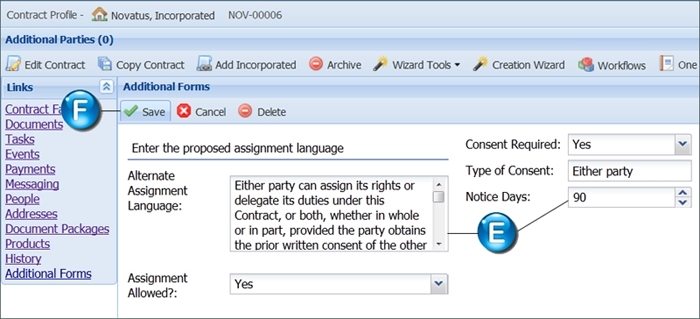
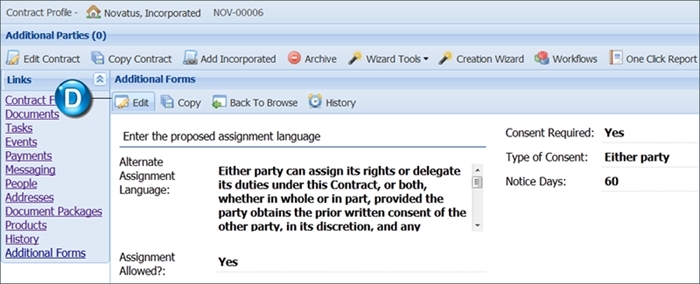
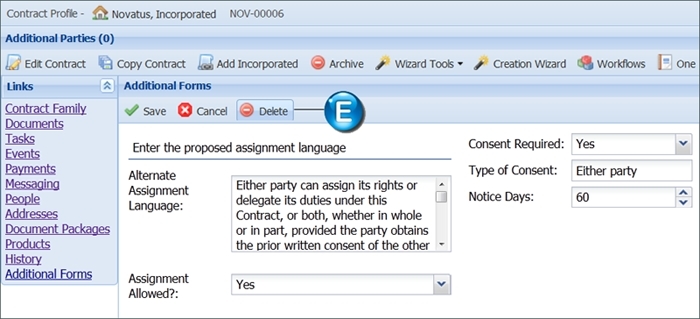
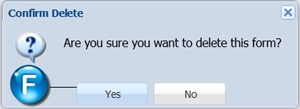
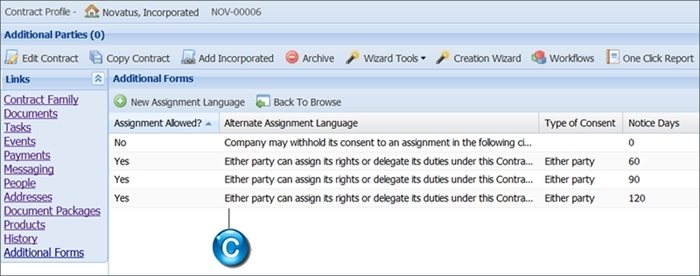
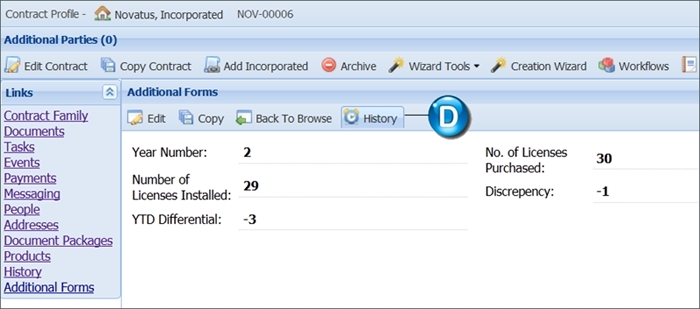
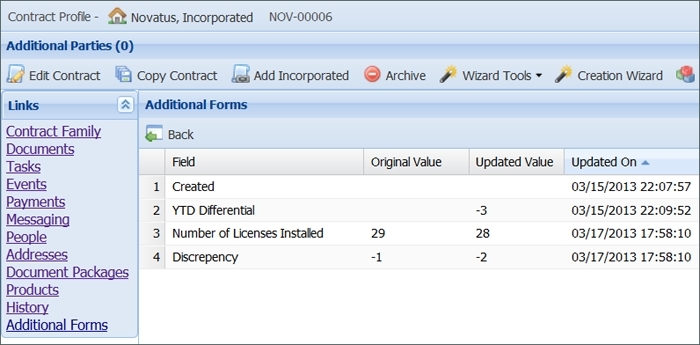
Additional Forms
.
.
.
.
.
.
.
.
.
.
.
.
.
.
.
.
.
.
.
.
.
.
.
.
.
.
.
.
.
.
.
.
.
.
.
.
.
.
.
.
.
.
.
.
.
.
.
.
.
.
.
.
.
.
.
.
.
.
.
.
.
.
.
.
.
.
.
.
.
.
.
.
.
.
.
.
.
.
.
.
.
.
.
.
.
.
.
.
.
.
.
.
.
.
.
.
.
.
.
.
.
.
107
Company Management
.
.
.
.
.
.
.
.
.
.
.
.
.
.
.
.
.
.
.
.
.
.
.
.
.
.
.
.
.
.
.
.
.
.
.
.
.
.
.
.
.
.
.
.
.
.
.
.
.
.
.
.
.
.
.
.
.
.
.
.
.
.
.
.
.
.
.
.
.
.
.
.
.
.
.
.
.
.
.
.
.
.
.
.
.
.
.
.
.
.
.
.
.
.
.
.
.
.
.
.
.
107
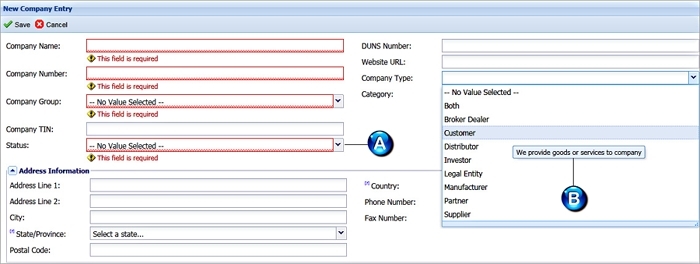
Adding a Company
.
.
.
.
.
.
.
.
.
.
.
.
.
.
.
.
.
.
.
.
.
.
.
.
.
.
.
.
.
.
.
.
.
.
.
.
.
.
.
.
.
.
.
.
.
.
.
.
.
.
.
.
.
.
.
.
.
.
.
.
.
.
.
.
.
.
.
.
.
.
.
.
.
.
.
.
.
.
.
.
.
.
.
.
.
.
.
.
.
.
.
.
.
.
.
.
.
.
.
.
.
.
.
108
Editing Company Information
.
.
.
.
.
.
.
.
.
.
.
.
.
.
.
.
.
.
.
.
.
.
.
.
.
.
.
.
.
.
.
.
.
.
.
.
.
.
.
.
.
.
.
.
.
.
.
.
.
.
.
.
.
.
.
.
.
.
.
.
.
.
.
.
.
.
.
.
.
.
.
.
.
.
.
.
.
.
.
.
.
.
.
.
.
.
.
109
Marking a Company as a Legal Entity
.
.
.
.
.
.
.
.
.
.
.
.
.
.
.
.
.
.
.
.
.
.
.
.
.
.
.
.
.
.
.
.
.
.
.
.
.
.
.
.
.
.
.
.
.
.
.
.
.
.
.
.
.
.
.
.
.
.
.
.
.
.
.
.
.
.
.
.
.
.
.
.
110
Unmarking a Company as a Legal Entity
.
.
.
.
.
.
.
.
.
.
.
.
.
.
.
.
.
.
.
.
.
.
.
.
.
.
.
.
.
.
.
.
.
.
.
.
.
.
.
.
.
.
.
.
.
.
.
.
.
.
.
.
.
.
.
.
.
.
.
.
.
.
.
.
.
.
.
111
Company Wizards
.
.
.
.
.
.
.
.
.
.
.
.
.
.
.
.
.
.
.
.
.
.
.
.
.
.
.
.
.
.
.
.
.
.
.
.
.
.
.
.
.
.
.
.
.
.
.
.
.
.
.
.
.
.
.
.
.
.
.
.
.
.
.
.
.
.
.
.
.
.
.
.
.
.
.
.
.
.
.
.
.
.
.
.
.
.
.
.
.
.
.
.
.
.
.
.
.
.
.
.
.
.
.
.
.
.
.
.
.
.
111
Company Merger/Acquisition Wizard
.
.
.
.
.
.
.
.
.
.
.
.
.
.
.
.
.
.
.
.
.
.
.
.
.
.
.
.
.
.
.
.
.
.
.
.
.
.
.
.
.
.
.
.
.
.
.
.
.
.
.
.
.
.
.
.
.
.
.
.
.
.
.
.
.
.
.
.
.
.
.
.
.
112
Company Name Change Wizard
.
.
.
.
.
.
.
.
.
.
.
.
.
.
.
.
.
.
.
.
.
.
.
.
.
.
.
.
.
.
.
.
.
.
.
.
.
.
.
.
.
.
.
.
.
.
.
.
.
.
.
.
.
.
.
.
.
.
.
.
.
.
.
.
.
.
.
.
.
.
.
.
.
.
.
.
.
.
.
.
.
115
Company Archiving
.
.
.
.
.
.
.
.
.
.
.
.
.
.
.
.
.
.
.
.
.
.
.
.
.
.
.
.
.
.
.
.
.
.
.
.
.
.
.
.
.
.
.
.
.
.
.
.
.
.
.
.
.
.
.
.
.
.
.
.
.
.
.
.
.
.
.
.
.
.
.
.
.
.
.
.
.
.
.
.
.
.
.
.
.
.
.
.
.
.
.
.
.
.
.
.
.
.
.
.
.
.
.
118
Company Workflows
.
.
.
.
.
.
.
.
.
.
.
.
.
.
.
.
.
.
.
.
.
.
.
.
.
.
.
.
.
.
.
.
.
.
.
.
.
.
.
.
.
.
.
.
.
.
.
.
.
.
.
.
.
.
.
.
.
.
.
.
.
.
.
.
.
.
.
.
.
.
.
.
.
.
.
.
.
.
.
.
.
.
.
.
.
.
.
.
.
.
.
.
.
.
.
.
.
.
.
.
.
.
.
.
.
.
119
Viewing the Company Workflows Browse Screen
.
.
.
.
.
.
.
.
.
.
.
.
.
.
.
.
.
.
.
.
.
.
.
.
.
.
.
.
.
.
.
.
.
.
.
.
.
.
.
.
.
.
.
.
.
.
.
.
.
.
.
.
120
Creating a Company Workflow
.
.
.
.
.
.
.
.
.
.
.
.
.
.
.
.
.
.
.
.
.
.
.
.
.
.
.
.
.
.
.
.
.
.
.
.
.
.
.
.
.
.
.
.
.
.
.
.
.
.
.
.
.
.
.
.
.
.
.
.
.
.
.
.
.
.
.
.
.
.
.
.
.
.
.
.
.
.
.
.
.
.
.
.
121
Launching a Company Workflow
.
.
.
.
.
.
.
.
.
.
.
.
.
.
.
.
.
.
.
.
.
.
.
.
.
.
.
.
.
.
.
.
.
.
.
.
.
.
.
.
.
.
.
.
.
.
.
.
.
.
.
.
.
.
.
.
.
.
.
.
.
.
.
.
.
.
.
.
.
.
.
.
.
.
.
.
.
.
.
.
.
127
Viewing Company Workflow Steps
.
.
.
.
.
.
.
.
.
.
.
.
.
.
.
.
.
.
.
.
.
.
.
.
.
.
.
.
.
.
.
.
.
.
.
.
.
.
.
.
.
.
.
.
.
.
.
.
.
.
.
.
.
.
.
.
.
.
.
.
.
.
.
.
.
.
.
.
.
.
.
.
.
.
.
.
.
128
Managing Company Workflow Documents
.
.
.
.
.
.
.
.
.
.
.
.
.
.
.
.
.
.
.
.
.
.
.
.
.
.
.
.
.
.
.
.
.
.
.
.
.
.
.
.
.
.
.
.
.
.
.
.
.
.
.
.
.
.
.
.
.
.
.
.
.
.
.
.
130
Completing a Company Workflow Step
.
.
.
.
.
.
.
.
.
.
.
.
.
.
.
.
.
.
.
.
.
.
.
.
.
.
.
.
.
.
.
.
.
.
.
.
.
.
.
.
.
.
.
.
.
.
.
.
.
.
.
.
.
.
.
.
.
.
.
.
.
.
.
.
.
.
.
.
.
.
131
Approving or Declining a Company Workflow Step
.
.
.
.
.
.
.
.
.
.
.
.
.
.
.
.
.
.
.
.
.
.
.
.
.
.
.
.
.
.
.
.
.
.
.
.
.
.
.
.
.
.
.
.
.
.
.
.
.
.
133
Closing and Re-opening Company Workflows
.
.
.
.
.
.
.
.
.
.
.
.
.
.
.
.
.
.
.
.
.
.
.
.
.
.
.
.
.
.
.
.
.
.
.
.
.
.
.
.
.
.
.
.
.
.
.
.
.
.
.
.
.
.
.
.
.
.
134
Editing and Deleting Company Workflows
.
.
.
.
.
.
.
.
.
.
.
.
.
.
.
.
.
.
.
.
.
.
.
.
.
.
.
.
.
.
.
.
.
.
.
.
.
.
.
.
.
.
.
.
.
.
.
.
.
.
.
.
.
.
.
.
.
.
.
.
.
.
.
.
.
135
Additional Names
.
.
.
.
.
.
.
.
.
.
.
.
.
.
.
.
.
.
.
.
.
.
.
.
.
.
.
.
.
.
.
.
.
.
.
.
.
.
.
.
.
.
.
.
.
.
.
.
.
.
.
.
.
.
.
.
.
.
.
.
.
.
.
.
.
.
.
.
.
.
.
.
.
.
.
.
.
.
.
.
.
.
.
.
.
.
.
.
.
.
.
.
.
.
.
.
.
.
.
.
.
.
.
.
.
.
.
.
.
.
.
136
Additional Names Browse Screen
.
.
.
.
.
.
.
.
.
.
.
.
.
.
.
.
.
.
.
.
.
.
.
.
.
.
.
.
.
.
.
.
.
.
.
.
.
.
.
.
.
.
.
.
.
.
.
.
.
.
.
.
.
.
.
.
.
.
.
.
.
.
.
.
.
.
.
.
.
.
.
.
.
.
.
.
.
.
137
Adding an Additional Company Name
.
.
.
.
.
.
.
.
.
.
.
.
.
.
.
.
.
.
.
.
.
.
.
.
.
.
.
.
.
.
.
.
.
.
.
.
.
.
.
.
.
.
.
.
.
.
.
.
.
.
.
.
.
.
.
.
.
.
.
.
.
.
.
.
.
.
.
.
.
.
.
137
4 / 393
Editing an Additional Company Name
.
.
.
.
.
.
.
.
.
.
.
.
.
.
.
.
.
.
.
.
.
.
.
.
.
.
.
.
.
.
.
.
.
.
.
.
.
.
.
.
.
.
.
.
.
.
.
.
.
.
.
.
.
.
.
.
.
.
.
.
.
.
.
.
.
.
.
.
.
.
.
.
138
Deleting a Company Name
.
.
.
.
.
.
.
.
.
.
.
.
.
.
.
.
.
.
.
.
.
.
.
.
.
.
.
.
.
.
.
.
.
.
.
.
.
.
.
.
.
.
.
.
.
.
.
.
.
.
.
.
.
.
.
.
.
.
.
.
.
.
.
.
.
.
.
.
.
.
.
.
.
.
.
.
.
.
.
.
.
.
.
.
.
.
.
.
.
.
139
Locations
.
.
.
.
.
.
.
.
.
.
.
.
.
.
.
.
.
.
.
.
.
.
.
.
.
.
.
.
.
.
.
.
.
.
.
.
.
.
.
.
.
.
.
.
.
.
.
.
.
.
.
.
.
.
.
.
.
.
.
.
.
.
.
.
.
.
.
.
.
.
.
.
.
.
.
.
.
.
.
.
.
.
.
.
.
.
.
.
.
.
.
.
.
.
.
.
.
.
.
.
.
.
.
.
.
.
.
.
.
.
.
.
.
.
.
.
.
.
.
.
.
.
.
.
.
140
Locations Browse Screen
.
.
.
.
.
.
.
.
.
.
.
.
.
.
.
.
.
.
.
.
.
.
.
.
.
.
.
.
.
.
.
.
.
.
.
.
.
.
.
.
.
.
.
.
.
.
.
.
.
.
.
.
.
.
.
.
.
.
.
.
.
.
.
.
.
.
.
.
.
.
.
.
.
.
.
.
.
.
.
.
.
.
.
.
.
.
.
.
.
.
.
.
141
Location Profile
.
.
.
.
.
.
.
.
.
.
.
.
.
.
.
.
.
.
.
.
.
.
.
.
.
.
.
.
.
.
.
.
.
.
.
.
.
.
.
.
.
.
.
.
.
.
.
.
.
.
.
.
.
.
.
.
.
.
.
.
.
.
.
.
.
.
.
.
.
.
.
.
.
.
.
.
.
.
.
.
.
.
.
.
.
.
.
.
.
.
.
.
.
.
.
.
.
.
.
.
.
.
.
.
.
.
.
.
.
.
141
Adding a Location Profile
.
.
.
.
.
.
.
.
.
.
.
.
.
.
.
.
.
.
.
.
.
.
.
.
.
.
.
.
.
.
.
.
.
.
.
.
.
.
.
.
.
.
.
.
.
.
.
.
.
.
.
.
.
.
.
.
.
.
.
.
.
.
.
.
.
.
.
.
.
.
.
.
.
.
.
.
.
.
.
.
.
.
.
.
.
.
.
.
142
Editing a Location Profile
.
.
.
.
.
.
.
.
.
.
.
.
.
.
.
.
.
.
.
.
.
.
.
.
.
.
.
.
.
.
.
.
.
.
.
.
.
.
.
.
.
.
.
.
.
.
.
.
.
.
.
.
.
.
.
.
.
.
.
.
.
.
.
.
.
.
.
.
.
.
.
.
.
.
.
.
.
.
.
.
.
.
.
.
.
.
.
.
144
Deleting a Location Profile
.
.
.
.
.
.
.
.
.
.
.
.
.
.
.
.
.
.
.
.
.
.
.
.
.
.
.
.
.
.
.
.
.
.
.
.
.
.
.
.
.
.
.
.
.
.
.
.
.
.
.
.
.
.
.
.
.
.
.
.
.
.
.
.
.
.
.
.
.
.
.
.
.
.
.
.
.
.
.
.
.
.
.
.
.
.
145
Contracts
.
.
.
.
.
.
.
.
.
.
.
.
.
.
.
.
.
.
.
.
.
.
.
.
.
.
.
.
.
.
.
.
.
.
.
.
.
.
.
.
.
.
.
.
.
.
.
.
.
.
.
.
.
.
.
.
.
.
.
.
.
.
.
.
.
.
.
.
.
.
.
.
.
.
.
.
.
.
.
.
.
.
.
.
.
.
.
.
.
.
.
.
.
.
.
.
.
.
.
.
.
.
.
.
.
.
.
.
.
.
.
.
.
.
.
.
.
.
.
.
.
.
.
.
.
.
.
.
.
.
147
Contract Profile
.
.
.
.
.
.
.
.
.
.
.
.
.
.
.
.
.
.
.
.
.
.
.
.
.
.
.
.
.
.
.
.
.
.
.
.
.
.
.
.
.
.
.
.
.
.
.
.
.
.
.
.
.
.
.
.
.
.
.
.
.
.
.
.
.
.
.
.
.
.
.
.
.
.
.
.
.
.
.
.
.
.
.
.
.
.
.
.
.
.
.
.
.
.
.
.
.
.
.
.
.
.
.
.
.
.
.
.
.
.
.
.
.
.
.
147
Using the Contract Profile Action Bar
.
.
.
.
.
.
.
.
.
.
.
.
.
.
.
.
.
.
.
.
.
.
.
.
.
.
.
.
.
.
.
.
.
.
.
.
.
.
.
.
.
.
.
.
.
.
.
.
.
.
.
.
.
.
.
.
.
.
.
.
.
.
.
.
.
.
.
.
.
.
.
.
.
148
Contract Links
.
.
.
.
.
.
.
.
.
.
.
.
.
.
.
.
.
.
.
.
.
.
.
.
.
.
.
.
.
.
.
.
.
.
.
.
.
.
.
.
.
.
.
.
.
.
.
.
.
.
.
.
.
.
.
.
.
.
.
.
.
.
.
.
.
.
.
.
.
.
.
.
.
.
.
.
.
.
.
.
.
.
.
.
.
.
.
.
.
.
.
.
.
.
.
.
.
.
.
.
.
.
.
.
.
.
.
.
.
.
.
.
150
Contract Family
.
.
.
.
.
.
.
.
.
.
.
.
.
.
.
.
.
.
.
.
.
.
.
.
.
.
.
.
.
.
.
.
.
.
.
.
.
.
.
.
.
.
.
.
.
.
.
.
.
.
.
.
.
.
.
.
.
.
.
.
.
.
.
.
.
.
.
.
.
.
.
.
.
.
.
.
.
.
.
.
.
.
.
.
.
.
.
.
.
.
.
.
.
.
.
.
.
.
.
.
.
.
.
.
.
150
Documents
.
.
.
.
.
.
.
.
.
.
.
.
.
.
.
.
.
.
.
.
.
.
.
.
.
.
.
.
.
.
.
.
.
.
.
.
.
.
.
.
.
.
.
.
.
.
.
.
.
.
.
.
.
.
.
.
.
.
.
.
.
.
.
.
.
.
.
.
.
.
.
.
.
.
.
.
.
.
.
.
.
.
.
.
.
.
.
.
.
.
.
.
.
.
.
.
.
.
.
.
.
.
.
.
.
.
.
.
.
.
.
.
151
Tasks
.
.
.
.
.
.
.
.
.
.
.
.
.
.
.
.
.
.
.
.
.
.
.
.
.
.
.
.
.
.
.
.
.
.
.
.
.
.
.
.
.
.
.
.
.
.
.
.
.
.
.
.
.
.
.
.
.
.
.
.
.
.
.
.
.
.
.
.
.
.
.
.
.
.
.
.
.
.
.
.
.
.
.
.
.
.
.
.
.
.
.
.
.
.
.
.
.
.
.
.
.
.
.
.
.
.
.
.
.
.
.
.
.
.
.
.
.
.
.
.
.
152
Events
.
.
.
.
.
.
.
.
.
.
.
.
.
.
.
.
.
.
.
.
.
.
.
.
.
.
.
.
.
.
.
.
.
.
.
.
.
.
.
.
.
.
.
.
.
.
.
.
.
.
.
.
.
.
.
.
.
.
.
.
.
.
.
.
.
.
.
.
.
.
.
.
.
.
.
.
.
.
.
.
.
.
.
.
.
.
.
.
.
.
.
.
.
.
.
.
.
.
.
.
.
.
.
.
.
.
.
.
.
.
.
.
.
.
.
.
.
.
.
.
153
Payments
.
.
.
.
.
.
.
.
.
.
.
.
.
.
.
.
.
.
.
.
.
.
.
.
.
.
.
.
.
.
.
.
.
.
.
.
.
.
.
.
.
.
.
.
.
.
.
.
.
.
.
.
.
.
.
.
.
.
.
.
.
.
.
.
.
.
.
.
.
.
.
.
.
.
.
.
.
.
.
.
.
.
.
.
.
.
.
.
.
.
.
.
.
.
.
.
.
.
.
.
.
.
.
.
.
.
.
.
.
.
.
.
.
.
.
154
Messaging
.
.
.
.
.
.
.
.
.
.
.
.
.
.
.
.
.
.
.
.
.
.
.
.
.
.
.
.
.
.
.
.
.
.
.
.
.
.
.
.
.
.
.
.
.
.
.
.
.
.
.
.
.
.
.
.
.
.
.
.
.
.
.
.
.
.
.
.
.
.
.
.
.
.
.
.
.
.
.
.
.
.
.
.
.
.
.
.
.
.
.
.
.
.
.
.
.
.
.
.
.
.
.
.
.
.
.
.
.
.
.
.
.
155
People
.
.
.
.
.
.
.
.
.
.
.
.
.
.
.
.
.
.
.
.
.
.
.
.
.
.
.
.
.
.
.
.
.
.
.
.
.
.
.
.
.
.
.
.
.
.
.
.
.
.
.
.
.
.
.
.
.
.
.
.
.
.
.
.
.
.
.
.
.
.
.
.
.
.
.
.
.
.
.
.
.
.
.
.
.
.
.
.
.
.
.
.
.
.
.
.
.
.
.
.
.
.
.
.
.
.
.
.
.
.
.
.
.
.
.
.
.
.
.
159
Addresses
.
.
.
.
.
.
.
.
.
.
.
.
.
.
.
.
.
.
.
.
.
.
.
.
.
.
.
.
.
.
.
.
.
.
.
.
.
.
.
.
.
.
.
.
.
.
.
.
.
.
.
.
.
.
.
.
.
.
.
.
.
.
.
.
.
.
.
.
.
.
.
.
.
.
.
.
.
.
.
.
.
.
.
.
.
.
.
.
.
.
.
.
.
.
.
.
.
.
.
.
.
.
.
.
.
.
.
.
.
.
.
.
.
159
Document Packages
.
.
.
.
.
.
.
.
.
.
.
.
.
.
.
.
.
.
.
.
.
.
.
.
.
.
.
.
.
.
.
.
.
.
.
.
.
.
.
.
.
.
.
.
.
.
.
.
.
.
.
.
.
.
.
.
.
.
.
.
.
.
.
.
.
.
.
.
.
.
.
.
.
.
.
.
.
.
.
.
.
.
.
.
.
.
.
.
.
.
.
.
.
.
.
160
Products
.
.
.
.
.
.
.
.
.
.
.
.
.
.
.
.
.
.
.
.
.
.
.
.
.
.
.
.
.
.
.
.
.
.
.
.
.
.
.
.
.
.
.
.
.
.
.
.
.
.
.
.
.
.
.
.
.
.
.
.
.
.
.
.
.
.
.
.
.
.
.
.
.
.
.
.
.
.
.
.
.
.
.
.
.
.
.
.
.
.
.
.
.
.
.
.
.
.
.
.
.
.
.
.
.
.
.
.
.
.
.
.
.
.
.
.
162
History
.
.
.
.
.
.
.
.
.
.
.
.
.
.
.
.
.
.
.
.
.
.
.
.
.
.
.
.
.
.
.
.
.
.
.
.
.
.
.
.
.
.
.
.
.
.
.
.
.
.
.
.
.
.
.
.
.
.
.
.
.
.
.
.
.
.
.
.
.
.
.
.
.
.
.
.
.
.
.
.
.
.
.
.
.
.
.
.
.
.
.
.
.
.
.
.
.
.
.
.
.
.
.
.
.
.
.
.
.
.
.
.
.
.
.
.
.
.
.
.
162
Additional Forms
.
.
.
.
.
.
.
.
.
.
.
.
.
.
.
.
.
.
.
.
.
.
.
.
.
.
.
.
.
.
.
.
.
.
.
.
.
.
.
.
.
.
.
.
.
.
.
.
.
.
.
.
.
.
.
.
.
.
.
.
.
.
.
.
.
.
.
.
.
.
.
.
.
.
.
.
.
.
.
.
.
.
.
.
.
.
.
.
.
.
.
.
.
.
.
.
.
.
.
.
.
.
163
Contract Management
.
.
.
.
.
.
.
.
.
.
.
.
.
.
.
.
.
.
.
.
.
.
.
.
.
.
.
.
.
.
.
.
.
.
.
.
.
.
.
.
.
.
.
.
.
.
.
.
.
.
.
.
.
.
.
.
.
.
.
.
.
.
.
.
.
.
.
.
.
.
.
.
.
.
.
.
.
.
.
.
.
.
.
.
.
.
.
.
.
.
.
.
.
.
.
.
.
.
.
.
.
.
.
164
Adding a Root Contract
.
.
.
.
.
.
.
.
.
.
.
.
.
.
.
.
.
.
.
.
.
.
.
.
.
.
.
.
.
.
.
.
.
.
.
.
.
.
.
.
.
.
.
.
.
.
.
.
.
.
.
.
.
.
.
.
.
.
.
.
.
.
.
.
.
.
.
.
.
.
.
.
.
.
.
.
.
.
.
.
.
.
.
.
.
.
.
.
.
.
.
.
.
.
.
.
165
Adding an Incorporated Contract
.
.
.
.
.
.
.
.
.
.
.
.
.
.
.
.
.
.
.
.
.
.
.
.
.
.
.
.
.
.
.
.
.
.
.
.
.
.
.
.
.
.
.
.
.
.
.
.
.
.
.
.
.
.
.
.
.
.
.
.
.
.
.
.
.
.
.
.
.
.
.
.
.
.
.
.
.
.
.
.
.
168
Copying a Contract
.
.
.
.
.
.
.
.
.
.
.
.
.
.
.
.
.
.
.
.
.
.
.
.
.
.
.
.
.
.
.
.
.
.
.
.
.
.
.
.
.
.
.
.
.
.
.
.
.
.
.
.
.
.
.
.
.
.
.
.
.
.
.
.
.
.
.
.
.
.
.
.
.
.
.
.
.
.
.
.
.
.
.
.
.
.
.
.
.
.
.
.
.
.
.
.
.
.
.
.
.
.
.
169
Editing a Contract Profile
.
.
.
.
.
.
.
.
.
.
.
.
.
.
.
.
.
.
.
.
.
.
.
.
.
.
.
.
.
.
.
.
.
.
.
.
.
.
.
.
.
.
.
.
.
.
.
.
.
.
.
.
.
.
.
.
.
.
.
.
.
.
.
.
.
.
.
.
.
.
.
.
.
.
.
.
.
.
.
.
.
.
.
.
.
.
.
.
.
.
.
.
.
171
Archiving a Contract
.
.
.
.
.
.
.
.
.
.
.
.
.
.
.
.
.
.
.
.
.
.
.
.
.
.
.
.
.
.
.
.
.
.
.
.
.
.
.
.
.
.
.
.
.
.
.
.
.
.
.
.
.
.
.
.
.
.
.
.
.
.
.
.
.
.
.
.
.
.
.
.
.
.
.
.
.
.
.
.
.
.
.
.
.
.
.
.
.
.
.
.
.
.
.
.
.
.
.
.
.
.
172
Contract Wizards
.
.
.
.
.
.
.
.
.
.
.
.
.
.
.
.
.
.
.
.
.
.
.
.
.
.
.
.
.
.
.
.
.
.
.
.
.
.
.
.
.
.
.
.
.
.
.
.
.
.
.
.
.
.
.
.
.
.
.
.
.
.
.
.
.
.
.
.
.
.
.
.
.
.
.
.
.
.
.
.
.
.
.
.
.
.
.
.
.
.
.
.
.
.
.
.
.
.
.
.
.
.
.
.
.
.
.
.
.
.
.
.
173
Contract Creation Wizard
.
.
.
.
.
.
.
.
.
.
.
.
.
.
.
.
.
.
.
.
.
.
.
.
.
.
.
.
.
.
.
.
.
.
.
.
.
.
.
.
.
.
.
.
.
.
.
.
.
.
.
.
.
.
.
.
.
.
.
.
.
.
.
.
.
.
.
.
.
.
.
.
.
.
.
.
.
.
.
.
.
.
.
.
.
.
.
.
.
.
.
.
.
174
Contract Renewal Wizard
.
.
.
.
.
.
.
.
.
.
.
.
.
.
.
.
.
.
.
.
.
.
.
.
.
.
.
.
.
.
.
.
.
.
.
.
.
.
.
.
.
.
.
.
.
.
.
.
.
.
.
.
.
.
.
.
.
.
.
.
.
.
.
.
.
.
.
.
.
.
.
.
.
.
.
.
.
.
.
.
.
.
.
.
.
.
.
.
.
.
.
.
.
179
Contract Assignment Wizard
.
.
.
.
.
.
.
.
.
.
.
.
.
.
.
.
.
.
.
.
.
.
.
.
.
.
.
.
.
.
.
.
.
.
.
.
.
.
.
.
.
.
.
.
.
.
.
.
.
.
.
.
.
.
.
.
.
.
.
.
.
.
.
.
.
.
.
.
.
.
.
.
.
.
.
.
.
.
.
.
.
.
.
.
.
.
.
184
eSignature Package Wizard
.
.
.
.
.
.
.
.
.
.
.
.
.
.
.
.
.
.
.
.
.
.
.
.
.
.
.
.
.
.
.
.
.
.
.
.
.
.
.
.
.
.
.
.
.
.
.
.
.
.
.
.
.
.
.
.
.
.
.
.
.
.
.
.
.
.
.
.
.
.
.
.
.
.
.
.
.
.
.
.
.
.
.
.
.
.
.
.
188
Document Packages
.
.
.
.
.
.
.
.
.
.
.
.
.
.
.
.
.
.
.
.
.
.
.
.
.
.
.
.
.
.
.
.
.
.
.
.
.
.
.
.
.
.
.
.
.
.
.
.
.
.
.
.
.
.
.
.
.
.
.
.
.
.
.
.
.
.
.
.
.
.
.
.
.
.
.
.
.
.
.
.
.
.
.
.
.
.
.
.
.
.
.
.
.
.
.
.
.
.
.
.
.
.
.
.
.
201
Document Packages Portlet
.
.
.
.
.
.
.
.
.
.
.
.
.
.
.
.
.
.
.
.
.
.
.
.
.
.
.
.
.
.
.
.
.
.
.
.
.
.
.
.
.
.
.
.
.
.
.
.
.
.
.
.
.
.
.
.
.
.
.
.
.
.
.
.
.
.
.
.
.
.
.
.
.
.
.
.
.
.
.
.
.
.
.
.
.
.
.
.
202
Document Package Wizard
.
.
.
.
.
.
.
.
.
.
.
.
.
.
.
.
.
.
.
.
.
.
.
.
.
.
.
.
.
.
.
.
.
.
.
.
.
.
.
.
.
.
.
.
.
.
.
.
.
.
.
.
.
.
.
.
.
.
.
.
.
.
.
.
.
.
.
.
.
.
.
.
.
.
.
.
.
.
.
.
.
.
.
.
.
.
.
.
.
203
Document Packages Browse Screen
.
.
.
.
.
.
.
.
.
.
.
.
.
.
.
.
.
.
.
.
.
.
.
.
.
.
.
.
.
.
.
.
.
.
.
.
.
.
.
.
.
.
.
.
.
.
.
.
.
.
.
.
.
.
.
.
.
.
.
.
.
.
.
.
.
.
.
.
.
.
.
.
.
210
Checking Documents In and Out
.
.
.
.
.
.
.
.
.
.
.
.
.
.
.
.
.
.
.
.
.
.
.
.
.
.
.
.
.
.
.
.
.
.
.
.
.
.
.
.
.
.
.
.
.
.
.
.
.
.
.
.
.
.
.
.
.
.
.
.
.
.
.
.
.
.
.
.
.
.
.
.
.
.
.
.
211
Viewing the Revision History
.
.
.
.
.
.
.
.
.
.
.
.
.
.
.
.
.
.
.
.
.
.
.
.
.
.
.
.
.
.
.
.
.
.
.
.
.
.
.
.
.
.
.
.
.
.
.
.
.
.
.
.
.
.
.
.
.
.
.
.
.
.
.
.
.
.
.
.
.
.
.
.
.
.
.
.
.
.
.
.
.
.
.
213
Locking and Unlocking Documents
.
.
.
.
.
.
.
.
.
.
.
.
.
.
.
.
.
.
.
.
.
.
.
.
.
.
.
.
.
.
.
.
.
.
.
.
.
.
.
.
.
.
.
.
.
.
.
.
.
.
.
.
.
.
.
.
.
.
.
.
.
.
.
.
.
.
.
.
.
.
.
.
214
Deleting a Document
.
.
.
.
.
.
.
.
.
.
.
.
.
.
.
.
.
.
.
.
.
.
.
.
.
.
.
.
.
.
.
.
.
.
.
.
.
.
.
.
.
.
.
.
.
.
.
.
.
.
.
.
.
.
.
.
.
.
.
.
.
.
.
.
.
.
.
.
.
.
.
.
.
.
.
.
.
.
.
.
.
.
.
.
.
.
.
.
.
.
.
.
.
.
.
216
Managing Your Email Notifications
.
.
.
.
.
.
.
.
.
.
.
.
.
.
.
.
.
.
.
.
.
.
.
.
.
.
.
.
.
.
.
.
.
.
.
.
.
.
.
.
.
.
.
.
.
.
.
.
.
.
.
.
.
.
.
.
.
.
.
.
.
.
.
.
.
.
.
.
.
.
.
.
217
Managing Members
.
.
.
.
.
.
.
.
.
.
.
.
.
.
.
.
.
.
.
.
.
.
.
.
.
.
.
.
.
.
.
.
.
.
.
.
.
.
.
.
.
.
.
.
.
.
.
.
.
.
.
.
.
.
.
.
.
.
.
.
.
.
.
.
.
.
.
.
.
.
.
.
.
.
.
.
.
.
.
.
.
.
.
.
.
.
.
.
.
.
.
.
.
.
.
.
.
218
Marking a Document As Complete
.
.
.
.
.
.
.
.
.
.
.
.
.
.
.
.
.
.
.
.
.
.
.
.
.
.
.
.
.
.
.
.
.
.
.
.
.
.
.
.
.
.
.
.
.
.
.
.
.
.
.
.
.
.
.
.
.
.
.
.
.
.
.
.
.
.
.
.
.
.
.
.
221
Document Package Profile
.
.
.
.
.
.
.
.
.
.
.
.
.
.
.
.
.
.
.
.
.
.
.
.
.
.
.
.
.
.
.
.
.
.
.
.
.
.
.
.
.
.
.
.
.
.
.
.
.
.
.
.
.
.
.
.
.
.
.
.
.
.
.
.
.
.
.
.
.
.
.
.
.
.
.
.
.
.
.
.
.
.
.
.
.
.
.
.
.
.
222
Adding a Contract and Attachment
.
.
.
.
.
.
.
.
.
.
.
.
.
.
.
.
.
.
.
.
.
.
.
.
.
.
.
.
.
.
.
.
.
.
.
.
.
.
.
.
.
.
.
.
.
.
.
.
.
.
.
.
.
.
.
.
.
.
.
.
.
.
.
.
.
.
.
.
.
.
.
.
223
Messaging Members
.
.
.
.
.
.
.
.
.
.
.
.
.
.
.
.
.
.
.
.
.
.
.
.
.
.
.
.
.
.
.
.
.
.
.
.
.
.
.
.
.
.
.
.
.
.
.
.
.
.
.
.
.
.
.
.
.
.
.
.
.
.
.
.
.
.
.
.
.
.
.
.
.
.
.
.
.
.
.
.
.
.
.
.
.
.
.
.
.
.
.
.
.
.
.
226
Downloading a Document
.
.
.
.
.
.
.
.
.
.
.
.
.
.
.
.
.
.
.
.
.
.
.
.
.
.
.
.
.
.
.
.
.
.
.
.
.
.
.
.
.
.
.
.
.
.
.
.
.
.
.
.
.
.
.
.
.
.
.
.
.
.
.
.
.
.
.
.
.
.
.
.
.
.
.
.
.
.
.
.
.
.
.
.
.
.
.
229
Generating a Document Package Report
.
.
.
.
.
.
.
.
.
.
.
.
.
.
.
.
.
.
.
.
.
.
.
.
.
.
.
.
.
.
.
.
.
.
.
.
.
.
.
.
.
.
.
.
.
.
.
.
.
.
.
.
.
.
.
.
.
.
.
.
.
231
Editing a Document Package Profile
.
.
.
.
.
.
.
.
.
.
.
.
.
.
.
.
.
.
.
.
.
.
.
.
.
.
.
.
.
.
.
.
.
.
.
.
.
.
.
.
.
.
.
.
.
.
.
.
.
.
.
.
.
.
.
.
.
.
.
.
.
.
.
.
.
.
.
.
.
234
Marking a Document Package as Complete
.
.
.
.
.
.
.
.
.
.
.
.
.
.
.
.
.
.
.
.
.
.
.
.
.
.
.
.
.
.
.
.
.
.
.
.
.
.
.
.
.
.
.
.
.
.
.
.
.
.
.
.
.
.
.
.
236
5 / 393
Deleting a Document Package
.
.
.
.
.
.
.
.
.
.
.
.
.
.
.
.
.
.
.
.
.
.
.
.
.
.
.
.
.
.
.
.
.
.
.
.
.
.
.
.
.
.
.
.
.
.
.
.
.
.
.
.
.
.
.
.
.
.
.
.
.
.
.
.
.
.
.
.
.
.
.
.
.
.
.
.
.
.
.
237
Submitting the Contract for eSignatures
.
.
.
.
.
.
.
.
.
.
.
.
.
.
.
.
.
.
.
.
.
.
.
.
.
.
.
.
.
.
.
.
.
.
.
.
.
.
.
.
.
.
.
.
.
.
.
.
.
.
.
.
.
.
.
.
.
.
.
.
.
.
.
.
.
.
.
.
.
238
Running the DocuSign Wizard
.
.
.
.
.
.
.
.
.
.
.
.
.
.
.
.
.
.
.
.
.
.
.
.
.
.
.
.
.
.
.
.
.
.
.
.
.
.
.
.
.
.
.
.
.
.
.
.
.
.
.
.
.
.
.
.
.
.
.
.
.
.
.
.
.
.
.
.
.
.
.
.
.
.
.
.
.
.
.
.
239
Using the DocuSign Portal
.
.
.
.
.
.
.
.
.
.
.
.
.
.
.
.
.
.
.
.
.
.
.
.
.
.
.
.
.
.
.
.
.
.
.
.
.
.
.
.
.
.
.
.
.
.
.
.
.
.
.
.
.
.
.
.
.
.
.
.
.
.
.
.
.
.
.
.
.
.
.
.
.
.
.
.
.
.
.
.
.
.
.
.
.
.
243
Tracking Documents Submitted for Electronic Signature
.
.
.
.
.
.
.
.
.
.
.
.
.
.
.
.
.
.
.
.
.
.
.
.
.
.
.
.
.
.
.
.
.
.
.
.
247
Signing a Document with an eSignature
.
.
.
.
.
.
.
.
.
.
.
.
.
.
.
.
.
.
.
.
.
.
.
.
.
.
.
.
.
.
.
.
.
.
.
.
.
.
.
.
.
.
.
.
.
.
.
.
.
.
.
.
.
.
.
.
.
.
.
.
.
.
.
.
248
Reassigning a Signatory
.
.
.
.
.
.
.
.
.
.
.
.
.
.
.
.
.
.
.
.
.
.
.
.
.
.
.
.
.
.
.
.
.
.
.
.
.
.
.
.
.
.
.
.
.
.
.
.
.
.
.
.
.
.
.
.
.
.
.
.
.
.
.
.
.
.
.
.
.
.
.
.
.
.
.
.
.
.
.
.
.
.
.
.
.
.
.
.
.
251
Contract Workflows
.
.
.
.
.
.
.
.
.
.
.
.
.
.
.
.
.
.
.
.
.
.
.
.
.
.
.
.
.
.
.
.
.
.
.
.
.
.
.
.
.
.
.
.
.
.
.
.
.
.
.
.
.
.
.
.
.
.
.
.
.
.
.
.
.
.
.
.
.
.
.
.
.
.
.
.
.
.
.
.
.
.
.
.
.
.
.
.
.
.
.
.
.
.
.
.
.
.
.
.
.
.
.
.
.
.
.
.
253
Viewing the Contract Workflows Browse Screen
.
.
.
.
.
.
.
.
.
.
.
.
.
.
.
.
.
.
.
.
.
.
.
.
.
.
.
.
.
.
.
.
.
.
.
.
.
.
.
.
.
.
.
.
.
.
.
.
.
.
.
.
.
.
253
Creating a Workflow
.
.
.
.
.
.
.
.
.
.
.
.
.
.
.
.
.
.
.
.
.
.
.
.
.
.
.
.
.
.
.
.
.
.
.
.
.
.
.
.
.
.
.
.
.
.
.
.
.
.
.
.
.
.
.
.
.
.
.
.
.
.
.
.
.
.
.
.
.
.
.
.
.
.
.
.
.
.
.
.
.
.
.
.
.
.
.
.
.
.
.
.
.
.
.
.
.
.
.
.
.
.
254
Launching a Workflow
.
.
.
.
.
.
.
.
.
.
.
.
.
.
.
.
.
.
.
.
.
.
.
.
.
.
.
.
.
.
.
.
.
.
.
.
.
.
.
.
.
.
.
.
.
.
.
.
.
.
.
.
.
.
.
.
.
.
.
.
.
.
.
.
.
.
.
.
.
.
.
.
.
.
.
.
.
.
.
.
.
.
.
.
.
.
.
.
.
.
.
.
.
.
.
.
.
.
.
261
Viewing Workflow Steps
.
.
.
.
.
.
.
.
.
.
.
.
.
.
.
.
.
.
.
.
.
.
.
.
.
.
.
.
.
.
.
.
.
.
.
.
.
.
.
.
.
.
.
.
.
.
.
.
.
.
.
.
.
.
.
.
.
.
.
.
.
.
.
.
.
.
.
.
.
.
.
.
.
.
.
.
.
.
.
.
.
.
.
.
.
.
.
.
.
.
.
.
.
.
.
262
Managing Workflow Documents
.
.
.
.
.
.
.
.
.
.
.
.
.
.
.
.
.
.
.
.
.
.
.
.
.
.
.
.
.
.
.
.
.
.
.
.
.
.
.
.
.
.
.
.
.
.
.
.
.
.
.
.
.
.
.
.
.
.
.
.
.
.
.
.
.
.
.
.
.
.
.
.
.
.
.
.
.
.
.
.
.
.
264
Sending a Message for a Workflow Step
.
.
.
.
.
.
.
.
.
.
.
.
.
.
.
.
.
.
.
.
.
.
.
.
.
.
.
.
.
.
.
.
.
.
.
.
.
.
.
.
.
.
.
.
.
.
.
.
.
.
.
.
.
.
.
.
.
.
.
.
.
.
.
.
.
.
.
265
Completing a Workflow Step
.
.
.
.
.
.
.
.
.
.
.
.
.
.
.
.
.
.
.
.
.
.
.
.
.
.
.
.
.
.
.
.
.
.
.
.
.
.
.
.
.
.
.
.
.
.
.
.
.
.
.
.
.
.
.
.
.
.
.
.
.
.
.
.
.
.
.
.
.
.
.
.
.
.
.
.
.
.
.
.
.
.
.
.
.
.
.
268
Approving or Declining a Workflow Step
.
.
.
.
.
.
.
.
.
.
.
.
.
.
.
.
.
.
.
.
.
.
.
.
.
.
.
.
.
.
.
.
.
.
.
.
.
.
.
.
.
.
.
.
.
.
.
.
.
.
.
.
.
.
.
.
.
.
.
.
.
.
.
.
.
.
.
.
270
Reassigning a Workflow Step
.
.
.
.
.
.
.
.
.
.
.
.
.
.
.
.
.
.
.
.
.
.
.
.
.
.
.
.
.
.
.
.
.
.
.
.
.
.
.
.
.
.
.
.
.
.
.
.
.
.
.
.
.
.
.
.
.
.
.
.
.
.
.
.
.
.
.
.
.
.
.
.
.
.
.
.
.
.
.
.
.
.
.
.
.
.
271
Closing and Re-opening Workflows
.
.
.
.
.
.
.
.
.
.
.
.
.
.
.
.
.
.
.
.
.
.
.
.
.
.
.
.
.
.
.
.
.
.
.
.
.
.
.
.
.
.
.
.
.
.
.
.
.
.
.
.
.
.
.
.
.
.
.
.
.
.
.
.
.
.
.
.
.
.
.
.
.
.
.
.
273
Editing and Deleting Workflows
.
.
.
.
.
.
.
.
.
.
.
.
.
.
.
.
.
.
.
.
.
.
.
.
.
.
.
.
.
.
.
.
.
.
.
.
.
.
.
.
.
.
.
.
.
.
.
.
.
.
.
.
.
.
.
.
.
.
.
.
.
.
.
.
.
.
.
.
.
.
.
.
.
.
.
.
.
.
.
.
.
.
.
274
Payments
.
.
.
.
.
.
.
.
.
.
.
.
.
.
.
.
.
.
.
.
.
.
.
.
.
.
.
.
.
.
.
.
.
.
.
.
.
.
.
.
.
.
.
.
.
.
.
.
.
.
.
.
.
.
.
.
.
.
.
.
.
.
.
.
.
.
.
.
.
.
.
.
.
.
.
.
.
.
.
.
.
.
.
.
.
.
.
.
.
.
.
.
.
.
.
.
.
.
.
.
.
.
.
.
.
.
.
.
.
.
.
.
.
.
.
.
.
.
.
.
.
.
.
.
.
274
Payments Browse Screen
.
.
.
.
.
.
.
.
.
.
.
.
.
.
.
.
.
.
.
.
.
.
.
.
.
.
.
.
.
.
.
.
.
.
.
.
.
.
.
.
.
.
.
.
.
.
.
.
.
.
.
.
.
.
.
.
.
.
.
.
.
.
.
.
.
.
.
.
.
.
.
.
.
.
.
.
.
.
.
.
.
.
.
.
.
.
.
.
.
.
.
.
275
Adding a Payment Stream
.
.
.
.
.
.
.
.
.
.
.
.
.
.
.
.
.
.
.
.
.
.
.
.
.
.
.
.
.
.
.
.
.
.
.
.
.
.
.
.
.
.
.
.
.
.
.
.
.
.
.
.
.
.
.
.
.
.
.
.
.
.
.
.
.
.
.
.
.
.
.
.
.
.
.
.
.
.
.
.
.
.
.
.
.
.
276
Editing a Payment Stream
.
.
.
.
.
.
.
.
.
.
.
.
.
.
.
.
.
.
.
.
.
.
.
.
.
.
.
.
.
.
.
.
.
.
.
.
.
.
.
.
.
.
.
.
.
.
.
.
.
.
.
.
.
.
.
.
.
.
.
.
.
.
.
.
.
.
.
.
.
.
.
.
.
.
.
.
.
.
.
.
.
.
.
.
.
.
277
Deleting a Payment Stream
.
.
.
.
.
.
.
.
.
.
.
.
.
.
.
.
.
.
.
.
.
.
.
.
.
.
.
.
.
.
.
.
.
.
.
.
.
.
.
.
.
.
.
.
.
.
.
.
.
.
.
.
.
.
.
.
.
.
.
.
.
.
.
.
.
.
.
.
.
.
.
.
.
.
.
.
.
.
.
.
.
.
.
.
278
Creating a Payment Forecast
.
.
.
.
.
.
.
.
.
.
.
.
.
.
.
.
.
.
.
.
.
.
.
.
.
.
.
.
.
.
.
.
.
.
.
.
.
.
.
.
.
.
.
.
.
.
.
.
.
.
.
.
.
.
.
.
.
.
.
.
.
.
.
.
.
.
.
.
.
.
.
.
.
.
.
.
.
.
.
.
.
279
Viewing the Payment Forecast
.
.
.
.
.
.
.
.
.
.
.
.
.
.
.
.
.
.
.
.
.
.
.
.
.
.
.
.
.
.
.
.
.
.
.
.
.
.
.
.
.
.
.
.
.
.
.
.
.
.
.
.
.
.
.
.
.
.
.
.
.
.
.
.
.
.
.
.
.
.
.
.
.
.
.
.
.
.
.
281
Products
.
.
.
.
.
.
.
.
.
.
.
.
.
.
.
.
.
.
.
.
.
.
.
.
.
.
.
.
.
.
.
.
.
.
.
.
.
.
.
.
.
.
.
.
.
.
.
.
.
.
.
.
.
.
.
.
.
.
.
.
.
.
.
.
.
.
.
.
.
.
.
.
.
.
.
.
.
.
.
.
.
.
.
.
.
.
.
.
.
.
.
.
.
.
.
.
.
.
.
.
.
.
.
.
.
.
.
.
.
.
.
.
.
.
.
.
.
.
.
.
.
.
.
.
.
.
284
Products Browse Screen
.
.
.
.
.
.
.
.
.
.
.
.
.
.
.
.
.
.
.
.
.
.
.
.
.
.
.
.
.
.
.
.
.
.
.
.
.
.
.
.
.
.
.
.
.
.
.
.
.
.
.
.
.
.
.
.
.
.
.
.
.
.
.
.
.
.
.
.
.
.
.
.
.
.
.
.
.
.
.
.
.
.
.
.
.
.
.
.
.
.
.
.
.
.
285
Product Profile
.
.
.
.
.
.
.
.
.
.
.
.
.
.
.
.
.
.
.
.
.
.
.
.
.
.
.
.
.
.
.
.
.
.
.
.
.
.
.
.
.
.
.
.
.
.
.
.
.
.
.
.
.
.
.
.
.
.
.
.
.
.
.
.
.
.
.
.
.
.
.
.
.
.
.
.
.
.
.
.
.
.
.
.
.
.
.
.
.
.
.
.
.
.
.
.
.
.
.
.
.
.
.
.
.
.
.
.
.
.
.
285
Adding a Product
.
.
.
.
.
.
.
.
.
.
.
.
.
.
.
.
.
.
.
.
.
.
.
.
.
.
.
.
.
.
.
.
.
.
.
.
.
.
.
.
.
.
.
.
.
.
.
.
.
.
.
.
.
.
.
.
.
.
.
.
.
.
.
.
.
.
.
.
.
.
.
.
.
.
.
.
.
.
.
.
.
.
.
.
.
.
.
.
.
.
.
.
.
.
.
.
.
.
.
.
.
.
286
Editing Product Information
.
.
.
.
.
.
.
.
.
.
.
.
.
.
.
.
.
.
.
.
.
.
.
.
.
.
.
.
.
.
.
.
.
.
.
.
.
.
.
.
.
.
.
.
.
.
.
.
.
.
.
.
.
.
.
.
.
.
.
.
.
.
.
.
.
.
.
.
.
.
.
.
.
.
.
.
.
.
.
.
.
.
.
.
.
288
Deleting a Product
.
.
.
.
.
.
.
.
.
.
.
.
.
.
.
.
.
.
.
.
.
.
.
.
.
.
.
.
.
.
.
.
.
.
.
.
.
.
.
.
.
.
.
.
.
.
.
.
.
.
.
.
.
.
.
.
.
.
.
.
.
.
.
.
.
.
.
.
.
.
.
.
.
.
.
.
.
.
.
.
.
.
.
.
.
.
.
.
.
.
.
.
.
.
.
.
.
.
.
.
289
Product Grid
.
.
.
.
.
.
.
.
.
.
.
.
.
.
.
.
.
.
.
.
.
.
.
.
.
.
.
.
.
.
.
.
.
.
.
.
.
.
.
.
.
.
.
.
.
.
.
.
.
.
.
.
.
.
.
.
.
.
.
.
.
.
.
.
.
.
.
.
.
.
.
.
.
.
.
.
.
.
.
.
.
.
.
.
.
.
.
.
.
.
.
.
.
.
.
.
.
.
.
.
.
.
.
.
.
.
.
.
.
.
.
.
.
.
.
290
Adding a Product to the Grid
.
.
.
.
.
.
.
.
.
.
.
.
.
.
.
.
.
.
.
.
.
.
.
.
.
.
.
.
.
.
.
.
.
.
.
.
.
.
.
.
.
.
.
.
.
.
.
.
.
.
.
.
.
.
.
.
.
.
.
.
.
.
.
.
.
.
.
.
.
.
.
.
.
.
.
.
.
.
.
.
.
.
.
290
Editing and Deleting Products in the Grid
.
.
.
.
.
.
.
.
.
.
.
.
.
.
.
.
.
.
.
.
.
.
.
.
.
.
.
.
.
.
.
.
.
.
.
.
.
.
.
.
.
.
.
.
.
.
.
.
.
.
.
.
.
.
.
.
.
.
.
.
.
291
Addresses
.
.
.
.
.
.
.
.
.
.
.
.
.
.
.
.
.
.
.
.
.
.
.
.
.
.
.
.
.
.
.
.
.
.
.
.
.
.
.
.
.
.
.
.
.
.
.
.
.
.
.
.
.
.
.
.
.
.
.
.
.
.
.
.
.
.
.
.
.
.
.
.
.
.
.
.
.
.
.
.
.
.
.
.
.
.
.
.
.
.
.
.
.
.
.
.
.
.
.
.
.
.
.
.
.
.
.
.
.
.
.
.
.
.
.
.
.
.
.
.
.
.
.
293
Contract Address Browse Screen
.
.
.
.
.
.
.
.
.
.
.
.
.
.
.
.
.
.
.
.
.
.
.
.
.
.
.
.
.
.
.
.
.
.
.
.
.
.
.
.
.
.
.
.
.
.
.
.
.
.
.
.
.
.
.
.
.
.
.
.
.
.
.
.
.
.
.
.
.
.
.
.
.
.
.
.
.
.
.
293
Adding a Contract Address
.
.
.
.
.
.
.
.
.
.
.
.
.
.
.
.
.
.
.
.
.
.
.
.
.
.
.
.
.
.
.
.
.
.
.
.
.
.
.
.
.
.
.
.
.
.
.
.
.
.
.
.
.
.
.
.
.
.
.
.
.
.
.
.
.
.
.
.
.
.
.
.
.
.
.
.
.
.
.
.
.
.
.
.
.
294
Adding an Existing Company Address to a Contract
.
.
.
.
.
.
.
.
.
.
.
.
.
.
.
.
.
.
.
.
.
.
.
.
.
.
.
.
.
.
.
.
.
.
.
.
.
.
294
Adding a Company Address to a Contract
.
.
.
.
.
.
.
.
.
.
.
.
.
.
.
.
.
.
.
.
.
.
.
.
.
.
.
.
.
.
.
.
.
.
.
.
.
.
.
.
.
.
.
.
.
.
.
.
.
.
.
.
.
.
296
Editing Contract Addresses
.
.
.
.
.
.
.
.
.
.
.
.
.
.
.
.
.
.
.
.
.
.
.
.
.
.
.
.
.
.
.
.
.
.
.
.
.
.
.
.
.
.
.
.
.
.
.
.
.
.
.
.
.
.
.
.
.
.
.
.
.
.
.
.
.
.
.
.
.
.
.
.
.
.
.
.
.
.
.
.
.
.
.
.
297
Deleting Contract Addresses
.
.
.
.
.
.
.
.
.
.
.
.
.
.
.
.
.
.
.
.
.
.
.
.
.
.
.
.
.
.
.
.
.
.
.
.
.
.
.
.
.
.
.
.
.
.
.
.
.
.
.
.
.
.
.
.
.
.
.
.
.
.
.
.
.
.
.
.
.
.
.
.
.
.
.
.
.
.
.
.
.
.
298
Additional Forms
.
.
.
.
.
.
.
.
.
.
.
.
.
.
.
.
.
.
.
.
.
.
.
.
.
.
.
.
.
.
.
.
.
.
.
.
.
.
.
.
.
.
.
.
.
.
.
.
.
.
.
.
.
.
.
.
.
.
.
.
.
.
.
.
.
.
.
.
.
.
.
.
.
.
.
.
.
.
.
.
.
.
.
.
.
.
.
.
.
.
.
.
.
.
.
.
.
.
.
.
.
.
.
.
.
.
.
.
.
.
.
.
.
.
.
.
.
301
Additional Forms Browse Screen
.
.
.
.
.
.
.
.
.
.
.
.
.
.
.
.
.
.
.
.
.
.
.
.
.
.
.
.
.
.
.
.
.
.
.
.
.
.
.
.
.
.
.
.
.
.
.
.
.
.
.
.
.
.
.
.
.
.
.
.
.
.
.
.
.
.
.
.
.
.
.
.
.
.
.
.
.
.
.
.
.
.
.
.
301
Additional Form Profile
.
.
.
.
.
.
.
.
.
.
.
.
.
.
.
.
.
.
.
.
.
.
.
.
.
.
.
.
.
.
.
.
.
.
.
.
.
.
.
.
.
.
.
.
.
.
.
.
.
.
.
.
.
.
.
.
.
.
.
.
.
.
.
.
.
.
.
.
.
.
.
.
.
.
.
.
.
.
.
.
.
.
.
.
.
.
.
.
.
.
.
.
.
.
.
.
.
.
.
.
.
.
303
Adding an Additional Form
.
.
.
.
.
.
.
.
.
.
.
.
.
.
.
.
.
.
.
.
.
.
.
.
.
.
.
.
.
.
.
.
.
.
.
.
.
.
.
.
.
.
.
.
.
.
.
.
.
.
.
.
.
.
.
.
.
.
.
.
.
.
.
.
.
.
.
.
.
.
.
.
.
.
.
.
.
.
.
.
.
.
.
.
.
.
.
.
.
.
304
Editing an Additional Form
.
.
.
.
.
.
.
.
.
.
.
.
.
.
.
.
.
.
.
.
.
.
.
.
.
.
.
.
.
.
.
.
.
.
.
.
.
.
.
.
.
.
.
.
.
.
.
.
.
.
.
.
.
.
.
.
.
.
.
.
.
.
.
.
.
.
.
.
.
.
.
.
.
.
.
.
.
.
.
.
.
.
.
.
.
.
.
.
.
.
.
306
Copying an Additional Form
.
.
.
.
.
.
.
.
.
.
.
.
.
.
.
.
.
.
.
.
.
.
.
.
.
.
.
.
.
.
.
.
.
.
.
.
.
.
.
.
.
.
.
.
.
.
.
.
.
.
.
.
.
.
.
.
.
.
.
.
.
.
.
.
.
.
.
.
.
.
.
.
.
.
.
.
.
.
.
.
.
.
.
.
.
.
.
.
308
Deleting an Additional Form
.
.
.
.
.
.
.
.
.
.
.
.
.
.
.
.
.
.
.
.
.
.
.
.
.
.
.
.
.
.
.
.
.
.
.
.
.
.
.
.
.
.
.
.
.
.
.
.
.
.
.
.
.
.
.
.
.
.
.
.
.
.
.
.
.
.
.
.
.
.
.
.
.
.
.
.
.
.
.
.
.
.
.
.
.
.
.
.
311
Viewing the History of an Additional Form
.
.
.
.
.
.
.
.
.
.
.
.
.
.
.
.
.
.
.
.
.
.
.
.
.
.
.
.
.
.
.
.
.
.
.
.
.
.
.
.
.
.
.
.
.
.
.
.
.
.
.
.
.
.
.
.
.
.
.
.
.
.
.
.
.
313
Events
.
.
.
.
.
.
.
.
.
.
.
.
.
.
.
.
.
.
.
.
.
.
.
.
.
.
.
.
.
.
.
.
.
.
.
.
.
.
.
.
.
.
.
.
.
.
.
.
.
.
.
.
.
.
.
.
.
.
.
.
.
.
.
.
.
.
.
.
.
.
.
.
.
.
.
.
.
.
.
.
.
.
.
.
.
.
.
.
.
.
.
.
.
.
.
.
.
.
.
.
.
.
.
.
.
.
.
.
.
.
.
.
.
.
.
.
.
.
.
.
.
.
.
.
.
.
.
.
.
.
.
.
.
.
.
316
Event Management
.
.
.
.
.
.
.
.
.
.
.
.
.
.
.
.
.
.
.
.
.
.
.
.
.
.
.
.
.
.
.
.
.
.
.
.
.
.
.
.
.
.
.
.
.
.
.
.
.
.
.
.
.
.
.
.
.
.
.
.
.
.
.
.
.
.
.
.
.
.
.
.
.
.
.
.
.
.
.
.
.
.
.
.
.
.
.
.
.
.
.
.
.
.
.
.
.
.
.
.
.
.
.
.
.
.
.
.
316
Events Browse Screen
.
.
.
.
.
.
.
.
.
.
.
.
.
.
.
.
.
.
.
.
.
.
.
.
.
.
.
.
.
.
.
.
.
.
.
.
.
.
.
.
.
.
.
.
.
.
.
.
.
.
.
.
.
.
.
.
.
.
.
.
.
.
.
.
.
.
.
.
.
.
.
.
.
.
.
.
.
.
.
.
.
.
.
.
.
.
.
.
.
.
.
.
.
.
.
.
.
.
.
.
.
.
320
6 / 393
Event Profile
.
.
.
.
.
.
.
.
.
.
.
.
.
.
.
.
.
.
.
.
.
.
.
.
.
.
.
.
.
.
.
.
.
.
.
.
.
.
.
.
.
.
.
.
.
.
.
.
.
.
.
.
.
.
.
.
.
.
.
.
.
.
.
.
.
.
.
.
.
.
.
.
.
.
.
.
.
.
.
.
.
.
.
.
.
.
.
.
.
.
.
.
.
.
.
.
.
.
.
.
.
.
.
.
.
.
.
.
.
.
.
.
.
.
.
.
.
.
.
.
321
Creating an Event
.
.
.
.
.
.
.
.
.
.
.
.
.
.
.
.
.
.
.
.
.
.
.
.
.
.
.
.
.
.
.
.
.
.
.
.
.
.
.
.
.
.
.
.
.
.
.
.
.
.
.
.
.
.
.
.
.
.
.
.
.
.
.
.
.
.
.
.
.
.
.
.
.
.
.
.
.
.
.
.
.
.
.
.
.
.
.
.
.
.
.
.
.
.
.
.
.
.
.
.
.
.
.
.
.
.
322
Editing an Event
.
.
.
.
.
.
.
.
.
.
.
.
.
.
.
.
.
.
.
.
.
.
.
.
.
.
.
.
.
.
.
.
.
.
.
.
.
.
.
.
.
.
.
.
.
.
.
.
.
.
.
.
.
.
.
.
.
.
.
.
.
.
.
.
.
.
.
.
.
.
.
.
.
.
.
.
.
.
.
.
.
.
.
.
.
.
.
.
.
.
.
.
.
.
.
.
.
.
.
.
.
.
.
.
.
.
.
.
.
326
Subscribing and Unsubscribing to Events
.
.
.
.
.
.
.
.
.
.
.
.
.
.
.
.
.
.
.
.
.
.
.
.
.
.
.
.
.
.
.
.
.
.
.
.
.
.
.
.
.
.
.
.
.
.
.
.
.
.
.
.
.
.
.
.
.
.
.
.
.
.
.
.
.
.
328
Completing an Event
.
.
.
.
.
.
.
.
.
.
.
.
.
.
.
.
.
.
.
.
.
.
.
.
.
.
.
.
.
.
.
.
.
.
.
.
.
.
.
.
.
.
.
.
.
.
.
.
.
.
.
.
.
.
.
.
.
.
.
.
.
.
.
.
.
.
.
.
.
.
.
.
.
.
.
.
.
.
.
.
.
.
.
.
.
.
.
.
.
.
.
.
.
.
.
.
.
.
.
.
.
328
Closing an Event Series
.
.
.
.
.
.
.
.
.
.
.
.
.
.
.
.
.
.
.
.
.
.
.
.
.
.
.
.
.
.
.
.
.
.
.
.
.
.
.
.
.
.
.
.
.
.
.
.
.
.
.
.
.
.
.
.
.
.
.
.
.
.
.
.
.
.
.
.
.
.
.
.
.
.
.
.
.
.
.
.
.
.
.
.
.
.
.
.
.
.
.
.
.
.
.
329
Viewing the Completion History
.
.
.
.
.
.
.
.
.
.
.
.
.
.
.
.
.
.
.
.
.
.
.
.
.
.
.
.
.
.
.
.
.
.
.
.
.
.
.
.
.
.
.
.
.
.
.
.
.
.
.
.
.
.
.
.
.
.
.
.
.
.
.
.
.
.
.
.
.
.
.
.
.
.
.
.
.
.
.
.
.
.
.
330
Deleting an Event
.
.
.
.
.
.
.
.
.
.
.
.
.
.
.
.
.
.
.
.
.
.
.
.
.
.
.
.
.
.
.
.
.
.
.
.
.
.
.
.
.
.
.
.
.
.
.
.
.
.
.
.
.
.
.
.
.
.
.
.
.
.
.
.
.
.
.
.
.
.
.
.
.
.
.
.
.
.
.
.
.
.
.
.
.
.
.
.
.
.
.
.
.
.
.
.
.
.
.
.
.
.
.
.
.
.
331
Tasks
.
.
.
.
.
.
.
.
.
.
.
.
.
.
.
.
.
.
.
.
.
.
.
.
.
.
.
.
.
.
.
.
.
.
.
.
.
.
.
.
.
.
.
.
.
.
.
.
.
.
.
.
.
.
.
.
.
.
.
.
.
.
.
.
.
.
.
.
.
.
.
.
.
.
.
.
.
.
.
.
.
.
.
.
.
.
.
.
.
.
.
.
.
.
.
.
.
.
.
.
.
.
.
.
.
.
.
.
.
.
.
.
.
.
.
.
.
.
.
.
.
.
.
.
.
.
.
.
.
.
.
.
.
.
.
.
333
Tasks Browse Screen
.
.
.
.
.
.
.
.
.
.
.
.
.
.
.
.
.
.
.
.
.
.
.
.
.
.
.
.
.
.
.
.
.
.
.
.
.
.
.
.
.
.
.
.
.
.
.
.
.
.
.
.
.
.
.
.
.
.
.
.
.
.
.
.
.
.
.
.
.
.
.
.
.
.
.
.
.
.
.
.
.
.
.
.
.
.
.
.
.
.
.
.
.
.
.
.
.
.
.
.
.
.
.
.
333
Adding a Task
.
.
.
.
.
.
.
.
.
.
.
.
.
.
.
.
.
.
.
.
.
.
.
.
.
.
.
.
.
.
.
.
.
.
.
.
.
.
.
.
.
.
.
.
.
.
.
.
.
.
.
.
.
.
.
.
.
.
.
.
.
.
.
.
.
.
.
.
.
.
.
.
.
.
.
.
.
.
.
.
.
.
.
.
.
.
.
.
.
.
.
.
.
.
.
.
.
.
.
.
.
.
.
.
.
.
.
.
.
.
.
.
334
Editing a Task
.
.
.
.
.
.
.
.
.
.
.
.
.
.
.
.
.
.
.
.
.
.
.
.
.
.
.
.
.
.
.
.
.
.
.
.
.
.
.
.
.
.
.
.
.
.
.
.
.
.
.
.
.
.
.
.
.
.
.
.
.
.
.
.
.
.
.
.
.
.
.
.
.
.
.
.
.
.
.
.
.
.
.
.
.
.
.
.
.
.
.
.
.
.
.
.
.
.
.
.
.
.
.
.
.
.
.
.
.
.
.
.
335
Completing a Task
.
.
.
.
.
.
.
.
.
.
.
.
.
.
.
.
.
.
.
.
.
.
.
.
.
.
.
.
.
.
.
.
.
.
.
.
.
.
.
.
.
.
.
.
.
.
.
.
.
.
.
.
.
.
.
.
.
.
.
.
.
.
.
.
.
.
.
.
.
.
.
.
.
.
.
.
.
.
.
.
.
.
.
.
.
.
.
.
.
.
.
.
.
.
.
.
.
.
.
.
.
.
.
.
336
Viewing Completed Task Notes
.
.
.
.
.
.
.
.
.
.
.
.
.
.
.
.
.
.
.
.
.
.
.
.
.
.
.
.
.
.
.
.
.
.
.
.
.
.
.
.
.
.
.
.
.
.
.
.
.
.
.
.
.
.
.
.
.
.
.
.
.
.
.
.
.
.
.
.
.
.
.
.
.
.
.
.
.
.
.
.
.
.
338
Creating a Task List
.
.
.
.
.
.
.
.
.
.
.
.
.
.
.
.
.
.
.
.
.
.
.
.
.
.
.
.
.
.
.
.
.
.
.
.
.
.
.
.
.
.
.
.
.
.
.
.
.
.
.
.
.
.
.
.
.
.
.
.
.
.
.
.
.
.
.
.
.
.
.
.
.
.
.
.
.
.
.
.
.
.
.
.
.
.
.
.
.
.
.
.
.
.
.
.
.
.
.
.
.
.
339
Documents
.
.
.
.
.
.
.
.
.
.
.
.
.
.
.
.
.
.
.
.
.
.
.
.
.
.
.
.
.
.
.
.
.
.
.
.
.
.
.
.
.
.
.
.
.
.
.
.
.
.
.
.
.
.
.
.
.
.
.
.
.
.
.
.
.
.
.
.
.
.
.
.
.
.
.
.
.
.
.
.
.
.
.
.
.
.
.
.
.
.
.
.
.
.
.
.
.
.
.
.
.
.
.
.
.
.
.
.
.
.
.
.
.
.
.
.
.
.
.
.
.
.
.
.
.
.
.
342
Documents Browse Screen
.
.
.
.
.
.
.
.
.
.
.
.
.
.
.
.
.
.
.
.
.
.
.
.
.
.
.
.
.
.
.
.
.
.
.
.
.
.
.
.
.
.
.
.
.
.
.
.
.
.
.
.
.
.
.
.
.
.
.
.
.
.
.
.
.
.
.
.
.
.
.
.
.
.
.
.
.
.
.
.
.
.
.
.
.
.
.
.
.
.
.
.
.
.
342
Document Profile
.
.
.
.
.
.
.
.
.
.
.
.
.
.
.
.
.
.
.
.
.
.
.
.
.
.
.
.
.
.
.
.
.
.
.
.
.
.
.
.
.
.
.
.
.
.
.
.
.
.
.
.
.
.
.
.
.
.
.
.
.
.
.
.
.
.
.
.
.
.
.
.
.
.
.
.
.
.
.
.
.
.
.
.
.
.
.
.
.
.
.
.
.
.
.
.
.
.
.
.
.
.
.
.
.
.
.
.
.
.
.
.
343
Adding a Document
.
.
.
.
.
.
.
.
.
.
.
.
.
.
.
.
.
.
.
.
.
.
.
.
.
.
.
.
.
.
.
.
.
.
.
.
.
.
.
.
.
.
.
.
.
.
.
.
.
.
.
.
.
.
.
.
.
.
.
.
.
.
.
.
.
.
.
.
.
.
.
.
.
.
.
.
.
.
.
.
.
.
.
.
.
.
.
.
.
.
.
.
.
.
.
.
.
.
.
.
.
.
345
Using the Multi-Print Function
.
.
.
.
.
.
.
.
.
.
.
.
.
.
.
.
.
.
.
.
.
.
.
.
.
.
.
.
.
.
.
.
.
.
.
.
.
.
.
.
.
.
.
.
.
.
.
.
.
.
.
.
.
.
.
.
.
.
.
.
.
.
.
.
.
.
.
.
.
.
.
.
.
.
.
.
.
.
.
.
.
.
.
.
.
.
.
346
Editing a Document
.
.
.
.
.
.
.
.
.
.
.
.
.
.
.
.
.
.
.
.
.
.
.
.
.
.
.
.
.
.
.
.
.
.
.
.
.
.
.
.
.
.
.
.
.
.
.
.
.
.
.
.
.
.
.
.
.
.
.
.
.
.
.
.
.
.
.
.
.
.
.
.
.
.
.
.
.
.
.
.
.
.
.
.
.
.
.
.
.
.
.
.
.
.
.
.
.
.
.
.
.
.
.
347
Deleting a Document
.
.
.
.
.
.
.
.
.
.
.
.
.
.
.
.
.
.
.
.
.
.
.
.
.
.
.
.
.
.
.
.
.
.
.
.
.
.
.
.
.
.
.
.
.
.
.
.
.
.
.
.
.
.
.
.
.
.
.
.
.
.
.
.
.
.
.
.
.
.
.
.
.
.
.
.
.
.
.
.
.
.
.
.
.
.
.
.
.
.
.
.
.
.
.
.
.
.
.
.
348
Downloading a Document
.
.
.
.
.
.
.
.
.
.
.
.
.
.
.
.
.
.
.
.
.
.
.
.
.
.
.
.
.
.
.
.
.
.
.
.
.
.
.
.
.
.
.
.
.
.
.
.
.
.
.
.
.
.
.
.
.
.
.
.
.
.
.
.
.
.
.
.
.
.
.
.
.
.
.
.
.
.
.
.
.
.
.
.
.
.
.
.
.
.
.
.
348
Uploading a Document Revision
.
.
.
.
.
.
.
.
.
.
.
.
.
.
.
.
.
.
.
.
.
.
.
.
.
.
.
.
.
.
.
.
.
.
.
.
.
.
.
.
.
.
.
.
.
.
.
.
.
.
.
.
.
.
.
.
.
.
.
.
.
.
.
.
.
.
.
.
.
.
.
.
.
.
.
.
.
.
.
.
.
349
Comparing Document Revisions
.
.
.
.
.
.
.
.
.
.
.
.
.
.
.
.
.
.
.
.
.
.
.
.
.
.
.
.
.
.
.
.
.
.
.
.
.
.
.
.
.
.
.
.
.
.
.
.
.
.
.
.
.
.
.
.
.
.
.
.
.
.
.
.
.
.
.
.
.
.
.
.
.
.
.
.
.
.
.
.
.
351
Messaging
.
.
.
.
.
.
.
.
.
.
.
.
.
.
.
.
.
.
.
.
.
.
.
.
.
.
.
.
.
.
.
.
.
.
.
.
.
.
.
.
.
.
.
.
.
.
.
.
.
.
.
.
.
.
.
.
.
.
.
.
.
.
.
.
.
.
.
.
.
.
.
.
.
.
.
.
.
.
.
.
.
.
.
.
.
.
.
.
.
.
.
.
.
.
.
.
.
.
.
.
.
.
.
.
.
.
.
.
.
.
.
.
.
.
.
.
.
.
.
.
.
.
.
.
.
.
.
.
353
People
.
.
.
.
.
.
.
.
.
.
.
.
.
.
.
.
.
.
.
.
.
.
.
.
.
.
.
.
.
.
.
.
.
.
.
.
.
.
.
.
.
.
.
.
.
.
.
.
.
.
.
.
.
.
.
.
.
.
.
.
.
.
.
.
.
.
.
.
.
.
.
.
.
.
.
.
.
.
.
.
.
.
.
.
.
.
.
.
.
.
.
.
.
.
.
.
.
.
.
.
.
.
.
.
.
.
.
.
.
.
.
.
.
.
.
.
.
.
.
.
.
.
.
.
.
.
.
.
.
.
.
.
.
.
355
People Browse Screen
.
.
.
.
.
.
.
.
.
.
.
.
.
.
.
.
.
.
.
.
.
.
.
.
.
.
.
.
.
.
.
.
.
.
.
.
.
.
.
.
.
.
.
.
.
.
.
.
.
.
.
.
.
.
.
.
.
.
.
.
.
.
.
.
.
.
.
.
.
.
.
.
.
.
.
.
.
.
.
.
.
.
.
.
.
.
.
.
.
.
.
.
.
.
.
.
.
.
.
.
.
.
355
Person Profile
.
.
.
.
.
.
.
.
.
.
.
.
.
.
.
.
.
.
.
.
.
.
.
.
.
.
.
.
.
.
.
.
.
.
.
.
.
.
.
.
.
.
.
.
.
.
.
.
.
.
.
.
.
.
.
.
.
.
.
.
.
.
.
.
.
.
.
.
.
.
.
.
.
.
.
.
.
.
.
.
.
.
.
.
.
.
.
.
.
.
.
.
.
.
.
.
.
.
.
.
.
.
.
.
.
.
.
.
.
.
.
.
.
.
.
.
.
356
Adding a Person
.
.
.
.
.
.
.
.
.
.
.
.
.
.
.
.
.
.
.
.
.
.
.
.
.
.
.
.
.
.
.
.
.
.
.
.
.
.
.
.
.
.
.
.
.
.
.
.
.
.
.
.
.
.
.
.
.
.
.
.
.
.
.
.
.
.
.
.
.
.
.
.
.
.
.
.
.
.
.
.
.
.
.
.
.
.
.
.
.
.
.
.
.
.
.
.
.
.
.
.
.
.
.
.
.
.
.
.
357
Editing a Person Profile
.
.
.
.
.
.
.
.
.
.
.
.
.
.
.
.
.
.
.
.
.
.
.
.
.
.
.
.
.
.
.
.
.
.
.
.
.
.
.
.
.
.
.
.
.
.
.
.
.
.
.
.
.
.
.
.
.
.
.
.
.
.
.
.
.
.
.
.
.
.
.
.
.
.
.
.
.
.
.
.
.
.
.
.
.
.
.
.
.
.
.
.
.
.
.
.
358
Deleting a Person Profile
.
.
.
.
.
.
.
.
.
.
.
.
.
.
.
.
.
.
.
.
.
.
.
.
.
.
.
.
.
.
.
.
.
.
.
.
.
.
.
.
.
.
.
.
.
.
.
.
.
.
.
.
.
.
.
.
.
.
.
.
.
.
.
.
.
.
.
.
.
.
.
.
.
.
.
.
.
.
.
.
.
.
.
.
.
.
.
.
.
.
.
.
.
359
History
.
.
.
.
.
.
.
.
.
.
.
.
.
.
.
.
.
.
.
.
.
.
.
.
.
.
.
.
.
.
.
.
.
.
.
.
.
.
.
.
.
.
.
.
.
.
.
.
.
.
.
.
.
.
.
.
.
.
.
.
.
.
.
.
.
.
.
.
.
.
.
.
.
.
.
.
.
.
.
.
.
.
.
.
.
.
.
.
.
.
.
.
.
.
.
.
.
.
.
.
.
.
.
.
.
.
.
.
.
.
.
.
.
.
.
.
.
.
.
.
.
.
.
.
.
.
.
.
.
.
.
.
.
.
.
361
Company History Browse Screen
.
.
.
.
.
.
.
.
.
.
.
.
.
.
.
.
.
.
.
.
.
.
.
.
.
.
.
.
.
.
.
.
.
.
.
.
.
.
.
.
.
.
.
.
.
.
.
.
.
.
.
.
.
.
.
.
.
.
.
.
.
.
.
.
.
.
.
.
.
.
.
.
.
.
.
.
.
.
.
.
.
.
.
.
361
Contract History Browse Screen
.
.
.
.
.
.
.
.
.
.
.
.
.
.
.
.
.
.
.
.
.
.
.
.
.
.
.
.
.
.
.
.
.
.
.
.
.
.
.
.
.
.
.
.
.
.
.
.
.
.
.
.
.
.
.
.
.
.
.
.
.
.
.
.
.
.
.
.
.
.
.
.
.
.
.
.
.
.
.
.
.
.
.
.
.
.
362
Reports
.
.
.
.
.
.
.
.
.
.
.
.
.
.
.
.
.
.
.
.
.
.
.
.
.
.
.
.
.
.
.
.
.
.
.
.
.
.
.
.
.
.
.
.
.
.
.
.
.
.
.
.
.
.
.
.
.
.
.
.
.
.
.
.
.
.
.
.
.
.
.
.
.
.
.
.
.
.
.
.
.
.
.
.
.
.
.
.
.
.
.
.
.
.
.
.
.
.
.
.
.
.
.
.
.
.
.
.
.
.
.
.
.
.
.
.
.
.
.
.
.
.
.
.
.
.
.
.
.
.
.
.
.
363
Company One-Click Report
.
.
.
.
.
.
.
.
.
.
.
.
.
.
.
.
.
.
.
.
.
.
.
.
.
.
.
.
.
.
.
.
.
.
.
.
.
.
.
.
.
.
.
.
.
.
.
.
.
.
.
.
.
.
.
.
.
.
.
.
.
.
.
.
.
.
.
.
.
.
.
.
.
.
.
.
.
.
.
.
.
.
.
.
.
.
.
.
.
.
.
.
.
.
363
Contract One-Click Report
.
.
.
.
.
.
.
.
.
.
.
.
.
.
.
.
.
.
.
.
.
.
.
.
.
.
.
.
.
.
.
.
.
.
.
.
.
.
.
.
.
.
.
.
.
.
.
.
.
.
.
.
.
.
.
.
.
.
.
.
.
.
.
.
.
.
.
.
.
.
.
.
.
.
.
.
.
.
.
.
.
.
.
.
.
.
.
.
.
.
.
.
.
.
.
.
365
Reports Browse Screen
.
.
.
.
.
.
.
.
.
.
.
.
.
.
.
.
.
.
.
.
.
.
.
.
.
.
.
.
.
.
.
.
.
.
.
.
.
.
.
.
.
.
.
.
.
.
.
.
.
.
.
.
.
.
.
.
.
.
.
.
.
.
.
.
.
.
.
.
.
.
.
.
.
.
.
.
.
.
.
.
.
.
.
.
.
.
.
.
.
.
.
.
.
.
.
.
.
.
.
.
367
Copying a Report
.
.
.
.
.
.
.
.
.
.
.
.
.
.
.
.
.
.
.
.
.
.
.
.
.
.
.
.
.
.
.
.
.
.
.
.
.
.
.
.
.
.
.
.
.
.
.
.
.
.
.
.
.
.
.
.
.
.
.
.
.
.
.
.
.
.
.
.
.
.
.
.
.
.
.
.
.
.
.
.
.
.
.
.
.
.
.
.
.
.
.
.
.
.
.
.
.
.
.
.
.
.
.
.
.
.
368
Report Wizard
.
.
.
.
.
.
.
.
.
.
.
.
.
.
.
.
.
.
.
.
.
.
.
.
.
.
.
.
.
.
.
.
.
.
.
.
.
.
.
.
.
.
.
.
.
.
.
.
.
.
.
.
.
.
.
.
.
.
.
.
.
.
.
.
.
.
.
.
.
.
.
.
.
.
.
.
.
.
.
.
.
.
.
.
.
.
.
.
.
.
.
.
.
.
.
.
.
.
.
.
.
.
.
.
.
.
.
.
.
.
.
.
.
.
.
.
.
370
Editing a Report
.
.
.
.
.
.
.
.
.
.
.
.
.
.
.
.
.
.
.
.
.
.
.
.
.
.
.
.
.
.
.
.
.
.
.
.
.
.
.
.
.
.
.
.
.
.
.
.
.
.
.
.
.
.
.
.
.
.
.
.
.
.
.
.
.
.
.
.
.
.
.
.
.
.
.
.
.
.
.
.
.
.
.
.
.
.
.
.
.
.
.
.
.
.
.
.
.
.
.
.
.
.
.
.
.
.
.
.
.
379
Deleting a Report
.
.
.
.
.
.
.
.
.
.
.
.
.
.
.
.
.
.
.
.
.
.
.
.
.
.
.
.
.
.
.
.
.
.
.
.
.
.
.
.
.
.
.
.
.
.
.
.
.
.
.
.
.
.
.
.
.
.
.
.
.
.
.
.
.
.
.
.
.
.
.
.
.
.
.
.
.
.
.
.
.
.
.
.
.
.
.
.
.
.
.
.
.
.
.
.
.
.
.
.
.
.
.
.
.
.
380
Scheduled Reports Browse Screen
.
.
.
.
.
.
.
.
.
.
.
.
.
.
.
.
.
.
.
.
.
.
.
.
.
.
.
.
.
.
.
.
.
.
.
.
.
.
.
.
.
.
.
.
.
.
.
.
.
.
.
.
.
.
.
.
.
.
.
.
.
.
.
.
.
.
.
.
.
.
.
.
.
.
.
.
.
.
.
.
.
381
Scheduling a Report
.
.
.
.
.
.
.
.
.
.
.
.
.
.
.
.
.
.
.
.
.
.
.
.
.
.
.
.
.
.
.
.
.
.
.
.
.
.
.
.
.
.
.
.
.
.
.
.
.
.
.
.
.
.
.
.
.
.
.
.
.
.
.
.
.
.
.
.
.
.
.
.
.
.
.
.
.
.
.
.
.
.
.
.
.
.
.
.
.
.
.
.
.
.
.
.
.
.
.
.
.
.
382
Editing a Scheduled Report
.
.
.
.
.
.
.
.
.
.
.
.
.
.
.
.
.
.
.
.
.
.
.
.
.
.
.
.
.
.
.
.
.
.
.
.
.
.
.
.
.
.
.
.
.
.
.
.
.
.
.
.
.
.
.
.
.
.
.
.
.
.
.
.
.
.
.
.
.
.
.
.
.
.
.
.
.
.
.
.
.
.
.
.
.
.
.
.
.
383
Deleting a Scheduled Report
.
.
.
.
.
.
.
.
.
.
.
.
.
.
.
.
.
.
.
.
.
.
.
.
.
.
.
.
.
.
.
.
.
.
.
.
.
.
.
.
.
.
.
.
.
.
.
.
.
.
.
.
.
.
.
.
.
.
.
.
.
.
.
.
.
.
.
.
.
.
.
.
.
.
.
.
.
.
.
.
.
.
.
.
.
.
.
384
Glossary
.
.
.
.
.
.
.
.
.
.
.
.
.
.
.
.
.
.
.
.
.
.
.
.
.
.
.
.
.
.
.
.
.
.
.
.
.
.
.
.
.
.
.
.
.
.
.
.
.
.
.
.
.
.
.
.
.
.
.
.
.
.
.
.
.
.
.
.
.
.
.
.
.
.
.
.
.
.
.
.
.
.
.
.
.
.
.
.
.
.
.
.
.
.
.
.
.
.
.
.
.
.
.
.
.
.
.
.
.
.
.
.
.
.
.
.
.
.
.
.
.
.
.
.
.
.
.
.
.
.
.
.
387
7 / 393
Welcome
?
?
Welcome
to
Novâtus
Contracts™
Online
Help
Version 3.4
This online help system was designed to provide assistance in using Novâtus Contracts. The
help system is organized into the main topics listed below, which allow you to view or search for
the information you need, or perform the tasks required in managing the contracts stored in the
application.
·
Getting Started
·
Search
·
My Place
·
Companies
·
Contracts
·
Events
·
Tasks
·
Documents
·
Messaging
·
People
·
Addresses
·
History
·
Reports
·
Mobile Devices
·
Glossary of Terms
?
The owner or authorized user of a valid copy of Novâtus, Inc. software may reproduce this
information for the purpose of learning to use such software. No part of this information may be
reproduced or transmitted for commercial purposes, such as selling copies of this information or
for providing paid-for-support services.
Every effort has been made to ensure that this information is accurate. Novâtus is not
responsible for clerical errors. Because Novâtus is continuing to release new versions and
updates to its system software, images shown may be slightly different from what you see on
your screen.
8 / 393
The Novâtus logo is a trademark of Novâtus Software, Inc., registered in the U.S. and other
countries. Use of the Novâtus logo for commercial purposes without the prior written consent of
Novâtus may constitute trademark infringement and unfair competition in violation of federal and
state laws.
Other company and product names mentioned herein are trademarks of their respective
companies. Mention of third-party products is for informational purposes only and constitutes
neither an endorsement nor a recommendation. Novâtus assumes no responsibility with regard
to the performance or use of these products.
Novâtus, Incorporated
12124 High Tech Avenue, Suite 165
Orlando, FL 32817
© 2010 Novâtus Software, Inc.
All Rights Reserved
?
?
9 / 393
Technical Requirements
The technical requirements?
for Novâtus Contracts™ are shown below
. ?Using a current browser
and most operating systems,
you can access the Novâtus Contracts™ system and database
24x7 from any computer or from your
Apple iOS 4+, BlackBerry OS 6.0+, or Android 2.3+ mobile
device
. ?You have the option of using Novâtus as your Application Service Provider (ASP) or
hosting the applications on-premises on your own server
.
Desktop Software and Hardware
Web Server Hardware and Software (ASP
and On-Premises)
Software
·
Internet Explorer 7.0 (or higher)
·
Mozilla Firefox
·
Safari
·
Adobe Acrobat 7.0 (recommended)
or Reader 7.0
ASP Secured Hosting by Novâtus
·
No client hardware or software
requirements
Hardware - Standard Users
·
Workstation - 1 GHz 32-bit (x86) or 64-bit (x64)
processor
·
512 MB of system memory, or higher
·
Windows XP or Windows Vista
·
Minimum screen resolution of 1024 x 768 is
recommended
On-Premises Server Requirements
·
If you choose to host the Application on
premises, Novâtus will work with you to
configure the required hardware.
Hardware - Power Users
·
2 GHz 32-bit (x86) or 64-bit (x64) processor
·
1 GB of system memory
·
Minimum screen resolution of 1024x768 is
recommended
10 / 393
Mobile Devices
You can now access Novâtus Contracts using any of the following mobile devices:
·
Apple iOS 4+
·
BlackBerry OS 6.0+
·
Android 2.3+
Once you
login
to Novâtus Contracts from your mobile device, the program's
Slim Mobile
Interface
displays. Using this interface, you can view company and contract information, and
perform tasks associated with Contract and Company Profiles, such as downloading
documents, closing events, completing tasks, and approving (or declining) Gateway steps in a
workkflow
.
Companies option
Click the
icon to display an alphabetical listing of companies
.
Contract option
Click the
icon to display an alphabetical listing of contracts
.
11 / 393
Search field
Enter the first three letters of the contract (company) you want to view, and
click the Search
icon.
Prev and Next
buttons
Click to scroll backwards and forward in the list.
Back button
Click to return to the previous screen.
12 / 393
Profile screen
View the information for the contract. Scroll down to see the entire Profile,
which includes the links to the other contract items.
13 / 393
Tasks option
Click to display a screen showing the tasks for the contract.
From this
screen, you can complete a task.
Events option
Click to display a screen showing the events for the contract.
From this
screen, you can mark an event as complete or close an event series.
Workflow option
Click to display a screen showing the workflows for the contract.
From this
screen, you can approve (or decline) a Gateway step.
Messaging option
Click to display a screen showing the email messages for this contract.
From this screen, you can send an email message.
14 / 393
Documents option
Click to display a screen showing the documents uploaded to the contract
profile.
From this screen, you can download and view any of the documents in
the profile.
Documents list
Locate the document you want to download, and click on its
icon.
15 / 393
Document screen
View the information for the document, including the file size and document
format.
Download button
Click to begin the download. Once the document is downloaded, it can be
viewed from the mobile device.
16 / 393
Login
Novâtus Contracts™ is a secured network application that runs in an Internet browser
(Internet
Explorer 7.0 (or higher), Mozilla Firefox, and Safari) and requires a valid user name and
password to log?into the program.? If you do not have a user name and password for Novâtus
Contracts™
, contact your System Administrator.
?
To begin the login process, e
nter the URL for the program in the Address field of your Internet
browser to display the Novâtus Contracts™ Login screen
.??The URL address is:
https://
app1.novatuscontracts.com/Auth/
?
You can also login to the program using one of the following
mobile devices
:
Apple iOS 4+
,
BlackBerry OS 6.0+
, and
Android 2.3+
.
Username field
Enter your login name. Login names must be unique; the system defaults
your login name to your email address.
17 / 393
Password field
Enter your password. Passwords are
case sensitive
and they must have
a minimum of eight characters and must meet 3 of the 4 following
character requirements:
·
At least one uppercase Alpha Character
·
At least one lowercase Alpha Character
·
At least one Numeric Character
·
At least one Symbol Character (! @ # $ % ^ &
* + ? < > / .)
Login button
Click to login to
Novâtus Contracts.
Reset button
Click to
clear the information in the Username and Password fields
.
It is suggested that you save the Novâtus Contracts web address as one of your
Favorites, or create a desktop icon so that you can easily launch the program
.
18 / 393
Getting Started
Getting started with Novâtus Contracts includes the following tasks:
·
Setting up your user preferences
·
Becoming familiar with the program's components
·
Customizing
and
filtering
data in
Company Browse screens
·
Customizing
and
filtering
data in
Contract Browse screens
·
Adding navigational and calculation portlets to your Dashboard
Once you have completed these startup tasks, we recommend that you familiarize yourself with
the following:
·
MyPlace section of the Navigation Pane
·
Search Query function
·
Hierarchical relationships between companies and contracts
User Preferences
You can edit the following information user preferences by clicking the Preferences button in the
upper right corner of the screen
.?
19 / 393
?
?
This will display a User Preferences?window with six tabs:
·
Name
·
Address
·
Contact
·
Password
·
System
·
Portal
The Portal?tab will only be present if you will be involved with online contract negotiations in the
Portal
.??
?
Entering Your Name
To enter or edit your user name, click the
Preferences
button in the upper right corner of the
screen to display a User Preferences?window with six tabs: Name,
Address
,
Contact
,
Password
,
System
, and
Portal
(if you have this permission).
?
?
?
20 / 393
?
?
Name tab
Click the Name tab to view the Name window.?
Data fields
Enter the information for your name and title.
Submit button
Click to save your name information.
Cancel button
Click to exit the Preferences window without saving your changes.
?
You can click between all the tabs and make changes without losing the data entered
on each tab.??Just click the
Submit
button on any tab when you have finished your
changes
.
Entering Your Address
To enter or edit your address, click the
Preferences
button in the upper right corner of the
screen to display a User Preferences?window with six tabs:
Name
, Address,
Contact
,
Password
,
System
, and
Portal
(if you have this permission).
?
21 / 393
?
?
Address tab
Click the Address tab to view the Address window.?
Data fields
Enter your address information.
Submit button
Click to save your preferences when you are finished.
Cancel button
Click to exit the Preferences window without saving your changes.
Entering Contact Information
Edit your individual user preferences by clicking the
Preferences
button in the upper right corner
of the screen to display a User Preferences?window with six tabs:
Name
,
Address
, Contact,
Password
,
System
, and
Portal
(if you have this permission).
?
The system stores your contact information, including work, mobile, fax, and home
numbers.??When entering a phone number, include the area code and country code, if
applicable.??The system will automatically format the area code.
?
22 / 393
?
?
Contact tab
Click the Contact tab to view the Contact window.?
Data fields
Enter your contact information.??
In the phone and fax number fields, click on the
?icon to display a
Phone
Number Entry
window where you can enter the area code, phone number, as
well as an extension number and country code.
Submit button
Click to save your preferences when you are finished.
Cancel button
Click to exit the Preferences window without saving your changes.
?
?
If you enter an incomplete phone number, a Phone Number Entry window will display
with the information you entered, allowing you to enter the correct number
.
Changing Your Password
To edit your password, click the
Preferences
button in the upper right corner of the screen to
display a User Preferences?window with six tabs:
Name
,
Address
,
Contact
, Password,
System
,
23 / 393
and
Portal
(if you have this permission)
.
?
?
??
Password tab
Click the Password tab to view the Password window.?
Data fields
Enter old password and new password (twice) to update your password.
Submit button
Click to save your preferences when you are finished.
Cancel button
Click to exit the Preferences window without saving your changes.
?
?
Passwords are case sensitive and must have a minimum of eight (8)
characters.??Passwords must also meet 3 of these 4 character requirements (1) At
least one uppercase Alpha Character (2) At least one lowercase Alpha Character (3)
At least one Numeric Character, and (4) At least one Symbol Character.
Customizing System Settings
To change the default settings for the way dates and numbers display in your program screens
,
click
the
Preferences
button in the upper right corner of the screen to display a User
24 / 393
Preferences?window with six tabs:
Name
,
Address
,
Contact
,
Password
, System, and
Portal
(if
you have this permission)
.
?
?
?
?
System tab
Click the System tab to view the System window.
Date Format field
Use the default date format (Month/Day/Year), or select one of the other two
options: Day/Month/Year or Year/Month/Date.
Number Format
field
Use the default number American format (0,000.00) or select the
International format (0.000,00).
Prevent Filter
Save checkbox
Select to have grid filters cleared when exiting program screens.
Clear State button
Select to clear all user-defined screen settings and return them to the
system defaults, such as Dashboard Portlets and Browse screen fields.
Submit button
Click to save your preferences when you are finished.
25 / 393
Cancel button
Click to exit the Preferences window without saving your changes.
Setting Portal Notifications
To select the types of emails you will receive from the Portal
, click
the
Preferences
button in the
upper right corner of the screen to display a User Preferences?window with six tabs:
Name
,
Address
,
Contact
,
Password
,
System
, and Portal (if you have this permission).
?
The Portal?tab will only be present if you will be involved with online contract
negotiations via the Portal.??Online contract negotiations involve Document
Packages, which are one or more documents that can be checked out for review
and then checked back in again via the Portal.??Electronic signatures are also used
in the Portal when both parties are ready to seal the contract deal
.
?
?
??
Portal tab
Click the Portal tab to view the Portal Settings window.?
Send Check-in
Notifications
checkbox
Select if you want to receive a system email notifying you when a
document from a document package has been checked back in.
26 / 393
Send Check-out
Notifications
checkbox
Select if you want to receive a system email notifying you when a
document from a document package has been checked out.
Send Document
Completed
Notifications
checkbox
Select if you want to receive a system email notifying you when a
document package has been completed.
Submit button
Click to save your preferences when you are finished.
Cancel button
Click to exit the Preferences window without saving your changes.
Program Components
The main components of Novâtus Contracts are:
·
Navigation Pane
·
Portlets
·
Browse and input screens
·
Buttons
·
Links
·
Icons
·
Address Book
·
Phone Number Entry window
These components allow you to view and search for information, enter data, and perform
program tasks.??Novâtus Contracts also offers several additional features to assist you in
locating information and performing tasks, including a customizable
Dashboard
,
screen filters
,
column sorting
, wizards, a wizard-driven Reports feature, and a single-step
Search function
.
Navigation Pane
The Navigation Pane displays along the left border of every screen.??The sections in the
Navigation Pane?(
Search
,
MyPlace
,
Companies
,
Contracts
,
Reports
,
Admin
, and
Help
) can be
expanded??
??to display the available options for each section, or collapsed??
??to hide menu
items from view.??The entire Navigation Pane can be left-collapsed??
?to extend the viewable
area of the screen for data, and then returned to the default Fly-Out??
?mode.
?
27 / 393
?
Portlets
Portlets are windows that display in the Dashboard on system startup and act as personal
navigation tools since they contain hot links to the information you need at your fingertips, such
as upcoming events and tasks that require your attention. You can add as many portlets to the
Dashboard as you desire. You can also custom design a portlet that displays a color-coded pie
chart, bar chart, or time line depicting key contract or company information.
There are eight available portlets that can be added to your
Dashboard
:
·
Recently Viewed Companies
·
Recently Viewed Contracts
·
Upcoming Events
·
Upcoming Tasks
·
Active Workflow Items
·
Search Query
·
Document Packages
·
Charting
Browse and Input Screens
Novâtus Contracts™ program screens are state
-of-the art.??The application uses two main
views types:
Browse
views?that allow you to view a list of data items and
Input
views that allow
you to enter and edit information.
To access the All Companies browse screen, click on the
Companies
expand
icon in the
Navigation Pane
, and then click on the
All Companies
link.
?
28 / 393
?
?
Browse views include the following features:
?
Sort option
Click on the down arrow
?to the right of any field heading to display a
menu.???Select Sort Ascending or Sort Descending to sort the data.??To
quickly change the sort order of a column, simply click on it.
Column option
Click on the down arrow to the right of any field heading and select Columns
to display a list of available fields.??Select the fields you want displayed in the
Browse screen by clicking in the check box to the left of the field.
Reorder and
Resize Columns
To move a column, click on the column heading and then drag and drop it to
a new location in the screen.??To change the width of column headings,
mouse-over the right border of the column until the resize symbol
displays.??Click on the symbol and drag it to the left (or right) until the column
is the desired width.
Show field
Click on the
?icon and select 5, 10, 25, 50, or 100 to control the number of
data records that display on each screen.
Page field
Enter the page you want to jump to and hit the Enter key on your
keyboard.??You can also use the previous
?and next
?icons.??To jump to
the first/last page, use the first page
?and last page
?icons.
Search field
Refine the list of items by entering search criteria and clicking the
?icon.??Use an asterisk before or after your search criteria to broaden results
(e.g.,
Enter the first few letters of a company name (e.g., "nov" will return all
company names beginning with these letters
).??Click the
?icon to clear the
filter.
?
29 / 393
Input
views include the following features:
?
Required fields
Fields that must be populated are outlined with a red highlight and noted as
such (e.g., This field is required).
Quick-Tips
When you "mouse-over" a field, a tip displays for that field, including the
selections in lists.
Buttons
Buttons display in the Action Bar?of program screens, or in other locations, depending on system
functionality, such as running wizards to accomplish program tasks.
?
Company Profile Action Bar
?Contract Profile Action Bar
?
?
Links
Novâtus Contracts provides navigational links, such as those used in the
Navigation Pane
and
the Dashboard
portlets
so that you can quickly access the data you need.
The program also provides data links between
browse screens
and contract/company profiles
30 / 393
so that you can view and/or edit the
documents
,
events
,
messages
,
people
,
tasks
,
addresses
,
products
, and
payments
associated with your contracts.
Icons
Novâtus Contracts™ uses icons
?to denote key items, dates, links, and events.??The table below
provides a list of the program icons and a brief description of each.
Icon
Description
Icon
Description
Company
Add Item
Edit Company Location
Archive/Remove Item
vs
Browse Locations
Save
Calendar - displays a pop-up
calendar
Cancel, Decline Workflow Step
Edit Company Profile
Scheduled event alert for a key date. Yellow
bells indicate optional alerts; red bells indicate
required alerts.
Dashboard
Add Event
Print
Edit Event
Contract Profile
Browse Events
Add Incorporated Contract
Delete Event
Contract Help
Event Completion History
Document, Task/Task List
Subscribe to Event
31 / 393
Icon
Description
Icon
Description
Add Item to List, Add Payment
Stream, Add Task/Task List
Mark Event Completed
Add Task List Item
New Event Email Template
Complete Task/Workflow Step
Documents/Images
People/People Help
Edit Document Profile
User/User Preferences
Download Document
Add New User, Manage Users in
Document Package
Download Document in Document Package
Edit User, Reassign Signer
Upload New Document Revision/Version
Add Security Role
Remove Document Revision/Version
Edit Security Role, View Document
Revision History
Back to Browse (Documents)
Information
Messaging Help
Help – go to Help for this subject
Add Contact Number
Refresh the data in a Browse List
Wand - indicates a wizard is available for this
task
Check Out Document in Document
Package
Submit Document Package for Electronic
Signature
Check Out Document in Document
Package
View Document Package Profile
Reverse Check Out if Document In
Document Package
Complete Document Package
Lock Document in Document
Package
Manage Email Notifications for Document
Package
Unlock Document in Document
Package
Delete Document Package
Edit Workflow
Delete Workflow
Complete Workflow Step
Approve Workflow Step
32 / 393
Icon
Description
Icon
Description
Delete Document in Document
Package
Close/Re-open Workflow
Sign Here (electronic signature)
Sign Here – Optional
(electronic signature)
Initial Here (electronic signature)
Initial Here – Optional
(electronic signature)
Review Envelope (electronic
signature)
Void Envelope (electronic signature)
Sign Document (electronic
signature)
Re-send Request (electronic signature)
Go To Page (electronic signature)
Payment Forecasting
Edit Payment Stream
Delete Payment Stream
Delete Payment
Payments/Payments Help
View Report as PDF
View Report as Excel spreadsheet
One-Click Report - summary of key
contract or company info
Copy Report
Saved Report, Preview Report
Open Portlet Settings
Address Book
The Address Book is a compilation of the names and contact information for the people who take
part in your company's contract creation, negotiation, and management. The information for the
people in the Address Book can be managed using either the
People
link in the
Company Profile
or the
People
link in the
Contract Profile
. You can
add a person
to the Address Book,
delete a
person
, or
edit a person's information
.
The Address Book is automatically available for use in many of the
Novâtus Contracts
program
features, including messaging,
events
,
document packages
,
workflows
,
scheduled reports
, and
the
Document Package
wizard
.
It contains key information for each individual, such as their
email address, work number, and the roles they play in contract creation, negotiation, and/or
management
.
The Address Book is easy to use since it allows you to quickly locate a person using the Search
feature or Sort option. To select an individual in the Address Book, simply click on the person's
name to display that person in the
Selected
field. To de-select an individual, simply click on
their remove
icon in the
Selected
field.
33 / 393
Phone Number Entry Window
The Phone Number Entry window ensures that the phone numbers you enter into
the Novâtus
program screens are properly formatted so that the correct information is available for general
use and when running system reports. This window allows you to store not only basic area
codes and phone numbers, but extension numbers (e.g., ext 212) and country codes for other
nations.
To access the Phone Number Entry window, simply click on the
icon in a contact number
field in any program screen to display the window.
34 / 393
Arrow icon
Click on the
?icon in a contact number field to display the Phone Number
Entry window.?
Area Code field
Enter the area code for the contact number.
Do not use parenthesis
.
Phone Number
field
Enter the phone number.
Use a dash (-) to separate the numbers (e.g., 555-
4216).
Extension field
Enter the extension for the contact number.
Do not enter an "x" before the
extension number since the program will do this for you.
Country Code
field
If you are storing an international number (outside the USA), enter the
country code.
Submit button
Click to save your information and add the contact number.
35 / 393
The Phone Number Entry window is available in several program screens, including:
·
User Preferences Contact Information
·
Company Profile
·
Location Profile
·
Person Profile
·
Contract Addresses
Company Browse Screens
The Companies section of the
Navigation Pane
provides a link to the
All Companies
browse
screen, which displays a list of all companies. There are also links to the
Active Companies
and
Inactive Companies
browse screens to display active and inactive companies separately.
In any company browse screen, you can:
·
View company data using the default data fields
·
Customize the screen to display only specific company data fields
·
Perform a search to display only the companies that meet the criteria
Viewing a Company Browse Screen
Data is presented in columns on all of the company browse screens.??You can control the
number of company records that display on each browse screen and quickly jump to a specific
page in the list of companies.??You can also open a Company Profile from a browse screen, as
well as view a list of all the contracts associated with a company.?
To access the All Companies browse screen, click on the
Companies
expand
icon in the
Navigation Pane
, and then click on the
All Companies
link
.
?
36 / 393
?
?
Company links
Click on
All Companies
to display a list of all companies. Click on
Active
Companies
or
Inactive Companies
to display a list of companies by status.
Use the
New Company
link to add a company.
Company Profile
records
View a list of companies in the browse screen. The number of company
records displayed per page is shown in the
Show items
field. Click on a
record to display a Company Profile.
Navigation arrows
Click the
arrow to advance to the next page, and the
arrow to return to
the previous page. Use the
symbol to jump to the first page, and the
symbol to jump to the last page.
Page field
Displays the current page number and the total number of pages for the entire
list of companies. Use the navigation arrows to move between pages or type
a page number in the field and press the Enter key on your keyboard.
Documents list
Click on the
icon to the left of the company name to display a list of the
documents associated with the company.
Customizing a Company Browse Screen
The company data that displays in a Company browse screen can be customized to meet your
data viewing needs.??There are 17 available fields that can be displayed: Company Name,
Number, Tax ID, Group, Status, DUNS Number, Type, Category, State/Province, Address, City,
Postal Code, Country, Web Address, Phone Number, Fax Number, and Legal Entity.
?
You can not only select the columns that display, but also the order in which the columns
display.??Data in the columns can be sorted in ascending or descending order.
To access the All Companies browse screen, click on the
Companies
expand
icon in the
Navigation Pane
, and then click on the
All Companies
link
.
?
37 / 393
?
?
Sort/Column
menu
Click on the arrow
??icon to the right of any column to display the
menu.??Click on
Sort Ascending
or
Sort Descending
to sort the data in
that column.
Note:
You can also quickly sort the data in a column in
ascending or descending order by clicking (toggling) on the column heading.
Company Fields
menu
Click on
Columns
in the Sort/Colum menu to display a list of available
fields.??Select the fields you want displayed in the browse screen by clicking
in the check box to the left of the field.
Show field list
Set the number of records that display on each page by selecting 5, 10, 25,
50, or 100 in the field list.
?
?
Filtering Data in a Company Browse Screen
The Novâtus system automatically filters company data by status using active and inactive
browse screens.??You can use the Search function in a browse screen to set your own filters
and further customize the company data that displays.??There are 16 searchable company fields:
Company Name, Number, Tax ID, Group, Status, DUNS Number, Type, Category, State or
Province, Address, City, Postal Code, Country, Web Address, Phone Number, and Fax Number.
To access the All Companies browse screen, click on the
Companies
expand
icon in the
Navigation Pane
, and then click on the
All Companies
link.
?
38 / 393
Search field
Click to display a list of fields for your search.?
Search field list
Select the checkbox(es) of the field(s) you want to search to reduce the
number of records in the browse screen, or click the
Select All
checkbox to
search all fields.
Criteria field
Type in your search criteria.
For example, to display only companies that are
suppliers, select
Company Type
in the Search field list, and enter
supp
in
the Search field.
Execute Search
icon
Click
?to execute the search and filter the company records in the browse
screen.
Clear Search icon
Click
?to clear the search filter and restore the browse screen to display all
company records.??If you do not clear the search filter, all company browse
screens will display only the filtered results, even between login sessions.
?
Contract Browse Screens
The Contracts section of the
Navigation Pane
provides a link to the
All Contracts
browse
screen, which displays a list of all contracts. There are also links to the
Active Contracts
,
In
Process Contracts
, and
Inactive Contracts
browse screens to display contracts separately,
according to their status.
39 / 393
In any contract browse screen, you can:
·
View contract data using the default data fields
·
Customize the screen to display only specific contract data fields
·
Perform a search to display only the contracts that meet the criteria
Viewing a Contract Browse Screen
Data is presented in columns on all of the contract browse screens.??You can control the
number of contract records that display on each browse screen and quickly jump to a specific
page in the list of contracts.??You can also open a Contract Profile from a browse screen, as well
as view a list of all the documents associated with the contract.
?
To access the All Contracts browse screen, click on the
Contracts
expand
icon in the
Navigation Pane
, and then click on the
All Contracts
link.
?
?
Contract links
Click on
All Contracts
to display a list of all contracts.??Click on the
Active
Contracts
,
In Process Contracts
, or
Inactive Contracts
links to display
contracts by status.??Use the New Contract link to add a contract.
Contract Profile
records
View a list of contracts in the Browse screen. The number of contract
records displayed per page is shown in the Show items field. ?Click on a
contract record to display its Contract Profile.?
Navigation arrows
Click the
arrow to advance to the next page, and the
arrow to return to
the previous page. Use the
symbol to jump to the first page, and the
symbol to jump to the last page.
40 / 393
Page field
Displays the current page number and the total number of pages in the
contract list.??Use the navigation arrows to move between pages or type a
number in the Page field and press Enter.
Contract
documents list
Click on the
?icon to the left of the contract to display a list of the
documents associated with the contract.?
Customizing a Contract Browse Screen
The contract data that displays in a Contract browse screen can be customized to meet your
data viewing needs.??There are 20 available fields that can be displayed: Company Name,
Contract Number, Contract Purpose, Contract Group, Contract Status, Effective Date, Original
Expiration Date, Current Expiration Date, Renewal Interval, Contract Location, Contract Type,
Legal Entity, Original Company, Agreement Type, Notice Period, Notice Date, Contract Value,
Proposed Value, Term Type, and Description.
?
You can not only select the columns that display, but also the order in which the columns
display.??Data in the columns can be sorted in ascending or descending order.
To access the All Contracts browse screen, click on the
Contracts
expand
icon in the
Navigation Pane
, and then click on the
All Contracts
link.
?
?
?
Sort/Column menu
Click on the arrow
?icon to the right of any column to display the menu.??Click on
Sort Ascending or Sort Descending to sort the data in that column.
Note:
You
can also quickly sort the data in a column in ascending or descending order by
clicking (toggling) on the column heading.
41 / 393
Contract Fields
menu
Click on Columns in the Sort/Colum menu to display a list of available
fields.??Select the fields you want displayed in the browse screen by clicking in the
check box to the left of the field.
Show field list
Set the number of records that display on each page by selecting 5, 10, 25, 50, or
100 in the field list.
?
Filtering Data in a Contract Browse Screen
The Novâtus system automatically filters contract data by status using active, in process, and
inactive browse screens.??You can use the Search function in a browse screen to set your own
filters and further customize the contract data that displays.??There are 12 searchable contract
fields: Company Name, Contract Number, Contract Purpose, Contract Group, Contract Status,
Contract Location, Contract Type, Legal Entity, Original Company, Agreement Type, Term Type,
and Description.
To access the All Contracts browse screen, click on the
Contracts
expand
icon in the
Navigation Pane
, and then click on the
All Contracts
link.
?
?
Search field
Click to display a list of fields for your search.?
42 / 393
Search field list
Select the checkbox(es) of the field(s) you want to search to filter the
number of records in the browse screen, or click the
Select All
checkbox to
search all fields.
Criteria field
Type in your search criteria.
The search is NOT case sensitive and you can
use trailing wildcards, which are denoted by an * (asterisk). For example, to
display only contracts that are schedules, select
Agreement Type
in the
Search field list, and enter
sched
in the Search field.
Execute Search
icon
Click
?to execute the search and filter the contract records in the browse
screen.
Clear Search icon
Click
?to clear the search filter and restore the browse screen to display all
contract records.??If you do not clear the search filter, all contract browse
screens will display only the filtered results, even between login sessions.
Hierarchical Relationships
A relational database is the core of the Novâtus system. Therefore, all data relates to other data
directly or via an extended connection through other data.??Both of the major system
components, companies and contracts, have a direct relationship.??You must first create a
Company Record (Profile) and then link it to a Contract Record (Profile).
The following relationships are key in understanding how Novâtus Contracts deals with the data
and elements stored in the system:
·
Company and Contract Profiles
·
Contract Type and Agreement Type
·
Contract Family
·
Linked Data
(Contract and Company)
?
Company and Contract Profiles
The basic system hierarchy begins with the Company Profile that links to the Contract Profile
and other linked data. Contract Profiles can be linked to Incorporated Contract Profiles, as well
as linked to data that relates to each Contract Profile.
43 / 393
Contract Type and Agreement Type
At its core, Novâtus Contracts is a Contract?Management system.??Therefore, it is no surprise
that two of the key data organizational fields are directly related to the categorization of contract
data. ?These fields are the Contract Type?and Agreement Type.
?
44 / 393
The Contract Type field is the primary key for categorizing, searching, and reporting on
contracts.??Properly creating the hierarchical levels of the Contract Type field will provide
smooth and seamless reporting and searching.??The Contract Type field categorizes contracts
by the type of transactions they represent.
?
45 / 393
??
Up to five contract type levels are supported in the Contract Type field.
Contract Family
Perhaps the most important of all the hierarchical relationships is the Contract?Family.??Utilizing
the Agreement Type field, Novâtus Contracts links all the member documents together in a
family relationship that properly represents their legal relationships to one another.??That is, if one
document is subordinate to another, it is represented at the next hierarchical level, below its
parent.??Root or top level documents can have Incorporated or lower-level documents linked to
them, such as Schedules, Exhibits, and Addendums.??
Have you ever found a Contract Amendment in a paper file and spent hours searching for which
document it amended???Novâtus Contracts?solves this problem.
?
46 / 393
?
?
?
?
?
?
?
?
?
?
Linked Data
Both of the main data sources (Company Profile and Contract Profile) have a set of linked data
elements that extend the amount of company and contract information that can be captured.
These elements include:
47 / 393
·
Documents
·
Tasks
·
Events
·
Messaging
·
People
·
Addresses
·
Locations
·
Document Packages
·
Payments
·
Products
·
History
·
Additional Forms
·
Additional Names
48 / 393
Search
Novâtus Contracts allows you to perform three types of searches using the Search section of
the
Navigation Pane
.
¨
Basic Search
to search for a single keyword or phrase.
¨
Search Query
to perform a search using multiple criteria. You can also
run a search that you
have saved
, and
delete a saved search
if it is no longer needed.
¨
Document Search
to search for a document stored in the system.
Performing a Basic Search
Using the basic search feature, you can quickly search for companies and contracts using the
company name or a portion of the company name
.
?
49 / 393
?
Search field
Enter the search criteria (keyword or phrase) for a company or contract.?
Search button
Click to perform the search.
Company search
results
All companies that match the search criteria display in the top portion of the
screen. ?Click on a company record to display the Company Profile.
Contract search
results
All contracts that match the search criteria display in the bottom portion of
the screen. ?Click on the
?icon to display a list of the documents associated
with the contract.??Click on a document in the list to display an Open prompt
that will allow you to open the document in its default format or download the
document.
?
?
The Search feature is not case sensitive, so searching for NOVATUS, Novatus, or novatus
will all yield the same results.??Searching for "Nov" will find all items that begin with these
three letters
.
Performing a Search Query
Search?Query is a robust feature that allows you to search multiple fields in a Contract or
Company Profile simultaneously.???This is useful if you want to locate very specific information
about your customers or contracts.
?
In the following example, a search is being performed to locate all the supplier contracts that
have a value of $10,000 or more, and are set to expire before the end of 2013
.
?
?
Search Query
link
Click to launch the Search Query Info screen.?
50 / 393
New button
Click to display the initial fields needed to set up a search query.
Filter Name field
Enter a descriptive name for the search.
Description field
Enter a description of the search
. Since search queries are saved, a
complete description will allow a complex search to be run again, or to be
slightly modified for future use.
Entity field
Make a selection to identify the type of information you want your search to
yield. The options are
Company, Company Document, Contract,
and
Contract Document
.
Search Parameter
list
Once a value is selected in the Entity field, the first search parameter field
displays. Click on the
arrow to display a list of searchable categories.
The options are
Company, Company History, Contract, Contract History,
and
Document
.
Expand icon
Click on the
icon for a search category to display a list of searchable fields
for that category.
Search fields
Click on field in the list to select the first search parameter. Once you select a
field, the
Parameter Inclusion and Parameter Value lists display so that you
can define/refine the search.
?
51 / 393
Parameter
Inclusion list
Select "IN" if you want the selections in the Parameter Value list to appear in
the search results. Select "NOT IN" if you want everything other than these
field values to appear in the search results. Use the "IS NULL" option to
display search results where the field has a zero (0) value or is empty. Use
the "IS NOT NULL" option to display search results where the field has a
numeric value or is populated.
Note:
If the search field is a
value
, the options are
Equals
,
Greater Than
,
Less Than
,
Is Null
, and
Is Not Null
.
If the search field is a
date
, the options are
Before
,
After
,
Greater than today
+ (x) days
, and
Less than today + (x) days
.
Parameter Value
list
Select as many values for the search parameter, as desired.
Note:
If the search field is a
value
or a
date
, you will be required to enter the
criteria for the number or date.
Operand buttons
If you want to add another search parameter, click the "AND" button to
increase your search results, or click the "OR" button to refine your results.
To remove any search field, click its Delete
icon.
Execute button
Click to run the search query without saving it.
Use only if you do not need to
run this search in the future
.
Save and Execute
button
Click to both run the search and save it so that you can easily run the same
search in the future.
Search results
View the search results at the bottom on the screen.
You can select several search parameters to locate the exact data you desire.??As you select
multiple parameters, each becomes a sub-parameter of the previous selection and the screen
displays this relationship as a hierarchy
.
?
?
?
Running a Saved Search Query
Once you have saved a search query, you can access it at any time, and re-run the search to
obtain the most current data. Saved searches are also used by the Search Query portlet where
they are stored on your Dashboard for easy access, and in the Charting portlet to filter the data
that is displayed visually, in a pie chart, line chart, or time line.
A search is saved by selecting the
Save and Execute
button, instead of the
Execute
button while performing a
search query
.
52 / 393
Search Query
link
Click to launch the Search Query Info screen.?
Load button
Click to display the Query Selection window.
Query list
Locate the query you want to run, and click on it to select it.
53 / 393
OK button
Click to load the query in the Search Query Info screen.
Execute button
Click to run the search query.
Note:
You can edit the search parameters, as needed, before running the
search. If you want to save your updates to the search, click the
Save and
Execute
button, instead of the Execute button.
Search Results
View the search results at the bottom of the screen.
Deleting a Search Query
You can easily delete a saved search query if it is no longer needed, or if an existing search
query can be substituted by slightly modifying it.
54 / 393
Search Query
link
Click to launch the Search Query Info screen.?
Load button
Click to display the Query Selection window.
Delete icon
Locate the query you want to delete, and click on its Delete
icon.
Delete
Confirmation
prompt
Click the
Yes
button to delete the search query.
Performing a Document Search
The Document Search?feature allows you to search for a document that has been uploaded to a
Contract or Company Profile.??To begin the document search, click on the Search section in the
Navigation Pane to display the search options.
55 / 393
?
Document
Search
link
Click to display a screen that will allow you to search for a document that has
been uploaded to a company or contract profile.?
Document Type
field
Select
Company Profile
or
Contract Profile
, depending on the location
where the document was uploaded.??To search both company and contract
profiles, select
All
.
Search criteria
field
Enter the name of the document.??If you do not know the name of the
document or only know a key word or phrase in the document, use a trailing
wildcard (denoted by an "
*
").
Search button
Click to run the search.
Search result
record
View the results of the system search for the document.
Document icon
Click on the
?icon to display a prompt that will allow you to view or save a
copy of the document.
56 / 393
My Place
The My Place?section of the Navigation Pane will take you to customized views of data that is
specifically related to you, as well as information that is available to all program users.
You can
perform the following tasks from the MyPlace menu:
·
Adding Portlets to the Dashboard
·
Viewing My Calendar
·
Viewing My Events
·
Viewing My Contracts
·
Viewing My Contract Requests
·
Viewing My Contract Approvals
·
Viewing the Address Book
·
Viewing Global Documents
·
Viewing Document Packages
·
Using Clauses
57 / 393
?
??
58 / 393
My Place Menu
MyPlace links will take you to screens where you can customize the views of
data that is specific to you (Dashboard, My Calendar, My Events, My
Contracts).??This menu also provides shared links to People, Global
Documents, Clauses, and Document Packages.
If you have made any
requests for a contract or are able to approve contract requests, the My
Requests and My Approvals links display.
?
?
Dashboard
The Dashboard is the screen that displays once you login to Novâtus Contracts. You can return
to this screen at any time by clicking the Dashboard
button in the Action Bar that
displays at the top of every screen.
The Dashboard can be customized to display
portlets
, which are windows that contain links to
the data you need at your fingertips. Most portlets provide quick and easy access to activities,
like your upcoming events and tasks, all your active workflow items, and any document
packages for which you are a member. There are also portlets that display a list of the company
and contract profiles that you visited recently. The special
"charting" portlet
displays a visual
representation of the key elements of your data using a pie chart, bar chart, or time line. There is
even a
Search Query portlet
that allows you to store the parameters of a search if you need
regular access to queried information, plus it saves you the time and trouble of performing the
same search every time you log into Novâtus Contracts.
Adding a Portlet
You can add portlets to the Dashboard so that the information you need is always available once
you login to Novâtus Contracts. You can easily remove a portlet from the Dashboard by simply
clicking on its Close
button.
59 / 393
Add Portlet button
Click to display the Add Portlet prompt.
Portlet Name field
list
Make a selection in the list (
Recently Viewed Companies
,
Recently Viewed
Contracts
,
Upcoming Events, Upcoming Tasks, Active Workflow Items,
Search Query, Charting,
or
Document Packages
).
Add button
Click to add the selected portlet to the Dashboard.
60 / 393
Portlet buttons
Expand/collapse the Portlet
Close Portlet
Open Portlet Settings (displays only if additional options are available for
the portlet)
Column display
Click on the down arrow
to the right of any field heading to display a menu
that will allow you to select the columns that display in the portlet. Select the
columns of information you want to display by clicking inside the appropriate
checkbox. To remove a column of information, click inside a selected field to
remove the checkmark.
A portlet
can be repositioned on the screen by clicking in the header section of the window
until a navigation symbol
displays, and then dragging and dropping it to the desired
location.
Using the Query Search Portlet
61 / 393
You can add a portlet to your Dashboard that allows you to quickly run any of the searches you
have saved using the
Search Query
feature.
If you are not on the Dashboard, click the Dashboard
button in the Action Bar
that displays at the top of every screen
.
Add Portlet button
Click to display the Add Portlet prompt
.?
New button
Select
Search Query
in the list.
Add button
Click to add the Search Query portlet to the Dashboard.
Open Portlet
Settings button
Click the
button to display the Query Selection window with additional
options for the portlet
.
62 / 393
Entity list
Select the category for the search in the Query Selection window
. The options are
Company, Company Document, Contract,
and
Contract Document
.
Query list
Select the saved search you want to run.
The list contains all of your saved
search
queries
.
OK button
Click to run the saved search.
Search
results
View the search results in the Search Query portlet
.
Using the Charting Portlets
Charting is a special portlet that allows you to design a color-coded illustration, representing one
63 / 393
or more elements of the contract (or company) information stored in your Novâtus Contracts
database. You define the parameters for the data that you want displayed graphically by
selecting the medium (pie chart, bar chart, time line), and then defining one or two company
variables (
category, group, status
, or
type
) and/or contract variables (
agreement type, group,
location, status, legal entity, term type, or currency
).
There are three options for displaying information in the charting portlet:
·
Pie Chart
·
Bar Chart
·
Time Line
Generating a Pie Chart
If you are not on the Dashboard, click the Dashboard
button in the Action Bar
that displays at the top of every screen
.
In the following example, a pie chart is being created to show the breakdown of contracts, by
agreement type, which have an effective date of January 1, 2010 (and later), and are valued at
more than $25,000
.
64 / 393
Add Portlet button
Click to display the Add Portlet prompt
.?
New button
Select
Charting
in the list.
Add button
Click to add the Charting portlet to the Dashboard.
Open Portlet
Settings button
Click the
button to display the Chart Design window with additional
options for the portlet
.
If you use only one variable in your pie chart, the callout sections of the pie will show the
calculated totals for the variable you selected in the
X-Axis Field
. If you use more than one
variable by making a selection in the
Y-Axis Field
and then selecting an
Aggregate option
, the
callout sections of the pie will display only the calculation for the Y-Axis Field.
Chart Name field
Enter a name for the pie chart.
Chart Type list
Select
Pie Chart
in the list.
65 / 393
X-Axis or Group
By Field list
Select a Company option (
Category, Group, Status, Type
) or select a
Contract option (
Agreement Type, Contract Group, Contract Status,
Contract Location, Term Type, Legal Entity, Currency Type
) to identify the
information you want displayed in the pie chart.
Y-Axis Field
Select an additional Contract option (
Contract Value, Notice Period,
Proposed Value, Renewal Interval
)
only if
you want the program to
calculate one of these variables versus the selection you made in the
X-Axis
Field
. If so, you must select the
Sum
,
Average
,
Min
, or
Max
aggregate
option to indicate the type of calculation.
Aggregate
Options radio
buttons
Select the
Sum
or
Average
radio button to display the contract information
as a
total
or an
average
of the total. Select
None
if you
do not
want the
information to be grouped. The
Min
and
Max
options are typically used in
bar charts and time lines, but can be used in pie charts if you want to display
only the high end and low end of your information.
Date Options
fields
Enter a date in the
Start
and/or
End
fields if you want to select a timeframe
for your chart. You can also click on the
Calendar
icon to use the pop-up
calendar in the date fields.
Date Group
Options radio
buttons
Select
Day
,
Month
, or
Year
if you want to group the timeframe for the
contract (or company) data by the day, month, or year.
Search/Query
Filter list
Make a selection in the list if you want to apply a previously saved
search/
query
to the information chart.
This feature is used to limit the results
displayed in the chart or graph
.
OK button
Click to generate the pie chart.
Pie Chart and
Legend
View the results of your chart design in the Charting portlet on your
Dashboard. Mouse over a section of the pie chart to "call out" this section of
the pie with a pop-up showing its calculated value.
66 / 393
Generating a Bar Chart
If you are not on the Dashboard, click the Dashboard
button in the Action
Bar that displays at the top of every screen
.
In the following example, a bar chart is being generated to show the average value of all the
pharmaceutical contracts by status (active, draft, inactive) that have an effective date of January
1, 2010 (and later).
67 / 393
Add Portlet button
Click to display the Add Portlet prompt
.?
New button
Select
Charting
in the list.
Add button
Click to add the Charting portlet to the Dashboard.
Open Portlet
Settings button
Click the
button to display the Chart Design window with additional
options for the portlet
.
68 / 393
Chart Name field
Enter a name for the bar chart.
Chart Type list
Select
Bar Chart
in the list.
X-Axis or Group
By Field list
Select a Contract option (
Agreement Type, Contract Group, Contract
Status, Contract Location, Term Type, Legal Entity, Currency Type
) or
select a Company option (
Category
,
Group, Status, Type
) to identify the
variable you want displayed along the bottom (or X-Axis) of the chart.
Y-Axis Field
Select a Contract option (
Contract Value, Notice Period, Proposed Value,
Renewal Interval
) to identify the variable you want displayed along the left
margin (or Y-Axis) of the chart.
Aggregate
Options radio
buttons
Select the
Sum
or
Average
radio button to display the Y-Axis data as a
total
or an
average
of the total. Select the
Min
or
Max
option if you want to
display only the high end and low end of your data.
The "None" option is not
valid in a bar chart if
Month
or
Year
is selected in
Date Group Options
.
Date Options
fields
Enter a date in the
Start
and/or
End
fields if you want to select a timeframe
for your chart. You can also click on the
Calendar
icon to use the pop-up
calendar in the date fields.
69 / 393
Date Group
Options radio
buttons
Select
Day
,
Month
, or
Year
if you want to group the timeframe for the
contract (or company) data by the day, month, or year.
Search/Query
Filter list
Make a selection in the list if you want to apply a previously saved
search/
query
to the information chart.
This feature is used to limit the results
displayed in the chart or graph
.
OK button
Click to generate the bar chart.
Bar Chart
View the results of your chart design in the Charting portlet on your
Dashboard. Mouse over a section of the bar chart to highlight it and display a
pop-up showing the calculated value.
70 / 393
Generating a Time Line
If you are not on the Dashboard, click the Dashboard
button in the Action Bar
that displays at the top of every screen
.
In the following example, a time line is being generated to show the total value of contracts that
expired at the end of each year, for the last five years
.
Add Portlet button
Click to display the Add Portlet prompt
.?
New button
Select
Charting
in the list.
Add button
Click to add the Charting portlet to the Dashboard.
Open Portlet
Settings button
Click the
button to display the Chart Design window with additional
options for the portlet
.
71 / 393
Chart Name field
Enter a name for the time line chart.
Chart Type list
Select
Time Line Chart
in the list.
X-Axis or Group
By Field list
Select a Contract option (
Created on, Effective Date, Current Expiration
Date, Original Expiration Date, Notice Date,
) or select the Company option
(
Company Created On
) to identify the variable you want displayed along the
bottom (or X-Axis) of the chart.
Y-Axis Field
Select a Contract option (
Contract Value, Notice Period, Proposed Value,
Renewal Interval
) to identify the variable you want displayed along the left
margin (or Y-Axis) of the chart.
Aggregate
Options radio
buttons
Select the
Sum
or
Average
radio button to display the Y-Axis data as a
total
or an
average
of the total. Select the
Min
or
Max
option if you want to
display only the high end and low end of your data.
The "None" option is not
valid in a time line if
Month
or
Year
is selected in
Date Group Options
.
Date Options
fields
Enter the start date to begin tracking data in the
Start
field,
and then enter
the end date in the
End
field. You can also click on the
Calendar
icon to
use the pop-up calendar in the date fields.
72 / 393
Date Group
Options radio
buttons
Select
Day
,
Month
, or
Year
if you want to group the timeframe for the
contract (or company) data by the day, month, or year.
Search/Query
Filter list
Make a selection in the list if you want to apply a previously saved
search/
query
to the information chart.
This feature is used to limit the results
displayed in the chart or graph
.
OK button
Click to generate the time line chart.
Time Line Chart
View the results of your chart design in the Charting portlet on your
Dashboard. Mouse over a point on the time line to display a pop-up showing
a date and its calculated value.
Viewing My Calendar
73 / 393
My Calendar displays a monthly calendar showing all events and tasks assigned to you or
assigned by you to other users. You can also view past months and years, as well as adjust the
view so that events and tasks are hidden
.
My Calendar is accessed from the
My Place menu
in
the Navigation Pane.
?
?
My Calendar
link
Click to view Events and Tasks assigned to you (or by you), in a calendar
view.
Mini Calendar
buttons
Click on the forward
and back
arrows to scroll through future and
past months. Click on the down
arrow to change the calendar year.
Click on the
button to return to today's date.
Monthly
timeframe field
Click on the forward
or back
arrow to advance/return to the previous
month's view.
Note:
The calendar view always contains an additional week
or two, showing either the last week of the previous month or the first week of
the next month (or both).
Event/Task
buttons
Click to jump to the company/contract profile screen where you can view
information on your tasks and events. Click the program's back
button to
return to your calendar.
Hide My Events
Hide My Tasks
Click to hide/display your events and tasks on the calendar. Hide My Events
controls the display of events assigned to you. Hide All Events controls the
display of all events assigned to you and by you. Hide My Tasks controls the
74 / 393
Hide All Events
toggle buttons
display of tasks assigned to you.
?
Viewing My Events
The My Events?browse screen displays a list of all events for which you are the "owner."??You
can assign yourself the role of owner when you create an event, or another user can create an
event and designate you as the owner. You can customize the Event browse screen to meet
your data viewing and access needs by
selecting the columns that display
, reordering the
columns, and sorting the data. My Events is accessed from the
My Place menu
in the
Navigation Pane
.
?
?
My Events
link
Click to view your Event Browse screen with a list of all your events.?
Event records
View a summary of the events for which you are the owner. To display
additional information for the event, click on the event record to display the
Event Profile. From the profile, you can edit the event, delete it, mark it as
completed, or subscribe to the event
.?
?
?
Viewing My Contracts
There are four contract browse screens available from the
My Place?menu
.??You can view all the
contracts for which you have some responsibility, or you can view your contracts by their status:
active, in process, or inactive
.
?
75 / 393
?
?
My Contracts
link
Click to view your MyContracts browse screen with a list of all the contracts
for which you have some responsibility. To view only your active contracts,
click on the
My Contracts (Active)
link. To view only the inactive or in
process contracts, click on the
My Contracts (Inactive)
link or the
My
Contracts (In Process)
link
.
Contract records
View a summary of the information for your contracts. To display additional
information for a contract, click on the contract record to display its Contract
Profile. From the profile, you can print, edit, or copy the contract, add an
incorporated contract, add a workflow, run any of the available wizards,
generate a report, or archive the contract
.
Document icon
Click on the
?icon to display a list of the documents associated with the
contract.??Click on a document in the list to display an Open prompt that will
allow you to open the document in its default format or download the
document.
Viewing the Address Book
The People?browse screen lists all the Company People, External People, and Users of the
program.??The view can also be customized to show individual categories of people
.
The People
browse screen is accessed via the People link in the
My Place menu
in the Navigation Pane.
?
?
76 / 393
?
People
?link
Click to view an alphabetized list of all the people in
your Novâtus Contracts
database
.
People menu
Click on the
arrow if you want to change the view from
All People
to
Company People
,
External People
, or
Users
.
Person record
Click on any record to open that person's profile where you can obtain
additional information for the person
.
Note:
To locate a specific person, use
the
Search
field or click on any heading (
First Name
,
Last Name
) to change
the sort order of the records and then page through the list
.
Add External
Person button
Click if you want to add a new external person to the database. A screen
displays that allows you to add an external contact.
Add Company
Person
Click if you want to add a new contact person to a company. A prompt
displays, asking you to select the company. Once you select a company, a
screen displays inside the Company Profile where you can add a new
company contact person.
You also have the option of adding a new
company, and then adding a person to the contacts for the new company.
Viewing Global Documents
The Global?Documents browse screen contains documents that are available to all users for
downloading. This is a good location to store documents?that need to be accessed by all users,
such a contract in draft form
.
The Global Documents browse screen is accessed via the Global
Documents link in the
My Place menu
in the Navigation Pane
?
?
Global
Documents
link
Click to open the Global Documents Browse screen.
77 / 393
Global Document
record
Click on a document to open its Document Profile. From the Document
Profile, you can edit the document, download it, upload a revision, or delete
the document
.
Document
Revision Number
If more than one version of the document exists, a number other than "1"
appears in the Revision column. Click the Expand
icon to view and/or
download other revisions of the document
.
Document icon
Click on the
?icon to
display an Open prompt that will allow you to open the
document in its default format or download the document
.
New Document
button
Click if you want to add a new document to the
Global Documents
Repository.
?
?
?
Clauses
The Clause Library is a repository for substitute contract language, and the clauses that are
stored in the library can be viewed and managed by all program users. Contract clauses are
categorized
are categorized by your program administrators (e.g.,
legal terms
and
business
terms
) and
are viewed and managed from the Clause Library browse screen.
From the Clause Library browse screen, you can:
·
View a list of available contract clauses
·
Copy and paste clause language
·
Add a contract clause to the library
·
Edit a contract clause
·
Delete a contract clause
Viewing Contract Library Clauses
The contract clauses stored in the Clause Library are categorized as either
legal terms
or
business terms
and are viewed and
managed from the Clause Library browse screen
.
?
78 / 393
?
?
Clauses
link
Click to open the Clause Library browse screen.?
Clause categories
and records
Locate the category for the type of clause you want to use (e.g.,
Business
Terms
or
Legal Terms
) and view the list of available clauses in this category
.
Expand icon
Click on the
icon for a clause to view the alternate contract language
.
?
?
?
Copying & Pasting a Contract Clauses
From the Clause Profile screen, you can copy the alternative contract language stored in the
Profile and then paste it into another document.
79 / 393
??
Clauses
link
Click to open the
Clause Library b
rowse screen.
Clause records
Locate the clause you want to copy, and then click on it to display its
Clause Profile.
Note:
Clauses are grouped by categories
.
?
?
Clause Text field
Select the text you want to copy by using your mouse to shade the text.
Then, simultaneously depress the "Ctrl" key and the letter "c" key on your
computer keyboard. Open the document where you want to paste the text
you just copied. Position your cursor at the precise location in the
document where you want to past the text, and then simultaneously
depress the "Ctrl" key and the letter "v" key on your computer keyboard.
80 / 393
Back to Browse
button
Click to return to the Clause Library browse screen.
?
?
Adding a Contract Clause
You can easily add a contract clause to the library from the Clause Library browse screen.
Clauses
link
Click to open the
Clause Library
browse screen.
New Clause
button
Click to display a screen that will allow you to add a new contract clause to
the library
.
81 / 393
Clause Name
field
Enter a descriptive name for the new clause.
Clause Type list
Select an option in the list that most accurately describes the type of clause
you are adding.
Clause Category
list
Select an option in the list that most accurately describes how the clause
you are adding should be categorized.
Clause Text field
Paste the text for the clause into the field, or type the information in the field.
Use the bold, italic, and underline formatting features, as needed.
Save button
Click to save your information and add the clause to the Clause Library.
Editing a Contract Clause
You can quickly and easily edit any of the clauses in the Contract Library from the Clause Profile
screen. To access the Profile screen, click the
Clauses
link in the MyPlace menu in the
Navigation Pane
. Locate the clause you want to edit in the
Clause Library browse screen
, and
click on it to display its Caluse Profile screen. Click on the
Edit Clause
button in the Action Bar
to display the Clause Profile in edit mode.
82 / 393
Clause Name
field
Type over the existing text if you want to change the name of the clause.
Clause Type list
Make a different selection in the list if you want to change the clause type.
Clause Category
list
Make a different selection in the list if you want to change the way the clause
is categorized in the browse screen.
Clause Text field
Replace or modify the existing text if you want to update the wording of the
clause. Use the bold, italic, and underline formatting features, as needed.
Save button
Click to save your changes and edit the contract clause.
Deleteing a Contract Clause
You can easily delete a clause from the Contract Library if it becomes obsolete or is no longer
used in any of your company's contracts. Deleting a contract clause is accomplished from the
clause's Profile screen.
To access the Profile screen, click the
Clauses
link in the MyPlace section of the
Navigation
Pane
. Locate the clause you want to delete in the
Clause Library browse screen
, and click on it
to display its Clause Profile screen
.
83 / 393
Delete Clause
button
Click to display a Delete Clause prompt to confirm your intent to delete the
clause
.
Yes button
Click to delete the clause from the Clause Library
.
Viewing Document Packages
The Document Packages?link will only be present if you will be involved in online contract
negotiations using the Portal.??If you are a member of any document packages, which include all
the documents that are used during contract re-negotiation, they will be displayed in your
Document Packages screen
.?
?
?
?
Document
Packages
link
Click to open the Document Packages Browse screen.
Document
Package record
View your active document packages in the
Current
(default) view. To view
document packages that have been
Checked Out
,
Submitted
, and
Completed
, click on the appropriate tab. Click on the
All Packages
tab to
display all document packages that have not been completed and click on
the
All Completed
tab to view all completed document packages.
Document
Package icons
To use the onscreen icons for a document package, click on the package to
select it, and then click on an icon. Using the icons, you can change the
email notifications for the document package, manage the user permissions,
view the Document Package Profile, complete the document package, delete
it, submit it for electronic signature, and return to the Contract Profile
.?
84 / 393
Document
Package Actions
To perform an action for a document package, click on the package to select
it, and then click on an action icon. Using the action icons, you can check
out a document in the package, lock a document, view the document revision
history, download a document, or delete a document in the package.
My Contract Requests
If you do not have permissions to create a contract, you can submit a request to have a contract
created. You can also monitor the progress of your contract requests
.
Contract requests are
made
and
viewed
from the My Requests browse screen, which is
accessed by clicking on the
MyRequests
link in your My Place menu in the Navigation Pane
.
?
85 / 393
Viewing My Contract Requests
The My Requests browse screen contains a list of the documents that you have
requested.??Once you have requested a contract document, you can view the progress of your
request from this browse screen.
?
?
?
My
Requests
link
Click to open the My Requests browse screen.
Request
record
categories
View the status of your contract request(s). The requests that are currently being
processed are listed under the
Processing
category. The requests that have not
been processed are listed under the
Submitted
category
.
Submitted
Request
records
View the only information available for submitted requests, which is the date and
time you created the request.
In-Process
Request
records
View the information for your contract requests under these column headings:
·
Processed By
- name of person assigned to your request
·
Processing Started
- date the person assigned to your request first began
reviewing it
·
Completed On
- date the person assigned to your request completes
(approves/disapproves) it
?
Requesting a Contract Document
86 / 393
A contract request is initiated from the My Requests browse screen
.
?
?
?
My Requests
link
Click to open the My Requests browse screen.
New Request
button
Click to open the Select a Request Type window.
Request Type
records
Locate the type of contract you want to request, and click on it to display the
Contract Request screen.
87 / 393
Company Name
list
OR
New Company
radio button
If the company for your contract request already exists in the database, make
a selection in the
Company Name
field list.
If the company is a new company, click the
New Company
radio button and
enter the name of the company in the
Company Name
field when it displays.
Contract
Description field
Enter a description of the contract you are requesting.
Required fields
and optional fields
Populate all the required fields.
Also populate the optional fields if you have
this information.
Save button
Click to save your contract request.
After the contract request has been saved, the screen redisplays with a document upload option
so that you can upload the document you are requesting to be approved as a contract
.
New Document
button
Click to display fields that will allow you to upload a document and provide
information about the document.
88 / 393
Document Type
list
Select the type of document you are uploading.
File upload field
Click on the
Select
button to display a File Upload window that allows you to
navigate to a document file on your computer.
Document data
fields
Populate the Author, Effective Date, Current Expiration Date, and Description
fields for the document being uploaded. You can also click on the
Calendar
icon to use the pop-up calendar in the date fields.
Submit Request
button
Select to submit the contract request
.
89 / 393
My Contract Approvals
If you have been given permission to approve contract requests, the My Approvals link will
appear in your
MyPlace menu in the Navigation Pane.
Click on the
My Approvals
link to display the My Approvals browse screen. From this browse
screen, you can:
·
View the contract requests awaiting your approval
·
Process a contract request
90 / 393
Viewing My Contract Approvals
If you have been asked to approve any requests for contracts to be added to the database, these
requests?will appear in your My Approvals?browse screen.?
?
91 / 393
My Approvals
link
Click to open the My Approvals browse screen.
Contract Request
records
View the contract requests pending your approval. Requests are grouped
under one of two headings:
Pending
(no action has been taken) and
Processing
(some action has been taken). If you have completed the
request, a date and time stamp appears in the
Completed On
column.
Add icon
Click on the
icon to begin
processing a contract request
.
?
Edit icon
Click on the
icon to continue
processing a contract request
that you
have partially processed.
?
?
Processing a Contract Request
Processing a contract request involves reviewing the request, providing mandatory information
for the contract, and assigning individuals responsibilities associated with the contract.
Contract requests are processed from the
My Approvals
browse screen. To begin processing a
new request, click on its
icon. To continue processing a request, click on its
icon.
You can exit the contract approval process at any point prior to completing the
process
.
You can resume the approval process by simply clicking on the
icon for
the contract request.
?
92 / 393
?
?
Document icon
Click on the
icon to open the document attached to the contract request.
The attached document is provided by the requestor in support of his/her
contract request
.
Change Company
button
Click to display a list that will allow you to change the name of the company.
Review/Create
Contract button
Click to review the contract request and create the contract.
Decline Request
button
Click to decline the contract request.
Reassign button
Click to display a Reassign Request window that allows you to select an
individual from a list of those qualified to approve the contract request. Once
you click the
Reassign
button in this window, the contract request is
transferred to the selected individual's My Approvals browse screen.
93 / 393
?
When you approve a contract request, a Contract Profile is created.??You then have to provide
the required information in order to save the Contract Profile
.?
?
?
?
Required fields
Enter the required information for the contract request: Contract Group,
Legal Entity, Agreement Type, Contract Type, Term Type, Original Exp Date,
and Status.
Optional fields
If known, enter the optional information for the contract request: Proposed
Value, Contract Location, Renewal Interval, Notice Period, and Notice Date.
Add
Responsibility
button
Click to assign one or more areas of responsibility to the contract, such as
the Contract Manager, Contract Owner, and Negotiator.??You must then
assign an individual to each area of responsibility.
Save button
Click to save your information and approve the contract request.
?
94 / 393
Companies
Company information is stored in a company profile in the
Novâtus system, along with all of the
contracts for that company. The primary tasks associated with companies are:
·
Accessing the Company Profile
·
Viewing additional contract information through linked data screens
·
Managing Companies
·
Using
Company Wizards
·
Creating Workflows
·
Identifying Company AKAs, DBAs, and FNAs
·
Managing Company Locations
?
Company Profile
A Company Profile provides basic information on the company, including contact information,
TIN (Taxpayer Identification Number) and DUNS (Dun & Bradstreet) number, and the profile also
houses all the contracts for the company.??The Company Profile contains an
Action Bar
that
allows you to perform company-related tasks.??The profile also contains
links
to view additional
information for the company.
A Company?Profile is accessed by clicking on a company record in:
·
any
Company browse screen
·
the
Recently Viewed Companies
portlet
in the Dashboard
95 / 393
?
?
Company Action
Bar
Provides buttons that allow you to perform company-related tasks.?
Company Data
fields
Provides basic company data, such as its physical and website addresses,
Tax ID number, DUNS number, a description, and the company type (e.g.,
supplier, distributor, manufacturer, or service provider).??The Profile also
contains program-specific information, such as the company number, group,
category, and status.??The company number consists of the first four letters
of the company name, followed by a six-digit number.
Company links
Provides access to the contracts, tasks, events, messages, and people
associated with the company.
Company
Contract records
Lists the contracts associated with the company.??Click on a contract record
to view the Contract Profile.??Click on the Document icon
?to display a list
of uploaded documents for the contract.??Click on a document in the list to
display an Opening window so you can view or download the document.
Using the Company Profile Action Bar
The Action Bar in the
Company?Profile
contains several icons, which when selected, allow you to
perform one or more tasks.?
96 / 393
?
?
?
Edit Company
button
Displays the fields in the Company Profile in an editable mode so the
company information can be updated.
Add Contract
button
Displays a new Contract Profile screen so a new contract can be added to
the company profile.
Admin Tools
button
Allows you to perform four tasks: (1) record an acquisition or merger if the
company has been merged with or acquired by another company using the
Merger/Acquisition Wizard (2) change the name of the company using the
Company Name Change Wizard (3) archive the company, and (4) mark (or
unmark) the company as a legal entity.
Workflows button
Displays a screen that shows the active and completed workflows for the
company. A new workflow can also be created from this screen.
One Click Report
button
Displays a screen showing key company information, as well as data on the
company locations, contacts, documents, tasks, events, and
contracts.??Clicking the Print button
?will print a copy of this report.
Report button
Allows you to run any of the reports you created and saved.
Print button
Allows you to print the One-Click Report.
Help button
Displays a menu with company-related help topics.??When a topic is
selected in the menu, the Novâtus User Guide displays and is open to the
specific location in the guide where the selected topic is covered.
?
Company Links
The
Company Profile
contains basic information for a company. The profile also contains links
to the following screens, which are used to store additional information, upload documents, and
send/receive email messages
:
97 / 393
·
Contracts
·
Documents
·
Tasks
·
Events
·
Messaging
·
People
·
Locations
·
Additional Names
·
Additional Forms
·
History
Company Contracts
The Contracts link is used to display a browse screen showing all of the company's
contracts.??You can customize the browse screen to display only the contract data that is
relevant to you.
?
98 / 393
Contracts
link?
Click to display a list of the company's contracts.
Contract record
?
Click on a contract record to display its Contract Profile where you can view
additional data for the contract.??From the profile, you can edit the information for
the contract, create workflows, run reports, run program wizards, or archive the
contract.?
Document icon
?
Click on the
?icon for a contract to view it.??A prompt will display, which allows
you to open or save a copy of the contract.?
New Contract
button
Click to display a screen that will allow you to add a new contract.
?
The fields that display when any of the links are selected in a Company Profile can be
customized to show only the data that is relevant to you.??You can also sort the data in a
column, re-order columns of data, and re-size columns
.
Documents
The Documents link is used to display a browse screen showing the documents the company
uses in association with its contracts.??You can customize the browse screen to display only the
document data that is relevant?to you.
?
?
Documents
link
Click to display a list of the documents associated with the company.
Document record
Click on a document record to display its Document Profile where you can
view additional information for the document.??From the profile, you can edit
the document's information, upload a revision, compare revisions, download
the document, or delete it.?
Document
Revision Number
Indicates how many revisions of the document have been uploaded.
99 / 393
Document icon
Click on the
?icon to view an uploaded document.??A prompt will display,
which allows you to open or save a copy of the document.?
New Document
button
Click to display a screen that will allow you to add a new company
document.??You can also upload a revision to the document and compare
revisions.?
Multi-Print button
Click to select multiple documents for printing.
Tasks
The Tasks link is used to display a browse screen?listing all the tasks that have been assigned
for the company
.?
?
?
?
Tasks
link
Click to display a list of the active tasks for the company.?????
Task record
View the tasks for the company.??
Tasks displayed in red have not been
completed and are past due
.?
Group Tasks By
Field option
Click on any column heading and select the
Group By This Field
checkbox
in the menu to group tasks by this field in the browse screen.
100 / 393
Complete Task
icon
Click on the
?icon to display a Task Completion window that will allow you
to enter notes on how and when the task was completed.
Task calendar
Click on the
?icon in the
Due Date
field to display a pop-up calendar where
you can select a new due date if you want to reschedule a task.
Show Completed/
Hide Completed
toggle buttons
Click the
Show Completed
button to show both active and completed
tasks.??Click the
Hide Completed
button to hide completed tasks.?
Add Task button
Populate the
Subject
,
Due Date
,
Owner
,
Task Created On
, and
Task
Created By
fields and then click this button to add a task.
Add Task List
button
Click to create a task list from a selection of available task lists.
Events
The Events link is used to display a browse screen showing all the events for the company.??You
can customize the browse screen?to display only the event data that is relevant to you
.
?
?
?
Events
link
Click to display a list of the events for the company.
Event record
Click on an event record to display its Event Profile with additional
information for the event.??From the profile, you can edit information for the
event, complete the event, or delete it.??If the event is part of a series, you
can close the event series from the Event Profile, as well as view the
completion history for the series.
101 / 393
New Event button
Click to display a screen that will allow you to add a company event.
Messaging
The
Messaging
link is used to both create messages and view all existing messages that have
been sent from the Company Profile
.?
Creating a Message
You can easily create an email message from a Company Profile and attach one or more
documents to the message. The Address Book automatically displays so that you can select all
the desired recipients for your message.
?
?
Messaging
link
Click to display a Messaging window, which allows you to create an email
message and attach documents
.
New Thread
button
Click to display the Messaging window.
102 / 393
?
?
Message To
and Message
Cc lists
Click on the
icon to display the Address Book. Click on all the recipients for
the email message, and then click the
Submit
button
.?????
Subject line
Enter the subject of your email message
.?
Message body
Enter the text for your message.
Attach
Document
button
Click if you want to send an attachment with the email message.
The Attach
Document window displays
.
Company and
Global
Documents
tab
Click on the
Company Documents
or
Global Documents
tab to see a list of
available documents in the selected category
.?
Company or
Global
Document
record
Locate the document you want to attach to the email message and click on it to
select it.
Note:
To quickly locate a document, click on a column heading (e.g.,
Document Type, Filename, Author) to sort the list of documents in alphabetical
order
.
Attach
Selected
Documents
button
Click to attach the document to the email message and close the Attach
Document window.
If you want to add more than one document, simply repeat
the process.
103 / 393
Send button
Click to send your email message.
Viewing Messages
You can view the messages sent from the Company Profile in a central location. You can
also reply to an email message stored in the profile, as well as delete any message
threads
.
Messaging
?link
Click to display a list of the messages sent from the Company Profile.?????
Message record
Click on a message record to view the body of the message.?
Message body
View the content of the message.
Reply button
Click to send a reply to the message.
Delete Thread
button
Click to delete the message thread.?
104 / 393
?
The Messaging window is separate from the program screens and can be re-sized and moved
onscreen.??To exit the Messaging window, click the Close button
.
People
The People link is used to display a browse screen showing a list of all the people associated
with the company's contracts.??You can customize?the browse screen to display only the
person-related data that is relevant to you
.
?
?
?
People
link
Click to display a list of people associated with the company's contracts.?????
Person record
Click on an individual's record to display their Person Profile with additional
information for that person.??From the profile, you can edit a person's
information or delete the person.??You can also add a new person to the
Company Profile from this screen.?
Add Person
button
Click to display a screen that will allow you to add a person to the Company
Profile.
Locations
The Locations link is used to display a browse screen showing a list of all the company's
locations. You can customize the browse screen to display only?the location data that is relevant
to you
.
?
105 / 393
?
?
Locations
link
Click to display a list of locations for the company.?????
Location record
Click on a location record to display a Location Profile with additional
information for that location.??From the profile, you can edit the information for
a location or delete the location.?
Add Location
button
Click to display a screen that will allow you to add a new location for the
company or one of its contracts.
Relationships
The Relationships link displays if the company?has relationships to other companies in the
Novâtus system and is used to display a browse screen showing these relationships.??For
example, a company may have a parent company with a different company name
.
History
The History link is used to display a browse?screen showing all of the updates that have been
made to the Company Profile
.
?
106 / 393
?
?
History
link
Click to displays a historical record of all changes made to the Company
Profile.
History record
View the change that has been made to the Company Profile.?
Additional Names
The Additional Names link is used to display a browse?screen that will show whether a company
has an AKA (also known as), DBA (doing business as), or FKA (formerly known as)
.?
?
?
?
Additional
Names
link
Click to display a browse screen with a list of additional names for the
company.
Additional name
record
Click on an additional name record to display an Additional Names Profile
with additional information on the AKA, DBA, or FKA.??From the profile, you
can edit the information or delete the additional name.?
107 / 393
Add Name button
Click to display a screen that will allow you to add an additional name for the
company.
Additional Forms
The Additional Forms link is used to display a browse?screen showing any additional forms that
are used by the company
.?
?
?
Additional
Forms
link
Click to display a browse screen with a list of additional forms used by the
company.?
Additional Form
record
Click on an additional form record to display a list of the forms for this type of
form.?
Additional Form
Profile record
Click on an additional form record to display an Additional Forms Profile with
additional information on the form.??From the profile, you can edit the form's
information.
New [Form
Name] button
Click to display a screen that will allow you to add a new form of this type to
the Company Profile.
Company Management
The
Company Profile
stores basic information,
linked information
, and
contract data
. In
managing the basic information in the profile, you can:
108 / 393
·
Edit company information
·
Mark a company as a legal entity
·
Unmark a company as a legal entity
·
Add a new company
Adding a Company
You can add a new company from the Companies?section of the
Navigation Pane
.
?
?
?
New Company
link
Click to display the New Company Entry screen.?
Required fields
Enter the required information for the new company:??
Company Name
,
Company Group
, and
Status
.??If these fields are not populated, you will not
be able to add the company.??
Company Number is also a required field but is
automatically assigned by the system.??The number consists of the first four
letters of the company name, followed by a 6-digit number.??However, you
can replace the system-generated number with your own company number
.
109 / 393
Optional fields
Enter optional information for the new company: DUNS number, Tax ID
number, website address, physical address, company type and category,
state of incorporation, and a description.??If a question mark
?appears next
to a field list, you can type the first letter of your entry into the field to
automatically populate the field, without having to scroll through the list of
available entries. For the
Phone Number
and
Fax Number
fields, click on
the
icon to display
a Phone Number Entry
window, which stores and
correctly formats the number using the area code, number, and any
extension. A country code field is also provided for international phone and
fax numbers.
Save button
Click to save the information and display the Company Profile.
?
The program automatically populates the Company Number field once you enter the
Company Name.??However, you can edit the field and assign your own unique company
number.
Editing Company Information
The information in the Company?Profile can be edited if changes need to be made.?
?
To edit a
Company Profile
, click the
Edit Company
button in the
Action Bar
.??
If you do not have
administrative permission to edit a Company Profile, this button will not appear in your Action
Bar
.
?
110 / 393
?
?
Company fields
and lists
Update the information in the company fields.??If a question mark
?appears
next to a list you are editing, type the first letter of your update into the field to
automatically populate the field, without having to scroll through the list of
available entries.
Save button
Click to save the changes to the Company Profile.
Marking a Company as a Legal Entity
In the Novâtus system, companies are divided into two categories: external and internal.??The
term "company" in Novâtus refers to the "other party" that has entered into a contract with your
company.??These other parties can be customers, suppliers, or vendors, and are considered
external companies.??Internal companies are all of your "legal entities," which include your main
company and any subsidiaries or other entities that you will list as a party to a contract.??Both
categories, external (companies) and internal (legal entities), have a full Company Profile in the
Novâtus system.??This facilitates creating contracts between companies and legal entities, as
well as between legal entities (if you engage in this practice).??However, contracts cannot be
created between two external companies.
?
The Mark As Entity function is used to identify your internal legal entities.??It is recommended that
you mark all the companies that you list as parties to a contract as legal entities.
?
?
?
?
Mark As Entity
function
Click the
Admin Tools
button in a
Company Profile
Action Bar
, and select
Mark as Entity
in the menu.?
Request
Complete
message
Click
OK
when the message displays confirming that the company has been
marked as an internal legal entity.
111 / 393
Unmarking a Company as a Legal Entity
In the event a company is no longer considered a legal entity, you can unmark it as
such.??However, if the company is currently assigned as the legal entity on any contracts, you
will not be able to "unmark" it until you first remove or reassign all its contracts to a different legal
entity.??This is accomplished using the Advanced Edit Tool in the Admin section of the
Navigation
Pane
.
?
?
?
?
Unmark As Entity
function
Click the
Admin Tools
button in a
Company Profile
Action Bar
, and select
Unmark as Entity
in the menu.
Request
Complete
message
Click
OK
when the message displays confirming that the company has been
unmarked as an internal legal entity.
?
All contracts must be removed or reassigned to another company before a company can be
unmarked as an internal legal entity.
Company Wizards
The
Action Bar
in the
Company Profile
contains an
Admin Tools
button that displays a menu,
which provides access to two company wizards and a feature that allows you to archive a
company.
·
Merger/Acquisition wizard
·
Change Name wizard
·
Archive option
112 / 393
Company Merger/Acquisition Wizard
The Merger/Acquisition Wizard?is used when one company merges with, or is acquired by,
another company.??The wizard?walks you through?the process of combining the data records of
the two companies, allowing you to select which data will be transferred, and?the status of the
acquired company. Begin by opening the
Company Profile
of the company that is being
acquired.
?
?
?
Company Merger/
Acquisition
Wizard
Click the
Admin Tools
button in a Company Profile and select
Merger/
Acquisition
in the menu.?
?
Step 1: Read Welcome Screen
?
113 / 393
?
?
Next button
Click to proceed to the next step of the Company Merger/Acquisition Wizard.?
Cancel button
Click to exit the Company Merger/Acquisition Wizard.
Step 2: Select Acquiring Company
?
?
?
Acquiring
Company??list
Select the acquiring company by paging through the list, or use the Search
feature to find the company.?
Next button
Click to proceed to the next step of the Company Merger/Acquisition
Wizard.?
Previous button
Click if you want to return to the previous step of the Company Merger/
Acquisition Wizard.
?
Step 3: Set Status of Acquired Company
?
114 / 393
?
?
Company Status
list
Select the company status for the company being acquired.?
Next button
Click to proceed to the next step of the Company Merger/Acquisition
Wizard.?
?
?
Step 4: Select Items to be Assigned to Acquiring Company
?
?
?
115 / 393
Item Selection
check boxes
Click inside the checkbox for the items that will be transferred to the
acquiring company.??To select all items, click in the Item checkbox.?
Next button
Click to proceed to the next step of the Company Merger/Acquisition Wizard.?
Step 5: Review Company Acquisition Summary
?
The Wizard provides a summary of the information for your review before completing the
acquisition/merger.??Be sure all the information is correct before proceeding.?
?
?
?
Company
Acquisition
Summary
Review for accuracy before proceeding.??When you complete the merger/
acquisition, all of the items listed will be moved to the acquiring company.?
Finish button
Click to complete the Company Merger/Acquisition Wizard.??The Wizard
directs you to the Company Profile of the acquiring company. The Wizard
will also update the status of the acquired company, and add the name of the
acquired company as an additional name (FKA) to the acquiring company.
?
Once the company merger/acquisition is complete, every time you visit the Company Profile
of the acquired company, a message displays, informing you that the company has been
acquired.??The message also gives you with the option of being redirected to the Company
Profile of the acquiring company
.
?
Company Name Change Wizard
The Company Name?Change Wizard is used when a company has legally changed its name.
The wizard?quickly walks you through the process of changing a company's name.??Begin by
116 / 393
opening the
Company Profile
?of the company that desires a name change
.
?
?
?
Company Name
Change Wizard
Click the
Admin Tools
button in a Company Profile and select
Change
Name
in the menu.?
?
Step 1: Read Welcome Screen
?
?
?
Next button
Click to proceed to the next step of the Company Name Change Wizard.?
Cancel button
Click to exit the Company Name Change Wizard.
Step 2: Enter New Company Name
?
117 / 393
?
?
New Company
Name field
Enter the name of the company exactly as you want it created.?
Next button
Click to proceed to the next step of the Company Name Change Wizard. ?
Previous button
Click if you want to return to the previous step of the Company Name
Change Wizard.?
?
It is recommended that you use the full official company name, as is should
appear on any legal document.??To store the acronym for a company or an
AKA (Also Known As), use the Additional Names link in the Company
Profile.
?
Step 3:??Review Company Name Change Summary
?
118 / 393
?
?
Company Name
Change Summary
Review for accuracy before proceeding.??The company's new name will be
saved, as shown, in the Company Name field of the Company Profile.
Finish button
Click to complete the Company Name Change Wizard.??When the
wizard?completes the name change process, the old company name will
be listed in the Additional Names section of the Company Profile as a FKA
(formerly known as).?
Company Archiving
The Archive feature?is used when a company needs to be removed from the database.??This
usually occurs when the company already has a Company Profile, but a second profile is
mistakenly created.??If data has already been added to the duplicate Company Profile, such as
contracts and events, it is recommended that you first run the Merger/Acquisition Wizard?to
move this data to the original Company Profile.??Then, you can archive the duplicate
Company
Profile
, which will remove it from the actively searchable records
.
?
?
?
Archive function
Click the
Admin Tools
button in a Company Profile and select
Archive
in
the menu.?
119 / 393
?
?
Delete Company
Confirmation
Prompt
Click the Yes button to archive the company.??Confirm the Company Profile
has been archived by running a search for the company or viewing the list of
companies in the All Companies browse screen.
Operation Error
Message
This message displays if the archiving process was unsuccessful.??This
typically occurs if the Company Profile you are trying to archive contains
contracts, events, or other data.??Run the Merger/Acquisition Wizard and
assign the company data before trying the archive process again.
?
All active contracts must be archived or assigned before a company can be archived
.
Company Workflows
The Novâtus system has a powerful workflow management tool, which allows a variety of
business processes to be mapped to workflow?steps that are executed, tracked, and reported on
in the system.
?
Workflows guide you in applying your company's standard processes and procedures, including
the steps followed when hiring new employees, as well as yearly reviews and evaluations
.
You can perform the follow tasks related to a company workflow:
·
View the workflows for a company
·
Create a workflow
120 / 393
·
Launch a workflow
·
View workflow steps
·
Manage workflow documents
·
Approve or decline a workflow step
·
Complete a workflow step
·
Close and re-open workflows
·
Edit and delete workflows
?
Viewing the Company Workflows Browse Screen
The workflows associated with a company are viewed from Workflows browse screen in the
Company Profile. To access the Company Workflows browse screen, click on the
Workflows
button in the
Action Bar
of the
Company Profile
.
To view only the
workflow steps that you
"own" (i.e., you are responsible for completing the step), open the
Active Workflow Items
portlet
in your Dashboard.
Workflows tabs
Click on the
Active Workflows
tab to view the "in process" workflows.? Click
on the
Completed Workflows
tab to view all the workflows that have been
finalized. Click on the
Documen
ts tab to view the documents that have
been uploaded to the Company Profile, and are available for use in the
workflow.
121 / 393
Workflow records
View the list of workflows associated with the company.
To view additional
information for a workflow, click on a workflow record to display the Workflow
Profile
.
Edit Workflow
icon
Click on the
icon to launch the Workflow Wizard, which will allow you to
edit the name and description, select a different template for the workflow,
update the team members, and change the persons responsible for
individual workflow steps.?
Delete Workflow
icon
Click on the
icon to delete the workflow.
New Workflow
button
Click to launch the Workflow Wizard, which will allow you to create a new
workflow.
Creating a Company Workflow
Novâtus Contracts employs a Workflow Wizard?to quickly and easily guide you through the
process of creating a workflow.??The wizard?uses templates designed by your System
Administrator that step you through different company procedures.??A company workflow is
initiated from the
Action Bar
in a
Company Profile
.
?
?
?
Workflows button
Click to display the Workflows browse screen.?
New Workflow
button
Click to launch the Workflow Wizard.
122 / 393
?
Step 1: Read Introductory Screen
?
The Workflow Wizard is used to both create and edit workflows
.
?
Next button
Click to proceed to the next step of the Workflow Wizard.?
Cancel button
Click to exit the Workflow Wizard.
?
??
The Workflow Wizard can be moved onscreen by clicking on the top border and dragging-and-
dropping the wizard?to the desired location
.
Step 2: Select Workflow Template
?
Your System Administrator has created templates for some of your company's procedures in
order to standardize the sequence in which the work is performed
.
123 / 393
?
?
Workflow
Template list
Select the appropriate workflow from the list of available options.?
Next button
Click to proceed to the next step of the Workflow Wizard.?
Previous
button
Click to return to the previous step in the Workkflow Wizard.
?
Step 3:??Review/edit Workflow Information
?
The default values in the Workflow Name and Workflow Description fields are set by your
System Administrator
.
?
124 / 393
?
?
Workflow
Name and
Description
fields
If desired, you can customize the workflow by editing its name and its
description.??Simply click in the Workflow Name or Workflow Description field
and then type over the existing text.?
Workflow
Owner list
If desired, assign the workflow to another user by selecting their name in the list
of available people.??By default, you are the Workflow Owner.
CC Workflow
Owner
checkbox
Select if you want the Workflow Owner to receive an email message whenever
a change is made to the workflow.
Next button
Click to proceed to the next step of the Workflow Wizard.?
?
Step 4: Select Workflow Team
?
A Workflow Team is a list of users who can be assigned to complete the different steps in a
workflow
.?
?
125 / 393
?
?
Workflow
Team list
Select a workflow team from the list of available teams.??The team members
and their contact information displays at the bottom of the window.??If you want
to delete a member from the team, click the
?icon for that person.?
Add Team
Member
button
Click to display the
Address Book
if you want to add additional members to the
workflow team
.
Address Book
records
Click on a record to add the user to the team. The selected users appear at the
top of the screen in the
Selected
text box. To remove a user from the team,
click the user's Delete
icon.
126 / 393
Submit button
Click to add the additional user(s) to the workflow team.
Next button
Click to proceed to the next step of the Workflow Wizard
Step 5: Select Owners for Steps
?
The wizard?displays a list of the steps in the workflow.??For each step, a team member must be
assigned to complete the task.??The list of people available for each step is based on the
functions that each person has been assigned in the Novâtus system
.
?
?
?
Owner list
Select an owner for each step in the workflow.?
Next button
Click to proceed to the next step of the Workflow Wizard.?
Step 6: Save Workflow
?
127 / 393
?
Finish button
Click to create the new workflow and exit the Workflow Wizard.?
?
After running the wizard, return to the Workflow Profile and verify that the workflow has been
added
.
Launching a Company Workflow
The Company Workflows browse screen displays a list of the existing company workflows and
their descriptions, as well as basic information for the company.?From the browse screen, you
can launch a company workflow.
To access the Company Workflows browse screen, click on
the
Workflows
button in the
Action Bar
of the
Company Profile
.
?
?
Workflow tabs
Ensure the
Active Workflows
tab is selected.
128 / 393
Workflow
record
Click to display a Workflow Profile showing the information for the workflow,
including the steps and the completion status of each step.
?
The first time you click on a workflow record, the workflow process will be launched.??The
person assigned to the first step of the workflow will receive an email message, notifying
him/her that action is required for the workflow.??The message includes hot links that direct
the user to the Novâtus system.???A sample email message is provided below.
?
?
Viewing Company Workflow Steps
Information for the individual steps in a company workflow can be viewed from the Workflow
Profile.
To access a Workflow Profile from the Company Profile, click on the
Workflows
button in the
Action Bar
of the
Company Profile
screen, and then click on a workflow record in the
Workflows
browse screen
.??To view only the steps that you "own" (i.e., you are responsible for completing
the step), open the
Active Workflow Items
portlet
in your Dashboard
.
129 / 393
?
Workflow step
From the Workflow Profile, view the current step(s) in the workflow and
information on each step. From the Active Workflow Items portlet, you can
view only the steps that you "own."
?
Documents tab
Click to view the list of documents associated with the workflow.??Click on
the
?icon to view or download a copy of any document.
Documents
button
Click to display a screen where you can manage all the company, contract,
and global documents available for this workflow.
Close Workflow
toggle button
Click if you want to close the workflow. The button will redisplay with a
"Reopen Workflow" label so that the workflow can be re-opened at any time.
The workflow is moved from the
Active Workflows
to the
Completed
Workflows
view (tab).
Note:
Any member of the workflow team can close the workflow at any
130 / 393
time, even if all the steps have not been completed.
Browse
Workflows button
Click to return to the Workflows browse screen.
Contract Profile
icon
Click on the
??icon to display the Contract Profile for the workflow.
Managing Company Workflow Documents
Documents can be uploaded to a company workflow via the Documents tab. There are also
system documents that are available for use in a company workflow. These system
documents, which are categorized as
company
and
global
documents, are managed from the
Workflow Profile.
To access a Workflow Profile from the Company Profile, click on the
Workflows
button in the
Action Bar
of the
Company Profile
screen, and then click on a workflow record in the
Workflows
browse screen
. You can also open the Workflow Profile for the step(s) you own from
the
Active
Workflow Items
portlet
in your Dashboard.
Documents
button
Click to display a browse screen showing the system documents that have
already been added to workflow. Click on the
icon for any document if you
want to view it.
?
131 / 393
Edit Workflow
Documents
button
Click to display a screen that will allow you to manage (add or remove) the
documents for the workflow.
Company and
Global
Documents
tab
Click on the
Company Documents
or
Global Documents
tab to see a list of
available documents in the selected category.
Company or
Global
Documents
record
Locate the system document that you want to attach to the workflow. Click on
the document's Add
icon to copy the document to the
Attached Documents
.
If you want to remove an attached document from the workflow, simply click on
that document's Delete
icon.
Save button
Click to save your updates to the system documents attached to the
workflow
.
?
?
Completing a Company Workflow Step
The owner of each company workflow step must "complete" the step in the Novâtus system
once the task associated with the step has been performed. You can complete a workflow step
from the Workflow Profile or from the
Active Workflow Items
portlet
in your Dashboard by
clicking on the Complete
icon. To access the Workflow Profile from the Company Profile,
click on the
Workflows
button in the
Action Bar
of the
Company Profile
screen, and then click on
a workflow record in the
Workflows browse screen
.
132 / 393
?
?
Workflow step
Locate the step you want to complete in the Workflow Profile or your Active
Workflow Items portlet.
Complete
Workflow Step
icon
Click on the
??icon to display an Item Complete window.
?
?
133 / 393
?
Item Complete
text field
Type in a description of the actions taken to complete the step in the space
provided.
Submit button
Click to complete the workflow step.
?
Once all the steps in a workflow are completed, the workflow is automatically transferred
from the
Active Workflows
tab to the
Completed Workflows
tab.
Approving or Declining a Company Workflow Step
One or more steps in a workflow may need to be approved by management or the Legal
Department of your company or corporation.??Workflow steps can be approved (or declined)
from the Workflow Profile or from the
Active Workflow Items
portlet
in your Dashboard by
clicking on the approve
icon or the decline
icon.
To access a Workflow Profile from the Company Profile, click on the
Workflows
button in the
Action Bar
of the
Company Profile
screen, and then click on a workflow record in the
Workflows
browse screen
.
134 / 393
Workflow step
View the steps in the workflow.??Any step that contains the
?and
?icons
is a step that requires approval.
Approve icon
Click the
icon to approve the workflow step. An Item Complete window
displays containing a message that simply says "Approved." Click the
Submi
t button to approve the workflow step.
If you want to add comments
or notes, type your information in the messaging area before clicking the
Submit button
.
Decline icon
Click the
icon to decline approval of the workflow step.
An Item Complete
window displays. Enter your reason for declining to approve the workflow
step in the messaging area, and then click the
Submi
t button
.
Closing and Re-opening Company Workflows
A user who is a member of a workflow team can close the workflow, even if all of the steps have
not been completed. This may be necessary if you want to stop email messages from being
sent to team members who no longer have any responsibility for the remaining steps, or in the
event no further steps need to be taken for a particular workflow. Conversely, a closed workflow
can easily be re-opened by any workflow team member. A workflow is closed or re-opened from
the Workflow Profile screen.
To access a Workflow Profile from the Company Profile, click on the
Workflows
button in the
Action Bar
of the
Company Profile
screen, and then click on a workflow record in the
Workflows
browse screen
to display the completed and pending steps in the workflow
.
Ensure the
Active Workflows
tab is selected in the Workflows browse screen
.
135 / 393
Close Workflow
toggle button
Click to close the workflow.
Reopen Workflow
toggle button
Click to re-open the workflow.
Editing and Deleting Company Workflows
A workflow can be edited or deleted from the Workflows browse screen.??To access the browse
screen, click on the
Workflows
button in the
Action Bar
of a
Company Profile
.
136 / 393
Ensure the
Active Workflows
tab is selected in the Workflows browse screen
.
?
?
Edit Workflow
icon
Click the
?icon to redisplay the Workflow Wizard where you can edit the
following: Workflow Name, Description, Owner, Team, and Step Owner.
Delete Workflow
icon
Click the
icon to display a prompt that confirms you want to delete the
workflow.?
?
Additional Names
The Additional?Names feature provides a way of storing information on the different names under
which a company may have, or currently is, operating.??In the system, there are three ways of
categorizing these additional company names:
¨
AKA (also known as)
¨
DBA (doing business as)
¨
FKA (formerly known as)
In managing the additional names for a company, you can:
·
View the names in the Additional Names browse screen
·
Add an additional company name
·
Edit an additional company name
·
Delete an additional company name
137 / 393
Additional Names Browse Screen
The additional names associated with a company are viewed from the
Company Profile
using
the Additional Names browse screen
.
?
?
?
Additional
Names
link
Click to view the Additional Names browse screen.
Additional Names
record
View the additional names for the company.??The Description field shows
whether this additional name is a DBA, FKA, or AKA.
?
The Company Acquisition Wizard is an effective tool in implementing a FKA since all of the
company responsibilities are transferred to the acquiring company
.
Adding an Additional Company Name
You can quickly and easily add an additional name to a Company Profile.??Additional names are
added from the
Additional Names browse screen
, which is accessed by clicking on the
Additional Names
link in a
Company Profile
.
?
?
138 / 393
?
?
Add Name button
Click to display a screen that will allow you to add a new company DBA,
FKA, or AKA.
Required fields
Enter the required information for the new name: Company Name and
Additional Name Type.
Optional fields
Enter the optional information for the new name: Effective Date and
Description.
Save button
Click to save your information and add the additional company name.
?
Editing an Additional Company Name
You can quickly and easily edit any of the additional names for company.??Additional company
names are edited from the
Additional Names browse screen
, which is accessed by clicking?on
the
Additional Names
link in a
Company Profile
.
?
139 / 393
Additional Name
records
Locate the name you want to edit, and then click on it to display a screen that
will allow you to edit the information for the additional company name.
?
?
Data fields
Update the information, as needed.
Save button
Click to save your updates and edit the additional company name.
Deleting a Company Name
You can delete any of the additional names for a company.??Additional company names are
deleted from the
Additional Names browse screen
, which is accessed by clicking on the
Additional Names
link in a
Company Profile
.
?
140 / 393
Additional Name
records
Locate the name you want to delete, and then click on it to display a screen
that will allow you to edit or delete the additional company name.
?
?
?
Delete button
Click to display a Delete Additional Name confirmation prompt.?
Delete Additional
Name
confirmation
prompt
Click the
Yes
button to delete the additional name.
?
?
Locations
The Locations?feature is used to store and manage all the addresses a company has, including
the corporate office (or headquarters), branch offices, subsidiaries, and satellite offices
.
In managing the locations for a company, you can:
·
View all locations in the Locations browse screen
·
View a location profile
·
Add a location profile
·
Edit a location profile
141 / 393
·
Delete a location profile
?
Locations Browse Screen
The locations associated with a company are viewed from the
Company Profile
using the
Locations browse screen
.
?
?
Locations
link
Click to view the Locations browse screen.?
Location record
Click on a record to display the Location Profile with additional
information on the location.??
From the profile, you can edit the information
for the location or delete the location.
Location Profile
A Location?Profile contains key data, including the type of location, contact numbers, and the
complete address of the location.??The Action Bar contains buttons that allows you to edit the
location information or delete a location from the Company Profile.?
?
To access a Location Profile, click on the
Locations
link in a
Company Profile
to display the
Locations browse screen
. From the browse screen, click on the location whose profile you want
to view to display its Location Profile screen.
?
142 / 393
?
Location data
fields
View the information for the location.
Edit Location
button
Click to display a screen that will allow you to edit the location information.
Delete Location
button
Click to delete the location from the Company Profile.
Browse Locations
button
Click to return to the Locations browse screen.
?
?
Adding a Location Profile
You can add a location?to a Company Profile from the
Locations browse screen
.??To access the
browse screen, click on the
Locations
link
in a
Company Profile
.
?
143 / 393
?
?
Add Location
button
Click to display a screen that will allow you to add a location to the Company
Profile.
Required fields
Enter the required information for the location: Location Name and State/
Province.
Optional fields
Enter the optional information for the location: Address, Location Type,
Phone Number, and Fax Number.??
In the phone and fax number fields, click on the
?icon to display a
Phone
Number Entry
window where you can enter the area code, phone number,
as well as an extension number and country code.
Save button
Click to save your information and add the location to the Company Profile.
?
144 / 393
Editing a Location Profile
You can quickly and easily edit the information for a location from its Location Profile.??To access
a Location?Profile, click the
Locations
link in Company Profile to display the
Locations browse
screen
.??In the browse screen, click on the location whose information needs to be edited to
display the
Location Profile
.
?
Edit button
Click to edit the information for the location.
?
145 / 393
Data fields and
list
Update the information for the location, as needed.
In the phone and fax number fields, click on the
?icon to display a
Phone
Number Entry
window where you can update the contact numbers, as
needed.
Save button
Click to save your information and edit the information for the location
?
?
Deleting a Location Profile
A location?is deleted from a Company Profile from its Location Profile.??To access a
Location?Profile, click the
Locations
link in Company Profile to display the
Locations browse
screen
.??In the browse screen, click on the location you want to delete to display its
Location
Profile
.
?
?
Delete Location
button
Click to display a Delete Company Location confirmation prompt.?
146 / 393
Delete Company
Location prompt
Click the
Yes
button to delete the location from the Company Profile.
.
147 / 393
Contracts
Contracts are stored in company profiles in the
Novâtus system. The primary tasks associated
with contracts are:
·
Accessing the Contract Profile
·
Viewing additional contract information through linked data screens
·
Managing Contracts
·
Using
Contract Wizards
·
Creating Workflows
·
Making and Receiving Payments
·
Using Additional Forms
·
Setting up Document Packages
?
Contract Profile
The Contract Profile provides basic information on a contract, including contract type, agreement
type, and term and renewal information.??The Contract Profile contains an
Action Bar
that allows
you to perform contract-related tasks.??The profile also contains
links
to view additional
information for the contract.
A Contract?Profile is accessed by clicking on a contract record in:
·
the
Contracts
section of a
Company Profile
·
any
Contract browse screen
·
the
Recently Viewed Contracts
portlet
in the Dashboard
?
148 / 393
?
?
Contract Profile
Action Bar
Provides buttons that allow you to perform contract-related tasks.?
Contract Data
fields
Provides basic contract information, such as the agreement type and the
contract purpose, value, group, number, location, type, and a
description.??The Profile also stores the contract term and renewal
information, as well as the name of the signatory and the date the contract
was signed. There are additional fields for program-specific information,
such as the contract number, the company that originated the contract, and
the identity of the legal entity.
Contract links
Provides access to the contract family, documents, tasks, events,
payments, messages, people, addresses, document packages, produtcs,
additional forms, and history associated with the contract.
The contract number is automatically generated by the system using the following format:
2011-MAS-NOV-00130, which is the year in which the contract became effective, followed
by the type of contract (root or incorporated), followed by the first three letters of the
company name, followed by a system-generated five-digit number.
Using the Contract Profile Action Bar
The Action Bar in the
Contract Profile
contains several icons, which when selected, allow you to
perform one or more tasks.?
?
149 / 393
?
?
Edit Contract
button
Displays the fields in the Contract Profile in an editable mode so the contract
information can be updated.
Copy Contract
Allows you to make a copy of the
Add Incorporated
button
Displays a new Contract Profile so an incorporated contract, such as a
Schedule or Addendum, can be added to a contract.
Archive button
Allows you to archive a contract.
Wizard Tools
button
Allows you to run four wizards: (1) Renew Contract Wizard to set the new
expiration date for a contract (2) Document Package Wizard to designate a
set of documents for a contract, assign an administrator for the documents
and identify the users (members) who can access the documents, (3)
eSignature Package wizard to step you through the process of creating a
document package and electronically signing its contract document(s), and
Assign Contract Wizard to assign a contract to another company.
Creation Wizard
Allows you to quickly and easily create a contract using a standard contract
template.
Workflows button
Displays a screen that shows the active and completed workflows for the
contract. A new workflow can also be created from this screen.
One Click Report
button
Displays a screen showing key contract information, as well as company
data. The report also shows all the documents, tasks, events, locations,
payments, and termination information for the contract.??Clicking the Print
button
?prints a copy of this report.
Report button
Allows you to run any of the reports you created.
150 / 393
Print button
Allows you to print the One Click Report.
Help button
Displays a menu with contract-related help topics.??When a topic is selected
in the menu, the Novâtus User Guide displays and is open to the specific
location in the guide where the selected topic is covered.
Contract Links
The Contract Profile contains basic information for a contract. The profile also contains links to
the following screens, which are used to store additional information, upload documents, and
send/receive email messages:
·
Contract Family
·
Documents
·
Tasks
·
Events
·
Payments
·
Messaging
·
People
·
Addresses
·
Document Packages
·
Products
·
Additional Forms
·
History
Contract Family
The
Contract Family
link is used to display a browse screen showing the hierarchical
relationship, if any, between the selected contract and other contracts in the system
.
There are eleven other
contract links
available in a Contract Profile
.
?
151 / 393
?
Contract Family
link?
Click to display the hierarchical relationship of this contract to other
contracts.?
Contract family
hierarchy
View the hierarchical relationships between root (top-level) documents like
Master or Individual contracts to incorporated (lower-level) documents like
schedules, service agreements, addendums, and amendments.??The
selected contract is displayed in red.
?
The fields that display when any of the links are selected in a Contract Profile can be
customized
to show only the data that is relevant to you. You can also sort the data, re-order
columns of data, and re-size columns.
Documents
The
Documents
link is used to display a browse screen showing the documents associated with
the contract.??You can customize the browse screen to display only the document data that is
relevant to you
.
There are eleven other
contract links
available in a Contract Profile
.
?
152 / 393
?
?
Documents
link
Click to display a list of the documents associated with the contract.?
Document
record
Click on a document record to display its Document Profile where you can view
additional information for the document.??From the profile, you can edit the
document's information, upload a revision, compare revisions, download the
document, or delete it.?
Document
Revision
Number
Indicates how many revisions of the document have been uploaded.
Document
icon
Click on the
?icon to view an uploaded document.??A prompt will display, which
allows you to open or save a copy of the document.?
New
Document
button
Click to display a screen that will allow you to add a new contract
document.??You can also upload a revision to the document and compare
revisions.?
Multi-Print
button
Click to select multiple documents for printing.
Tasks
The
Tasks
link is used to display a browse screen listing all the tasks that have been assigned
for the contract
.?
There are eleven other
contract links
available in a Contract Profile
.
?
153 / 393
Tasks
link
Click to display a list of the active tasks for the contract.?????
Task record
View the tasks for the contract.??Tasks displayed in red have not been
completed and are past due.?
Group Tasks By
Field option
Click on any column heading and select the
Group By This Field
option in
the menu to group tasks by this field in the browse screen.
Complete Task
icon
Click on the
?icon to display a Task Completion window that will allow you
to enter notes on how and when the task was completed.
Task calendar
Click on the
?icon in the
Due Date
field to display a pop-up calendar where
you can a new due date if you want to reschedule a task.
Show Completed/
Hide Completed
toggle buttons
Click the
Show Completed
button to show both active and completed
tasks.??Click the
Hide Completed
button to hide completed tasks.?
Add Task button
Populate the
Subject
,
Due Date
,
Owner
,
Task Created On
, and
Task
Created By
fields and then click this button to add a task.
Add Task List
button
Click to create a task list from a selection of available task lists.
Events
The
Events
link is used to display a browse screen showing all the events for the contract.??You
can customize the browse?screen to display only the event data that is relevant to you
.
154 / 393
There are eleven other
contract links
available in a Contract Profile
.
?
?
Events
link
Click to display a list of the events for the contract.
Event record
Click on an event record to display its Event Profile with additional
information for the event.??From the profile, you can edit information for the
event, complete the event, or delete it.??If the event is part of a series, you
can close the event series from the Event Profile, as well as view the
completion history for the series.
New Event button
Click to display a screen that will allow you to add a contract event.
Payments
The
Payments
link is used to display a browse screen listing all the payments that have been
made or received?for the contract
.
There are eleven other
contract links
available in a Contract Profile
.
?
155 / 393
?
Payments
link
Click to display a list of the payments for the contract.?????
Payment record
View the list of payments for the contract.?
Edit Payment icon
Click on the
?icon to edit the payment stream.
Delete Payment
icon
Click on the
?icon to delete the payment stream.
Payment
Forecasting icon
Click on the
?icon to create or edit a payment forecast that lists expected
payments.
Add Stream
button
Click to display a screen that will allow you to add a new payment stream for
the contract.?
View Forecast
button
Click to view a payment forecast that lists expected payments.
Messaging
The
Messaging
link is used to both create messages and view all existing messages that have
been sent from the Contract Profile
.?
There are eleven other
contract links
available in a Contract Profile
.
156 / 393
Creating a Message
You can easily create an email message from a Contract Profile and attach one or more
documents to the message. The Address Book automatically displays so that you can select all
the desired recipients for your message.
?
?
Messaging
link
Click to display a Messaging window, which allows you to create an email
message and attach documents
.
New Thread
button
Click to display the Messaging window.
157 / 393
?
?
Message To and
Message Cc lists
Click on the
icon to display the Address Book. Click on all the recipients
for the email message, and then click the
Submit
button
.?????
Subject line
Enter the subject of your email message
.?
Message body
Enter the text for your message.
Attach Document
button
Click if you want to send an attachment with the email message.
The Attach
Document window displays
.
Contract,
Company, and
Global
Documents tab
Click on the
Contract Documents
,
Company Documents
, or
Global
Documents
tab to see a list of available documents in the selected
category
.?
Contract,
Company or
Global Document
record
Locate the document you want to attach to the email message and click on it
to select it.
Note:
To quickly locate a document, click on a column heading
(e.g., Document Type, Filename, Author) to sort the list of documents in
alphabetical order
.
Attach Selected
Documents
button
Click to attach the document to the email message and close the Attach
Document window.
If you want to add more than one document, simply
repeat the process.
Send button
Click to send your email message.
Viewing Messages
You can view the messages sent from the Contract Profile in a central location. You can also
reply to an email message stored in the profile, as well as delete any message threads.
158 / 393
Messaging
?link
Click to display a list of the messages sent from the Contract Profile.?????
Message
record
Click on a message record to view the body of the message.?
Message body
View the content of the message.
Reply button
Click to send a reply to the message.
Delete Thread
button
Click to delete the message thread.?
?
The Messaging window is separate from the program screens and can be re-sized and
moved onscreen.??To exit the Messaging window, click the Close button
.
159 / 393
People
The
People
link is used to display a browse screen showing a list of all the people associated
with the contract.??You can customize the browse?screen to display only the person-related data
that is relevant to you.
There are eleven other
contract links
available in a Contract Profile
.
?
?
?
People
link
Click to display a list of people associated with the contract.?????
Person record
Click on an individual's record to display their Person Profile with additional
information for that person.?
?
You cannot add people, edit a person's information, or delete a person from the Contract
Profile.??These tasks can only be accomplished from a Company Profile or from the
People
link
in the My Place menu.
Addresses
The
Addresses
link is used to display a browse screen showing the addresses associated with
the contract.??You can customize the Contract?Addresses browse screen to display only the
address data that is relevant to you
.
There are eleven other
contract links
available in a Contract Profile
.
?
160 / 393
?
?
Addresses
?link
Click to display a list of the addresses for the contract.?????
Address record
View the information for contract address, including the contact's name and
phone/fax number.?
Delete icon
Click the
?icon to delete the contract address.
Document Packages
The
Document Packages
link is used to display a browse screen showing the document
packages that are relevant to the contract, either during re-negotiation or in enforcing the
contract.??A document package is one or more documents that are shared and edited by a group
of users for the purpose of performing a contract-related task
.?
There are eleven other
contract links
available in a Contract Profile
.
?
161 / 393
?
Document
Packages link
Click to display a list of the packages for a contract.?????
Document
Package list
View the document packages for the contract.?
Document
Package
record
View the list of documents in a document package.
Document
Package tabs
Click on any of the six tabs:
Current
(shows document packages for which you
are a member),
Checked Out
(shows documents you have checked out for
review or edit),
Submitted
(shows documents submitted for electronic signature
and the people required to sign the documents),
Completed
(shows completed
document packages for which you are a member),
All Packages
(shows
incomplete document packages), or
All Completed
(shows completed
document packages).
View
Document
Package
Profile icon
Click on the
?icon to view the Document Package Profile, which includes
additional information on the package.?
Document
Download
icon
Click on the
?icon to download a copy of the document for review.?
Document
Revision
History icon
Click on the
to display a screen showing the revisions to the
document.??From this screen, you can also download a copy of the document.
?
Document packages are added to a Contract Profile using the Document Package Wizard.
To run the wizard, click on the
Wizard Tools
button in the Action Bar and select
Document
Package Wizard
in the menu.??Before running the wizard, upload all the needed documents
162 / 393
for the package using the
Documents
link.
Products
The
Products
link is used to display a browse screen showing the
products
that are covered by
a contract
.??
There are eleven other
contract links
available in a Contract Profile
.
Products
link
Click to view the Products browse screen.
Product record
View the product records.
The information for each product includes its
name and a description of the product, its classification and product number,
and its quantity, price, and unit of measure
.
New Product
button
Click to add a product to the product grid.
Edit Product Grid
button
Click to manage the products associated with the contract.
History
The
History
link is used to display a browse screen showing all of the updates that have been
made to the Contract?Profile
.
There are eleven other
contract links
available in a Contract Profile
.
?
163 / 393
?
?
History link
Click to displays a historical record of all changes made to the Contract
Profile.
History record
View the change that has been made to the Contract Profile.?
Additional Forms
The
Additional Forms
link is used to display a browse screen showing any additional forms that
are used in association with the contract type
.?
There are eleven other
contract links
available in a Contract Profile
.
?
164 / 393
?
?
Additional Forms
link
Click to display a browse screen with a list of additional forms used by the
contract.?
Additional Form
record
Click on an additional form record to display a list of the forms for this type of
form.?
Additional Form
Profile record
Click on an additional form record to display an Additional Forms Profile with
additional information on the form.??From the profile, you can edit the form's
information.
New [Form
Name] button
Click to display a screen that will allow you to add a new form of this type to
the Contract Profile.
Contract Management
Contracts for a company are managed from the Company Profile, where you can:
·
Add a root contract
165 / 393
·
Add an incorporated contract
·
Add a contract by copying an existing contract
·
Edit an existing contract
·
Archive a contract
A contract added to the
Novâtus system
cannot be deleted.
Adding a Root Contract
A contract?can be added from a
Company Profile
or from the Contracts section of the
Navigation
Pane
.??Once you create the contract, you must add the required information.
You can then view the Contract Profile from its Company Profile since all contracts for a
company are listed in the Contracts section of the Company Profile.?You can also view a
contract from one of the Contracts browse screens by clicking on the appropriate link (Active, In
Process, Inactive) in the Contracts section of the Navigation Pane.??In a contract browse screen,
click on the contract record to display its
Contract?Profile
.
?
Adding a Contract from the Company Profile
You can create a contract from two locations in the Company Profile: (1)
Contracts
link in the
Company Profile, or (2) Action Bar of an existing contract in the Company Profile.
?
?
166 / 393
?
Add Contract
button
Click to display a new Contract Profile screen.
New Contract
button
Click to display a new Contract Profile screen.
Contracts link
If the New Contract button is not displayed, click this link.
?
Adding a Contract from the Navigation Pane
You can quickly add a contract from the Contracts section of the
Navigation Pane
by clicking on
the
New Contract
link.??A contract can be created for an existing company or you can add a
company and a contract at the same time
.
?
?
?
?
Contracts section
Click on the
icon to display the links in the Contracts section of the
Navigation Pane.
167 / 393
New Contract link
Click to add a new Contract Profile.
Add a New
Company option
Click if you are adding a contract for a new company.?
Company Name
field
Make a selection in the list is you are adding a contract for an existing
company.
Search field
Use the Search feature to quickly locate the name of the company.
?
Adding Contract Data
Once the contract?has been added from a Company Profile or the
New Contract
link in the
Contracts section of the Navigation Pane, you are ready to create the
Contract Profile
.
?
168 / 393
?
?
Required fields
Enter the required data for the contract: Contract Group and Type,
Agreement Type, Legal Entity, Term Type, Original Expiration Date, and
Status.?
The Currency field is auto-populated based on the currency
selected by your program Administrator.
Optional fields
Enter the optional information for the contract: Contract Purpose, Value,
Proposed Value, Currency, Location, Effective Date, Current Expiration
Date, Renewal Interval, Notice Period, Notice date, and Status.??If a
question mark
?appears next to a field list, you can type the first letter of
your entry into the field to automatically populate the field, without having to
scroll through the list of available entries.
Add Responsibility
button
Click to display a list of positions of responsibility for the contract (e.g.,
contract manager and contract owner), and select a position.??
If there are
mandatory positions associated with a contract, you will not be able to save
the contract without selecting a person for that responsibility
.
Name list
Click to display a list of people who can fill the selected position of
responsibility.??
Once you select an individual, the other fields, such as
email address and phone number, are automatically populated
.
Delete icon
Click on the
?icon to remove the position of responsibility record.
Save button
Click to save the information and display the Contract Profile.??If you want
to cancel the contract request, click the Cancel button.
The program automatically populates the Contract Number field once you select the
Contract Group.??However, you can edit the field and assign your own unique contract
number.
?
Adding an Incorporated Contract
Root or top level documents, such as Master and Individual contracts, can have Incorporated or
lower level contract documents associated with them.??Incorporated contracts can include
documents such as Schedules, Addendums, Amendments, and Statements of Work.?
?
You can easily add an Incorporated?contract from a
Contract?Profile
of a
root contract
.
?
Add Incorporated
button
Click to display a screen that will allow you to add an incorporated contract
and link it to an existing contract.
169 / 393
?
Required fields
Enter the required information for the incorporated contract:??Agreement
Type, Term Type, and Original Expiration Date.??Some of the fields are
already populated based on the root contract.
Optional fields
Enter the optional information for the incorporated contract.
Add
Responsibility
button
Click to add positions of responsibility for the Incorporated contract and
identify the people who hold these positions.
Save button
Click to save the information and display the Contract Profile for the
Incorporated contract.
Copying a Contract
If you need to create a contract that is very similar to one that already exists in the Novâtus
system, you can easily make a copy of the contract so that many of the data fields are auto-
populated.
To copy a contract, begin by opening the
Contract?Profile
of the contract that is similar to the one
170 / 393
you want to create.
Copy Contract
button
Click to display a new contract in edit mode with all of the required fields
automatically populated, except the contract's original expiration date.
The
information in the optional fields of the copied contract has also been
replicated to the new contract, including any persons identified as
responsible for the contract (e.g., contract manager, contract owner)
.
171 / 393
Original Exp
Date field
Enter the expiration date for the new contract.
Click on the
icon if you want
to set up an event alert for the contract's expiration date, or other key date
.
Update the information for the new contract, as needed.
Save button
Click to create the new contract by copying an existing contract.
Editing a Contract Profile
The information in the Contract Profile can be edited if changes need to be made.
To edit a Contract Profile, click the
Edit Contract
button in the
Action Bar
of the
Contract Profile
.
If you do not have administrative permission to edit a Contract Profile, this button will not appear
in your Action Bar.
172 / 393
Contract fields
Click to display a screen that will allow you to add an incorporated contract
and link it to an existing contract.
Responsible
Contact records
Click on a responsible contact record to make it editable, and update the
information for the contact, as needed. To add another person as a
responsible contact, click on the Add
icon. To remove a person from
being named as a responsible person for the contract, click on their Delete
icon.
Save button
Click to save the changes to the Contract Profile.
Archiving a Contract
The Archive feature is used to remove a Contract Profile from the database. This feature is
173 / 393
useful if a duplicate contract was created by mistake.
?
To archive a contract, use the
Archive
button in the
Action Bar
of the
Contract Profile.
?
?
?
Archive button
Click to activate the contract archive function.?
Delete Company
Confirmation
Prompt
Click the
Yes
button to archive the contract.??Confirm the Contract Profile
has been archived by running a search for the contract or viewing the list
of company's contracts from the Company Profile.
Contract Wizards
The
Action Bar
in the
Contract Profile
contains a
Wizard Tools
button that displays a menu,
which provides access to four contract wizards:
·
Contract Renewal wizard
·
Contract Assignment wizard
·
Document Package wizard
·
eSignature Package wizard
174 / 393
If you have permissions to create a contract, there will also be a
Creation Wizard
button in the
Action Bar, which will allow you to run the
Contract Creation Wizard
.
Contract Creation Wizard
The Contract?Creation Wizard allows you to quickly and easily create contracts using the
standard contract templates created by your System Administrator.?
Before running the Contract?Creation Wizard, you must first create a
Contract Profile
.??In addition
to populating all the required fields, you must also upload any forms that are will be needed in
negotiating or enforcing the contract to the
Additional Forms
section of the Contract?Profile
.
?
175 / 393
?
Contract Profile
fields
Enter the required information for the contract:??Contract Group, Type,
Agreement Type, Legal Entity, Term Type, Original Expiration Date, and
Status.??Also populate the optional fields since data provided in the profile will
be directly mapped into your MS Word draft document.
Additional Forms
link
Click to display a list of the available forms that are used in conjunction with
creating a contract. Add all the relevant documents for the contract type
since this data will also be mapped into your MS Word draft document.
Creation Wizard
button
Click to run the Contract Creation Wizard.
?
Once the Contract Profile is created and you have selected the Creation Wizard button in the
Action Bar
, the system prompts you to select the template to be used in creating the contract
.
?
176 / 393
Template Name
list
Select the template for the type of contract you are creating.??Only the
templates that are appropriate for this contract type will be listed.
Submit button
Click to select the template and launch the Contract Creation Wizard.
?
If the template you selected does not require you to provide any additional information
before creating the contract, the first three steps of the Contract Creation Wizard will
not display, and you will simply receive a confirmation that the contract draft has been
created. Proceed to Step 4
.
Step 1: Read Welcome Screen
?
?
Next button
Click to proceed to the next step of the Contract Creation Wizard.?
177 / 393
Cancel button
Click to exit the Contract Creation Wizard.
Step 2:??Answer First Wizard Question
?
The question(s) posed by wizard?in creating the contract will differ, depending on the type of
contract you are creating.??Also, the number of steps in the wizard?will be determined by the
number of questions posed by the wizard.
?
The example below relates to the creation of a Non-Disclosure Agreement
.
?
?
Field?list
Select the response that best answers the question in the list of available
responses.?
Next button
Click to proceed to the next step of the Contract Creation Wizardif you want
to return to the previous step of the Contract Creation Wizard.?
Previous button
Click i
f you want to return to the previous step of the Contract Creation
Wizard
.?
Step 3:??Answer Last Wizard Question
?
178 / 393
?
Field?list
Select the response that best answers the question in the list of available
responses.?
Finish button
Click to complete the Contract Creation Wizard and generate a draft contract
document in MS Word.?
?
Step 4:??
Receive Confirmation – Creation of Contract Draft
?
Once the system generates the contract draft, the prompt below displays.??The prompt advises
you that the contract draft has been stored in the Documents section of the Contract
Profile.??You also have the option of viewing the draft document now, or downloading it to your
computer
.
?
179 / 393
?
Contract Renewal Wizard
The Contract?Renewal Wizard allows you to quickly and easily renew a contract in the
system.??The wizard?will allow you to correct the expiration date for the contract, update the
event alert for the contract (if applicable), and enter a record so the history of the contract
renewal can be captured and tracked.
?
The Contract?Renewal Wizard can be used to renew both fixed and auto-renewal
contracts.??The wizard?is launched from the
Action Bar
in the
Contract Profile
.
?
?
?
Contract Renewal
Wizard
Click the Wizard Tools button in a Contract Profile and select
Renew
Contract
in the menu.?
?
Step 1:??Read Welcome Screen
?
180 / 393
?
Next button
Click to proceed to the next step of the Contract Renewal Wizard.?
Cancel button
Click to exit the Contract Renewal Wizard.
Step 2: Update Current Expiration Date
?
181 / 393
?
?
New Current Exp
Date field
Enter the new expiration date for the contract.?
You can also use the pop-up
Calendar to select the date by clicking on the
icon
Notice Period field
If applicable, enter the number of days prior to the end of a contract's current
term that your company is required to provide notice of intent to renew or
terminate the contract.
Renewal Interval
Update the timeframe between renewal dates, if needed.
The renewal
interval is expressed in months
.
Next button
Click to proceed to the next step of the Contract Renewal Wizard.?
Previous button
Click igyou want to return to the previous step of the Contract Renewal
Wizard .?
?
Step 3:??Update Contract Event
?
If there is no event for the contract, this screen will not display.
?
182 / 393
?
?
Warn Days field
If appropriate, change the number of days prior to the new expiration date
that an email notification is sent out.
Event Closure
Notes field
Enter the text that you want to appear in the email message of the event alert
that is sent out the next time the contract is up for renewal.
Next button
Click to proceed to the next step of the Contract Renewal Wizard.?
?
Step 4: Provide Contract Renewal Notes
?
?
183 / 393
?
Renewal Wizard
Notes field
Enter a description of the renewal process for this contract.
Next button
Click to proceed to the next step of the Contract Renewal Wizard.?
?
Step 5:??Review Contract Renewal Summary
?
184 / 393
?
?
Contract Renewal
Summary
Review for accuracy before proceeding.?
Finish button
Click to renew the contract and exit the Contract Renewal Wizard.?
?
Contract Assignment Wizard
The Contract?Assignment Wizard provides a quick and efficient way to transfer contracts from
one company to another.??When a contract is transferred, all of its data, including incorporated
contracts, events, tasks, messages, and the people associated with the contract are also
transferred to the new company.??The system also stores a record of the assignment so that the
contract's history can be tracked
.
?
The Contract Assignment Wizard
is launched from the
Action Bar
in the
Contract Profile
.
?
185 / 393
?
?
Contract
Assignment
Wizard
Click the Wizard Tools button in a Contract Profile and select
Assign
Contract
in?the menu.?
?
Step 1:??Read Welcome Screen
?
?
?
Next button
Click to proceed to the next step of the Contract Assignment Wizard.?
Cancel button
Click to exit the Contract Assignment Wizard.
186 / 393
Step 2:??Select New Company
?
?
?
Company
Selection list
Select the company that will now be assigned to the contract from the list, or
use the Search feature to find the company.
Next button
Click to proceed to the next step of the Contract Assignment Wizard.?
Previous button
Click to return to the previous step of the Contract Assignment Wizard.
?
?
Step 3 will only be present if the contract you are assigning is an incorporated contract
(Schedule or Exhibit) vs. a root contract (Master or Individual).
Step 3:??Select New Parent Contract
?
187 / 393
?
?
Agreement Link
list
Select the parent contract document company that will now be assigned to
the contract from the list of available contracts.
Next button
Click to proceed to the next step of the Contract Assignment Wizard.?
?
?
Step 4: Review Contract Assignment Summary
188 / 393
Contract
Assignment
Summary
Review for accuracy before proceeding.
Finish button
Click to assign the contract and exit the Contract Assignment Wizard.?
eSignature Package Wizard
The eSignature Package wizard allows you to create a document package and then send the
document to the appropriate parties for electronic signature without using the Docusign Portal. It
also allows the counter-signer party to sign the document in the Novâtus system without
providing any credentials (login information).
The eSignature Package wizard is launched from the Contract Profile
.
Before running the eSignature Package Wizard, make sure all the documents needed for
the document package have been uploaded to the contract.??Documents are uploaded to a
Contract Profile using the
Documents
link, located in the bottom half of the profile.
eSignature
Package Wizard
Click the
Wizard Tools
button in the Action Bar of a Contract Profile, and
select
Assign eSignature Wizard
in?the menu.?
Step 1:??Read Intro Screen
189 / 393
Next button
Click to proceed to the next step of the eSignature Package Wizard.?
Cancel button
Click to exit the eSignature Package Wizard.
Step 2:??Provie Package Name and Package Description
190 / 393
Package Name
field
Enter a name for the document(s) that comprise the document package.?
Package
Description field
Enter a description of the documents in the document package.
Next button
Click to proceed to the next step of the eSignature Package Wizard.
Previous button
Click if you want to return to the previous step of the eSignature Package
Wizard.?
Step 3:??Select Documents for Package
?
191 / 393
?
Document
checkbox
From the list of available documents, select all the documents you want to
include in the document package.?
Next button
Click to proceed to the next step of the eSignature Package Wizard.?
Step 4: Select Users
?
192 / 393
?
?
?
Administrators list
Click on the
icon to display the Address Book where you can select all
the administrators you want as members of the document package.??These
users will be notified via email that they have been invited to be
administrative members of the document package.
193 / 393
Users list
Click on the
icon to display the Address Book where you can select all the
users you want as members of the document package.??These users will be
notified via email that they have been invited to be members of the document
package.
Personal
Message field
If desired, edit the default message, which tells the administrator/user that
he/she has been invited as a member of the document package.?
Next button
Click to proceed to the next step of the eSignature Package Wizard.?
To remove an individual from the selected list in the Address Book or in the Wizard, click on
the
?icon.
Step 5: Select Template
Template??list
Select the appropriate template for the document from the list of available
options.??
If there is more than one document, a separate template must be
selected for each document
.
Next button
Click to proceed to the next step of the eSignature Package Wizard.??
194 / 393
Step 6:??Select Signatory Roles
?
?
Counter-Party
Signer list
Select the individual who is the counter-party signer.
Our Signer
list
Select the individual who needs to sign the contract for our company.
Next button
Click to proceed to the next step of the eSignature Package Wizard.?
The email that is sent to the individual designated as "Counter Party Signer" will contain a
link that automatically takes the individual to the document for signature, without the need for
system credentials
.
Step 7: Submit for signatures
?
195 / 393
?
Finish button
Click to exit the eSignature Package Wizard and open the DocuSign Portal.?
?
Step 8: Identify Components of DocuSign Portal
196 / 393
To
field and
Tag
for
list
Identify the individual whose name appears in bold text in the
To
field (this
name also appears in the
Tag for
list). This is the first individual whose
tagged information you need to review.
The default is the Counter-Party
signer, but the other signatory can be selected by simply clicking on their
name in the
To
field or selecting it in the
Tag for
list
.
Tag list
Review the list of tags for the document. The primary tags are the
Signature
tag, denoted by the
icon, the
Optional Signature
tag (
), and the
Initial
tag (
). Other tags that are used often in a
contract document are
Date Signed
,
Title
,
Company
, and
Full Name
.
Before submitting the document for electronic signature, you must ensure
every tag is in the the right location in the document.
Page Number
Review icon
Locate the first page number icon with a yellow background since this
indicates a page in the document that contains one or more tags, which
require your review before the document is submitted for electronic
signature.??Click on the icon to advance to the page.?
Step 9: Verify / Edit Tags for Counter-Party Signer
Signature tag
Locate the Signature tag for the Counter-party signer.
Note:
You may have to
scroll down to locate the tag. "Mouse over" the tag to display the signatory's
name to ensure the correct Signature tag is in the correct location.
When one
signatory is active, the other signatory's tags are grayed out in the document
197 / 393
Other tags
Ensure the other tags are properly located in the document. If you need to add
a tag to the document, simply click on its icon in the tag list, and then drag-and
drop the tag to the desired location in the document.
The tag list is static and
appears on every page of the Portal.
Tag field
Click on a tag if you want to edit its properties or delete the tag.
Increase Tag
Field Size icon
Click the
?icon to increase the size of the field.??Clicking on the icon
increases the field size by one character.
Edit Tag
Properties
icon
Click the
?icon to display a window that will allow you to edit the properties of
the tag.
Tag properties
window
Review the properties for the tag, and edit, as needed.??From this window, you
can change:
·
Name of the tag and the tool tip (text that displays when you mouse-over the
tag).
·
Location of the field so that it displays in exactly the location you want it to in
the document.
·
Font type, font size, and color of the text to make the tag more prominent in
the document.
Delete Tag
icon
Click the
icon to delete the tag from the document.
Step 10: Verify / Edit Tags for Our Signer
198 / 393
To
field or
Tag
for
list
Select the second signatory's name in the
To
field by clicking on it.
You can
also select their name in the
Tag for
list
.
Signature tag
"Mouse over" the tag to display the signatory's name to ensure the correct
Signature tag is in the correct location.
Other tags
Ensure the other tags are properly located in the document. If you need to
add a tag to the document, simply click on its icon in the tag list, and then
drag-and drop the tag to the desired location in the document.
The tag list is
static and appears on every page of the Portal.
Tag field
Click on a tag if you want to edit its properties or delete the tag. Use the
?icon to increase the size of the field. Click on the
icon to delete the tag.
Click on the
?icon to display a window that will allow you to edit the
properties of the tag.
Tag Properties
window
Edit the name and location of the tag, if needed. You can also control the
way the text for a field displays in the document by editing the font size, type,
and color.
Portal toolbar
Use the icons in the toolbar to perform a variety of formatting tasks in the
Portal, including selecting, aligning, and editing tags, as well as rotating and
deleting pages in the document.
Magnification Bar
Click and drag the controller on the magnification bar to the right if you want
to increase the size of the document display, or to the left to decrease its
display size
199 / 393
Step 11: Add Signatories and Recipients
To
field
If you want to electronically submit the contract to people other than the two
signatories, "mouse over" the field until a hand
displays, and then click in
the field to display a Receipts and Routing window.
If you do not want to add
any additional signatories or recipients, proceed to Step 12
.
Recipient Email
and Recipient
Name fields
Enter the email address and name of the person you want to receive the
contract in the appropriate field.
If you are the one who wants to receive the
contract electronically, click the
Add Me
link to quickly populate the fields
.
Add Signer or Add
CC button
Click on the appropriate button, depending on whether the person you
designated to receive the contract needs to sign the contract or only receive
a copy
. The person's name is added to the list at the bottom of the window.
200 / 393
Action list
If you want to change the default action for a signatory (i.e., sign) or a person
who is copied on the contract (i.e., receive a copy), make another selection
in the list. The other options are
Sign in person
and
Acknowledge receipt
.
Email list
If you want to change the delivery of the contract (i.e., email) for the
signatories or another recipient, make another selection in the list. The
options are
Access Code
and
Identity Check.
Delete icon
If you want to delete any signatories or recipients, simply click on their
icon.
Done button
Click to add the signatories and/or recipients and exit the Receipts and
Routing window.
Step 12: Submit Document for eSignatures
Send button
Click to submit the contract for electronic signature.
If you are not ready to submit the document, click the
Save Draft
button to save a copy of
your updates. Use the
Preview
button to view how the document will look to the signatories
and any recipients.
Once the contract is submitted for electronic signature, you need to
track the document
to
ensure the counter party electronically signs it. Once the counter-party signs it, you need to
201 / 393
ensure that
your signatory electronically signs the document
, or
reassigns a signatory
in his/her
absence.
Document Packages
The Document?Package feature is a powerful and comprehensive tool that creates a community
of users and administrators who need to perform a specific task, such as renegotiating the
terms of a contract.??This community has exclusive access to the document package, and
members of this community can perform activities related to these documents, including
checking documents out of the Novâtus system, and then checking them back in again after
revisions have been made.??The members of the document package community can also
communicate with one another via email messages sent from the system.??At the end of
contract negotiations, the Novâtus system can be used to submit the final contract document for
electronic signature.?
A document package can consist of one document or several documents, depending on the
task.??
·
Document?packages are added to a
Contract Profile
using the
Document Package Wizard.
·
Document packages are managed in the
Document Packages browse screen
and the
Document Package Profile
screen of the Contract Profile, and they can also be managed
from the
Document Packages portlet
in the Dashboard
.
You can perform the following tasks related to document packages:
·
View the existing document packages for a contract
·
Create a document package using the wizard
·
Check documents in and out of the package
·
Download a document from the package
·
Lock and unlock documents in the package
·
Edit a Document Package Profile
·
Mark a document in the package as complete
·
Add a contract and attachment to the package
·
Delete a document from the package
·
Manage the types of emails you receive about the document package
·
Manage the members of the document package
·
Send messages to members of the document package
·
Generate a Document Package Report
·
View the revision history
·
Mark a document package as complete
202 / 393
·
Submit a document from the document package for electronic signature
·
Delete a document package
Document Packages Portlet
The Document Packages portlet is a quick and easy way to manage a document package
from your Dashboard.
You can manage:
·
Individual documents
in the package by checking documents in and out of the
package (
), locking and unlocking documents in the package (
), viewing
the revision history of documents in the package (
), downloading a copy of a
document (
), or deleting a document from the package (
).
·
Entire document package
by selecting the types of email notifications you receive
about document activity in the package (
), adding or removing members of the
203 / 393
document package (
), submitting the document package for electronic signature (
), reviewing a document package that has already been submitted for electronic
signature (
), marking a document package as complete (
), deleting the
document package (
), and viewing the Document Packages browse screen (
)
.
Document Package Wizard
The Document Package Wizard allows you to quickly and easily create the document packages
that are used in contract negotiations or other tasks employed by your company.??The wizard?not
only identifies the documents in the document package, but also allows you to select the
members (users) who will participate in performing the task.??Document packages can be stored
in the Novâtus system for future use or deleted when the task has been completed.
?
Before running the Document Package Wizard, make sure all the documents needed for the
document package have been uploaded to the Contract Profile.??Documents are uploaded to
a Contract Profile using the
Documents
link, located in the bottom half of the profile.
?
The Document Package Wizard is launched from the
Action Bar
in the
Contract Profile
.
?
?
?
Document
Package Wizard
Click the
Wizard Tools
button in a Contract Profile and select
Document
Package Wizard
in the menu.?
Step 1: Read Welcome Screen
?
204 / 393
?
Next button
Click to proceed to the next step of the Document Package Wizard.?
Cancel
button
Click to exit the Document Package Wizard.
?
Step 2:??Provide Package Name and Package Description
?
The example below relates to the creation of a packet of forms used by contractors
.
?
205 / 393
?
Package Name
field
Enter a name for the document(s) that comprise the document package.?
Package
Description field
Enter a description of the documents in the document package.
Next Button
Click to proceed to the next step of the Document Package Wizard.
Previous button
Click if you want to return to the previous step of the Document Package
Wizard.?
?
Step 3:??Select Documents for Package
?
206 / 393
?
Document
checkbox
From the list of available documents, select all the documents you want to
include in the document package.?
Next button
Click to proceed to the next step of the Document Package Wizard.?
Step 4: Select Portal Users
?
207 / 393
?
?
?
Administrators list
Click on the
icon to display the Address Book where you can select all
the administrators you want as members of the document package.??These
users will be notified via email that they have been invited to be
administrative members of the document package.
Users list
Click on the
icon to display the Address Book where you can select all
the users you want as members of the document package.??These users will
be notified via email that they have been invited to be members of the
208 / 393
document package.
Personal
Message field
If desired, edit the default message, which tells the administrator/user that
he/she has been invited as a member of the document package.?
Next button
Click to proceed to the next step of the Document Package Wizard.?
To remove an individual from the selected list in the Address Book or in the Wizard, click on
the
?icon.
Step 5: Review Document Package Summary
?
?
?
Document
Package
Summary
Review for accuracy before proceeding.??When you complete the wizard, the
document package will be created and stored in the Contract Profile where it
can be accessed by clicking on the Document Packages link.
Finish button
Click to complete the Document Package Wizard.?
?
When the document package is successfully created and email messages have been sent out
209 / 393
to all the administrators and/or users you selected, a confirmation prompt displays, informing
you that all of these individuals have notified about becoming members of the document
package
.
?
Each administrator and user receives an email message about the invitation to join the
document package
.
?
?
The email also contains a hot link that takes them to the Document Packages browse screen in
the Novâtus system
.
?
?
In the Document Packages browse screen, members can use the many icons to perform the
following tasks:
?
·
Download a copy of the document using the
?icon.
210 / 393
·
Check out a document and then check it back in again after revisions have been made using
the
?and
?icons.
·
Lock a document so that no further changes can be made using the
?icon. The document
is then considered to be "completed."
·
Submit a document for electronic signature using the
?icon.
·
Complete the document package using the
?icon.
·
Manage email messages received by member of the document packing using the
?icon.
·
Add others users to the document package or remove existing members using the
?icon.
?
Document Packages Browse Screen
The document packages?associated with a contract are viewed in the Document Packages
browse screen, which is accessed by clicking on the
Document Packages
link in the
Contract
Profile
,
or by clicking on the
icon in the
Document Packages Portlet
in the Dashboard.
?
?
?
Document
Packages link
Click to view the Document Packages browse screen.?
Current tab
Ensure the Current tab is selected so you can view the active document
packages in which you are a member.
Document
Package records
View the active docuemnt package(s).
?
The Document Packages browse screen contains five other tabs, which allow you to view
browse screens showing the progression of documents in the package as it moves through the
various stages to completion.
·
Checked Out
– lists the documents that have been
"checked out" for review or revision.
·
Submitted
– lists the document packages that have been submitted for electronic
211 / 393
signature.??It also shows the people who are required to sign the document package before it
can be completed.
·
Completed
– lists the document packages that have been completed
.??This list is confined
to those packages for which you are a member.
·
All Packages
– lists all document packages
, both active and completed.
·
All Completed
– lists all the document packages that have been completed by all users
.
From the Document Packages browse, screen, you can perform the following tasks by clicking
on the appropriate icon:
·
Check documents in and out
·
Delete a document
·
Delete the document package
·
Lock and unlock documents
·
View the document(s) revision history
·
Manage members
·
Manage email notifications
·
Mark a document as complete
·
Submit a document package for electronic signature
·
Mark the document package as complete
You can also perform several of the tasks listed above in the
Document Package Profile
screen.
Checking Documents In and Out
During negotiations, some or all of the contract documents may need to be revised.??You can
quickly and easily check out a document that needs to be revised, update it, and then check the
revised document back into the system.??Whenever you check out a document, it is unavailable
to other members until you check the document back in again. ??
?
Documents are "checked out" from the Document?Packages browse screen, which is accessed
by clicking on the
Document Packages
link in a
Contract Profile
,
or by clicking on the
icon
in the
Document Packages Portlet
in the Dashboard.??Documents can also be checked out from
the
Document Package Profile
, which is accessed by clicking on the
Document Packages
link
in a Contract Profile,
selecting the document package,
and then clicking on the
View Document
Package Profile
?icon in the browse screen
.
212 / 393
?
If you want to download a copy of a contract document just to review it (and not make any
revisions), use the
Download Document
feature.
?
Checking Out a Document
+
?
?
Check Out
Document icon
Click on the
?icon to check out a document in the document package and
launch the Download Document prompt.
The icon switches to an upward
arrow
to indicate the document need to be checked back in.
Download the
document link
Click to download the document you just checked out so it can be
revised.??
You can skip this step and download the document at a later time
by clicking the
?icon in the Document Packages browse screen or the
Document Package Profile
.
OK button
Click to launch the Opening window, which will allow you to open or save the
file to your computer.
OK button
Select to open the file.?
?If you want to save a copy of the file, select the
Save
File
radio button and then click the
OK
button.??You can then save the file to
your computer and open it later
.
Checking In a Document
Once you have revised a contract document, you can check it back into the
system (
)
so
that other members of the document package can review your updates
.
If you accidentally check out the wrong document, you can quickly and easily check the original
213 / 393
?
document back into the system by simply clicking on its
?icon.
?
Check In
Document icon
Click on the
?icon to check the document back into the package and
launch the Upload New Document Revision window.
Select File button
Click the
Select
button in the
File
field to display a File Upload window that
will allow you to locate and select the document revision to be added to the
package.
Notes field
Enter a description of the revisions made to the document.??These notes will
display in the browse screen once the document is uploaded.
Keep file checked
out check box
Select if you are not ready to check the document back in so other members
can view and edit it.
Upload button
Click to upload the revision to the document package.
?
Viewing the Revision History
A history of the changes made to each of the documents in a document package can be viewed
from the Document?Packages browse screen.??The Document Packages browse screen is
accessed by clicking on the
Document Packages
link in a
Contract Profile
,
or by clicking on the
icon in the
Document Packages Portlet
in the Dashboard
.?
?
214 / 393
?
Current tab
Ensure this tab is selected to view all the icons for the active document
package.
Document
Revision History
icon
Click the??
??icon to display a screen that lists all the documents that have
been uploaded to the document package.??In this screen, you can download
any of the documents in the document package by clicking its??
?icon.
Locking and Unlocking Documents
A document in the document package can be "locked" so that no further edits can be
made.??Once a document is locked, email notification is sent to all members, notifying them that
negotiations are complete for the document.??A locked document?displays a status of
"completed."
Documents are locked and unlocked from the Document?Packages browse screen, which is
accessed by clicking on the
Document Packages
link in a
Contract Profile
, or by clicking on the
and
icons in the
Document Packages Portlet
in the Dashboard
.??
215 / 393
?
Lock document
icon
Click the
??icon for the document to lock it so that no further edits can be
made.
A locked document displays a status of "completed."
?
Documents can also be locked and unlocked from the
Document Package Profile
, which is
accessed by clicking on the
View Document Package Profile
?icon in the Document
Packages browse screen
.
Unlock document
icon
Click the
?icon for the document to unlock it.??Members of the document
package will now be able to download the document and check it out for
editing.?
?
?
216 / 393
Deleting a Document
One or more documents may need to be deleted from the document package as the work
progresses.??If you delete a document from the package, all of its revisions will also be deleted.?
?
Documents are deleted from the Document?Packages browse screen, which is accessed by
clicking on the
Document Packages
link in a
Contract Profile
, or by clicking on the
icon in
the
Document Packages Portlet
in the Dashboard.??Documents can also be deleted from the
Document Package Profile
, which is accessed by clicking on the
Document Packages
link in a
Contract Profile,
selecting the document package,
and then clicking on its
View Document
Package Profile
?icon in the browse screen
.??
?
Delete icon
Click on a document's
icon to delete it from the Document Packages
screen.?
?
217 / 393
Delete icon
Click on a document's
icon to delete it from the Document Package
Profile screen.?
?
Managing Your Email Notifications
As a member of a document?package, you can control the types of email messages you receive
concerning the activities performed in the document package.??Your email notifications are
managed from the Document Packages browse screen, which is accessed by clicking on the
Document Packages
link in a
Contract Profile
, or by clicking on the
icon in the
Document
Packages Portlet
in the Dashboard.
?
218 / 393
Email
Notifications icon
Click the
?icon for the document package to display its Document
Package Settings window.
?
??
Portal
Settings
check boxes
Select the
Send Check-In Notifications
check box if you want to receive an
email each time a member checks out a document in the document
package.??Select the Send
Check-Out Notifications
check box if you want to
receive an email each time a member checks a document back in.??Select the
Send Document Complete
check box if you want to receive an email each time
a document in the document package is completed.
Save button
Click to save your personal settings for email notifications
Managing Members
The original members of a document package can add new members to the package and they
can also delete existing members.??When a new member is "invited" to join the document
package, they receive an email notification of the invitation, which contains a link to the document
package.??
?
The members of a document package are managed from the Document Packages browse
screen, which is accessed by clicking on the
Document Packages
link in a
Contract Profile
, or
by clicking on the
icon in the
Document Packages Portlet
in the Dashboard.??Document
package members can also be managed from the
Document Package Profile
, which is
accessed by clicking on the
Document Packages
link in a Contract Profile,
selecting the
document package,
and then clicking on the
View Document Package Profile
?icon in the
Document Packages browse screen
.
?
Deleting Members
219 / 393
?
User icon
Click the
icon for the document package to display its Document
Package User Admin window
.?
Manage Users tab
Ensure this tab is selected to view all the members of the document
package.
Delete icon
Click the
?icon for a member to display a Delete Document Member
confirmation prompt.??Click
OK
in the confirmation prompt to delete the
member from the document package.
Admin check box
The current administrator of the document package has a check mark
inside their Admin check box
. Click inside another check box if you want to
select an additional administrator, or de-select a check box to remove a
user's administrator status.
220 / 393
Inviting Members
?
User icon
Click the
?icon to display the Document Package User Admin window.
Add Users tab
Click on this tab to display the fields that will allow you to send an email
invitation to a user to become a member of the document package.
Administrators list
Click on the
icon to display the Address Book where you can select all
the users you want to invite to be administrative members of the document
package.??These users will be notified via email that they have been invited to
be administrative members of the document package.
Users list
Click on the
icon to display the Address Book where you can select all
the users you want to invite to be members of the document
package.??These users will be notified via email that they have been invited to
be members of the document package.
Personal
Message field
If desired, you can replace the text in this field with your own message.
Send Invites
button
Click to send an email invitation to the selected users.
?
221 / 393
When system users receive the email invitation to join the document package, the message
contains a link that directs the user to the Document Packages browse screen for the contract
.
?
?
?
Marking a Document As Complete
The individual documents in a document package must be marked as complete before the
contract can be submitted to the appropriate parties for signature. ?Marking a document as
complete ensures there will be no more changes made to the document.??The documents in a
document package are marked as completed from the Document?Packages browse screen,
which is accessed by clicking on the
Document Packages
link in a
Contract Profile
, or by
clicking on the
icon in the
Document Packages Portlet
in the Dashboard. Documents can
also be marked as completed from the
Document Package Profile
, which is accessed clicking
on the
Document Packages
link in a Contract Profile,
selecting the document package,
and
then clicking on its
View Document Package Profile
?icon in the browse screen.
?
Documents that are still "open" are identified in two ways:
·
Actions
column contains a
?icon.??(Completed documents display a
?icon.)
·
Negotiation
column displays a status of "Open."??(Completed documents display a status of
"Completed.")
To mark a document as complete, simply click on its
?icon.??This will display a Complete
Document confirmation prompt. ?Simply select
Yes
in the prompt to complete the document
.
?
Once all the documents in a document package are marked as complete, the document is ready
for signature.??Documents can be printed and sent to the appropriate parties for signature, or the
signatories can sign the document electronically using the Novâtus
DocuSign Wizard
.
222 / 393
Document Package Profile
The?Document Package Profile contains key data for the document(s), and allows you to
perform the following tasks related to the document package:
·
Add a contract and attachment
·
Check documents in and out
·
Download a document
·
Send messages to members
·
Edit a Document Package Profile
·
Generate a document package report
·
Delete a document
·
Delete the document package
The Document Package Profile is accessed by clicking on the
View Document Package
Profile
?icon in the
Document Packages browse screen
.
?
?
Edit Document
Package button
Click to display the Document Package in edit mode.??The only editable fields
are Package Name and Package Description.
223 / 393
Messaging button
Click to send an email message to a member of the document package or
another user.
Delete button
Click to delete the document package.
Document
Package Report
button
Click to generate a report showing basic information on the document
package, as well as activities related to the package, including the document
(s) that were checked out/in and any messages sent.
Add Attachment
button
Click to display a window that will allow you to upload an attachment for a
document in the package, and enter notes for the attached
document.??When uploaded, the document will be displayed with an
"Attachment" tag and your notes will be visible.
Add Contract
button
Click to upload a new document to the document package.??Make sure you
upload the document to the Contract Profile first, using the Documents link.
Users tab
Click to view a list of the members of the document package.??To delete a
member, click on the member's
?icon.
Invites tab
Click to view a list of the users who were invited to be a member of the
document package, after it was initially created.
?
There are several actions that can performed in a document package:
·
Check documents in and out
·
Lock and unlock documents
·
Download a document from the document package
·
Delete a document from the document package
??Some or all of these actions may be needed in order to complete the task that the document
package was set up to accomplish
.
Adding a Contract and Attachment
As work on a document package progresses, you may need to add an
attachment
to one of the
documents, or add an entirely
new contract
.??You can upload both an attachment to a document
and a new contract to the document package from the Document Package Profile.??The
Document Package Profile is accessed by clicking on the
Document Packages
link in the
Contract Profile
, selecting the document package, and then clicking on its
View Document
Package Profile
?icon in the
Document Packages browse screen
.
?
Adding an Attachment to a Document Package
224 / 393
Add Attachment
button
Click to launch the Upload Document window.?
?
Browse button
Click to display a File Upload window that will allow you to locate and select
the document attachment to be added to the package
225 / 393
Notes field
Enter a description of the document attachment.??These notes will display in
the browse screen once the attachment is uploaded
Upload button
Click to upload the attachment to the document package.
?
When an attachment is added to a document package, the word "Attachment" will be displayed
in the Negotiation column for the document in the Document Packages browse screen.
Adding a Contract to a Document Package
?
Before a new contract document can be added to a document package, it must be uploaded to
the
Contract Profile
using the
Documents
link.
?
?
Add Contract
button
Click to launch the Upload Contract window.?
226 / 393
Contract check
box
Click inside the checkbox for the contract you want to add to the document
package.??To select all the contracts, click in the first checkbox.
Upload button
Click to upload the contract to the document?package.
?
?
Messaging Members
The document package contains a messaging feature to facilitate communication between
members of the document package, as well as other program users.??You can also add any of
the documents from the document package as attachments to the email messages.??Messages
are viewed, sent, replied to, and deleted from the Document?Package Profile, which is accessed
by clicking on the
Document Packages
link in the
Contract Profile
, selecting the document
package, and then clicking on its
View Document Package Profile
?icon in the
Document
Packages browse screen
.
Viewing Messages
227 / 393
?
Messaging button
Click to display a Messaging window.
Message record
Locate the message you want to view, and click on it.
The message record
includes the subject of the message, the date it was sent, and the individual
who sent it
.
Email message
View the information in the message.
·
Click the
Reply
button if you want to reply to the message. A new
Messaging window displays, which allows you to create a new email
message.
·
Click the
Delete Thread
button if you want to delete the message.
?
The Messaging window is separate from the program screens and can be re-sized and
moved onscreen.??To exit the Messaging window, click the Close button
.
?
Creating a Message
You can create a new message to send to members of the document package and/or other
program users. You can also respond to an existing message if the subject of your email
message is already displayed in the Messaging window.
?
228 / 393
?
Messaging button
Click to display a Messaging window, which shows the subjects of the
messages that have been sent from the document package.
If you want to
reply to the existing message, simply click on the
Reply
button and proceed
to step
.
New Thread
button
Click to display a second Messaging window that allows you to send an
email message to any members of the document package.
?
229 / 393
To and CC lists
Click on the
icon in both the To and CC fields to display the
Address
Book
. Click on all the recipients for the email message, and then click the
Submit
button
.
Subject field
Enter the subject of the email message.
Content field
Enter the content of your message.
Attach Document
button
Click if you want to add an attachment to the email message.??The Attach
Document window displays with a list of all documents currently in the
document package.
Document
selection
Click on a document to select it as an attachment.??You can only add one
document attachment at a time.
Attach Selected
Document button
Click to add the document as an attachment to the email message.
Remove link
If needed, click to remove the document attachment from the email
message.
Send button
Click to send the email message.
Downloading a Document
A document can be downloaded from the document package if you want to review it. However,
the downloaded copy will be in a 'Read Only' format, meaning you will not be able to make
changes to the document. If you want to revise a contract document and make your revisions
230 / 393
available to other members of the Document Packages team, use the
Check In - Check Out
Documents
feature
.
Documents are downloaded from the Document?Packages browse screen, which is accessed
by clicking on the
Document Packages
link in a
Contract Profile
, or by clicking on the
icon
in the
Document Packages Portlet
in the Dashboard
.??
Download
Document icon
Click on the
icon for the document you want to download. An Opening
window displays, allowing you to view the document in the program in which
it was created or save the document to your computer
.?
Documents can also be downloaded from the Document Packages Profile, which is accessed
by clicking on the
Document Packages
link in a Contract Profile, and then clicking on the
View
Document Package Profile
?icon in the browse screen
.
231 / 393
Download
Document icon
Click on the
icon for the document you want to download. An Opening
window displays, allowing you to view the document in the program in which
it was created or save the document to your computer
.?
Generating a Document Package Report
The Document Package Report allows you to generate an up-to-date summary of the activities
that have taken place during the life of document package. You can run the report as often as
you need to keep abreast of all the current activity.
The Document Package Report is generated from the Document Package Profile.??The
Document Package Profile is accessed by clicking on the
Document Packages
link in the
Contract Profile
, selecting the document package, and then clicking on its
View Document
Package Profile
?icon in the
Document Packages browse screen
.
232 / 393
233 / 393
Document
Package Report
button
Click to display a the Document Package Report in a new tab in your
browser.
Browser tab
Click on the new browser tab to view the report.
Document
Package Report
View the information in the report, which includes:
·
Basic data (package name, description, members, status, and start
date)
·
Package Documents
section, which provides a history of document
activity, including the date and time documents were checked in and out.
·
Messages
section, which provides a summary of all the email
correspondence for the document package.
234 / 393
Editing a Document Package Profile
The name of a document package and its description can easily be edited from the Document
Profile screen. T
he Document?Package Profile is accessed by clicking on the
Document
Packages
link in the
Contract Profile
, selecting the document package, and then clicking on its
View Document Package Profile
?icon in the
Document Packages browse screen
.
Edit button
Click to display the Document Package Profile in edit mode.?
235 / 393
Package
Name and
Package
Description
fields
Update the information in the Package Name field and Package Description
field, as needed
.
Save button
Click to save your information and edit the Document Package Profile.
From the Document Package Profile screen, you can also:
·
Add a contract and attachment
·
Check documents in and out
·
Download a document
·
Send messages to members
·
Generate a document package report
·
Delete a document
·
Delete the document package
236 / 393
Marking a Document Package as Complete
After the appropriate signatures have been obtained and there is a fully executed document, the
document package can be marked as complete. ?Marking a document package as complete
differs from marking the individual documents in the package as complete.??Individual documents
are marked as complete before the package is submitted for electronic signature.?
?
When?a document package is completed, no further changes can be made.??All the documents
in the package are copied to the Contract Profile as revisions to the original documents.??A
document package is marked as completed from the Document Packages browse screen,
which is accessed by clicking on the
Document Packages
link in a
Contract Profile
, or by
clicking on the
icon in the
Document Packages Portlet
in the Dashboard
.
?
?
237 / 393
Submitted tab
Click to display the status of all documents submitted for electronic
signature.
Signature Status
column
Verify the status for both "Their Signer" and "Our Signer" is "Completed."
Complete
Document
Package icon
Click the
?icon to display the Document Package Completion window.
Document
Package Notes
Enter information pertinent to completing the document package
.
Submit button
Click to mark the document package as complete.
?
Verify that the document package has been completed
.
?
?
Completed tab
Click to display a list of all document packages that have been marked as
complete.??The status in both the Negotiation and Package Status columns
displays as "Completed."
Notes column
Review the system generated note, which states: "Signed document pulled
from DocuSign."
?
Deleting a Document Package
In using a document?package to re-negotiate a contract and its attending documents, it may
become necessary to delete the proposed revisions if they are not accepted by both
parties.??You can easily delete a document package so that the documents in the package are
not copied to the contract as a revision to the original document.
?
238 / 393
A document package is deleted from the Document Packages browse screen, which is
accessed by clicking on the
Document Packages
link in a
Contract Profile
, or by clicking on the
icon in the
Document Packages Portlet
in the Dashboard
.
?
?
All Packages tab
Click to display a list of all document packages that can be deleted.
Delete Document
Package icon
Click the
?icon to delete the document package.??Select
Yes
in the Delete
Package confirmation prompt to delete the document package.
A document package that has been marked as complete cannot be deleted.
Submitting the Contract for eSignatures
Submitting a contract for electronic signatures is a four-step process:
·
Running the DocuSign Wizard
·
Reviewing and editing the document in the DocuSign Portal
·
Tracking the documents submitted for electronic signature
·
Signing a document with an electronic signature
During the process, it may become necessary to
reassign a signatory
for a company
.
239 / 393
Running the DocuSign Wizard
Once a contract has been successfully negotiated, the Novâtus system allows you to obtain
signatures electronically using a DocuSign?Wizard. The DocuSign wizard allows you to select
the template to be used in generating a contract that will be sent for electronic signatue, and also
requires you to identify the parties that need to sign the contarct. Once you complete the wizard,
you will be directed to the
Docusign Portal
, where you will review the document before it is
submitted for electronic signatures.
To begin the process of electronically submitting a document for signature, click on the
electronic signature
icon in the Document Packages browse screen or in the
Document
Packages Portlet
in the Dashboard
.
Clicking on this icon will launch the Docusign Wizard.
Before submitting a document package for signature, all of the documents in the package must
be "
marked as complete
."??
?
?
?
Current tab
Make sure the current tab is selected.
240 / 393
Electronic
Signature icon
Click on the
?icon for the document package to display the DocuSign
Wizard.
Step 1: Read Welcome Screen
?
?
Next button
Click to proceed to the next step of the DocuSign Wizard.?
Cancel button
Click to exit the DocuSign Wizard.
?
Step 2:??Select Template
?
All of the documents that are in the document package being submitted for electronic signature
are listed on the left
.
?
241 / 393
?
Template??list
Select the appropriate template for the document from the list of available
options.??
If there is more than one document, a separate template must be
selected for each document
.
Next button
Click to proceed to the next step of the DocuSign Wizard.??
Previous button
Click if you want to return to the previous step of the DocuSign Wizard.
?
Step 3:??Select Signatory Roles
?
242 / 393
?
Their Signer list
Select the individual who needs to sign the contract for the other company.
Our Signer list
Select the individual who needs to sign the contract for our company.
Next button
Click to proceed to the next step of the DocuSign Wizard.?
The email that is sent to the individual designated as "Their Signer" will contain a link that
automatically takes the individual to the document for signature, without the need for
system credentials.
Step 4: Submit for signatures
?
243 / 393
?
Finish button
Click to submit the document package for electronic signature and exit the
DocuSign Wizard.?
?
Using the DocuSign Portal
When you execute the
DocuSign?Wizard
, you are directed to the DocuSign Portal.??In the Portal,
you must ensure that all the signature tags are in the proper location in the document so that
when the signatory inserts his/her electronic signature, the document is properly executed.??You
must also ensure that tags are inserted in the proper place for any locations in the document
where the signatory is also required to place his/her initials.
See Editing and Deleting Tags
below
.
?
If there is more than one document in the document package, the documents will be combined
into one file.??The combined document is broken down into pages, which correspond to the
amount of text that can be viewed at one time in the Portal.??Document pages correspond to
numbered page icons (e.g.,??
?), which are displayed in the right-hand navigation pane of the
Portal.??Clicking on the numbered page icons allows you to quickly and easily navigate through
the document.??You can also use the scroll bar to the left of the page icons to navigate the
document.
?
Since both parties must sign the contract, you must check the signature tags in both email
messages: one to the signatory of the other company, and one to the signatory of your own
company before sending each message.??The first email message that displays is to the
signatory for the other company and that individual's name is in
bold text
in the
To
?field at the
top of the message.
244 / 393
?
If the signatory tag is in the wrong location, simply click on the tag and drag-and-drop it to the
correct location in the document.??If a tag is missing, click on the tag in the left navigation pane
and drag-and-drop it to the correct location in the document.??There are two signature tags
(required and optional)
??
??and two initial tags (required and optional) ?
?
?that you
can insert into the document
.
?
?
"Tag for" field
Identifies the recipient of the email message and is linked to the
To
?field,
which identifies the signatory for the other company, followed by the
signatory for your company. ?
Clicking on a name in the
To
field changes the
document tags to accommodate the person selected (i.e., the signature tag
(and any other tags) displayed in the document are in color (vs. black &
white) to indicate the tags pertain to the person whose name is displayed in
the
Tag for
field).
Document display
Review the document that will be emailed to the signatories.??The Portal
contains one file, which is comprised of all the documents that were in the
document package and displays them as consecutive documents.
Page Number
Indicator icon
Indicates the current page number you are on in the Portal document.??For
example, if you are on Page 1, the icon for Page 1 will contain a yellow
highlight (
?).??You can also use the scroll bar to move through the pages
of the Portal document.
Magnification bar
Click and drag the controller on the magnification bar to the right to increase
the size of the document display, or to the left to decrease its display size.
?
The items that you must review in the DocuSign Portal are identified by the template you
selected in the DocuSign Wizard.
245 / 393
?
Page Number
Review icon
Locate the first page number icon with a yellow background since this
indicates a page in the document that contains one or more tags, which
require your review before the document is submitted for electronic
signature.??Click on the icon to advance to the page.
Sign Here icon
Indicates the location where the signatory will insert his/her electronic
signature.??Ensure the signature tag is in the proper location.??If not, simply
click on the tag and drag-and-drop it to the correct location.
Additional tags
Ensure any additional tags, such as dates and titles, are correct and in the
proper location in the document.?
User-defined tags
Add an additional tag to the document by clicking on it and then dragging-
and-dropping it to the correct location.??The available tags are Optional
Signature, Initial, Optional Initial, Full Name, Company, Title, Date Signed,
Approve, and Decline.??You can also insert a data field, check box, radio
button, drop-down list, and a Notes field.
To field
Click on the second name in the field to display the tags for the signatory for
your company, and then repeat the review process.
The selected signatory
is displayed in bold text
.
When the second signatory is selected, all the tags
for the first signatory (Signature, Title, etc.) are grayed out.
Preview button
Click to display a preview of the document as it will be seen by both
signatories.
Save Draft button
Click to save a draft of your edits to the document.?
246 / 393
Send button
Click to send the email message to both signatories.
Editing and Deleting Tags in the DocuSign Portal
In reviewing the signature, initials, and other tags in the DocuSign?Portal, you may discover that
the wrong tag has been inserted in the document or that a tag has been inserted where it does
not belong.??You may also want to make some minor revisions to a tag, such as editing the
name of the tag or changing the way the tag is displayed in the document.??The DocuSign Portal
allows you to easily edit tags or delete them from the document
.
?
Tag field
Click on a tag to display the options for the field.
Increase Tag Field
Size icon
Click the
?icon to increase the size of the field.??Clicking on the icon
increases the field size by one character.
Edit Tag Properties
icon
Click the
?icon to display a window that will allow you to edit the
properties of the tag.
Tag properties
window
Review the properties for the tag, and edit, as needed.??From this
window, you can change:
·
Name of the tag and the tool tip (text that displays when you mouse-
over the tag).
·
Location of the field so that it displays in exactly the location you want
it to in the document.
247 / 393
·
Font type, font size, and color of the text to make the tag more
prominent in the document.
Delete Tag icon
Click the
icon to delete the tag from the document.
?
If you have to exit the DocuSign Portal before completing your review, you can easily return
to the Portal by clicking on the Review Envelope icon
?in the Document Packages
browse screen.???Once the signing ceremony has begun and the email messages have
been sent to both signatories, a Void Envelope icon??
?appears, which allows you to delete
the envelope.
?
Tracking Documents Submitted for Electronic Signature
Once a document?package is submitted for electronic signature, the signatory for the other
company receives an Electronic Signature Request email message.??The email message states
that there are documents awaiting signature and the message contains a link that will take the
signatory to the Novâtus screen where an electronic signature can be entered
.
?
The Novâtus system allows you to track the progress of the signature process from the
Document Packages browse screen, which is accessed by clicking on the
Document
Packages
link in a
Contract Profile
.
?
?
Submitted tab
Click to display the document packages that have been submitted for
electronic signature.
Signature Status
column
View the status of the signed document for the signatory from the other
company and the signatory from your company.
Resend Signature
Request icon
Click the
icon if you need to resend the request for an electronic
signature to their signatory.
?
248 / 393
Signing a Document with an eSignature
The Novâtus system sends an Electronic Signature Request email message to the first
individual who must sign a contract document that was negotiated using the
Document
Packages
feature.??The message contains a link that takes him/her directly to the
DocuSign
Portal
after logging into the Novâtus system. ?Once the first signatory signs the document, an
Electronic Signature Request email message is sent to the second signatory
.
?
The review and electronic signing of a document is accomplished from the
Document Packages
browse screen
, which is accessed by clicking on the
Document Packages
link in a
Contract
Profile
.?
?
?
Sign Document
icon
Click the
icon to display the DocuSign Portal and begin the document
review and signing process (ensure the Submitted tab is selected).??The first
review and signing is done by the signatory for the other company.
?
249 / 393
?
Read Full
Agreement link
Click to display a screen showing the full terms of doing business with your
company.??You can also use the scroll button to the right of the Consumer
Disclosure text to read the business terms.
I agree to do
business
electronically???ch
eck box
Click to continue.??If you do not select this check box, you will not be able to
review and sign the document.
Review
Document button
Click to begin the review and signing process.
?
?
250 / 393
?
Start button
Click to begin the document review and signing process.
Close button
Click on the
?icon if you want to exit the review and signing process.??You
will be able to return to it at a later time.
The screen automatically moves to the location where a signature is required
.
?
?
Signature icon
Click on the
?icon to display an Adopt Your Signature window that will
allow you to choose your signature from a list of options.?
Signature
selection options
Locate the signature option that most closely resembles your own, and click
on it to select it.??When you select a signature, it displays in the
Docusigned
by
field.
Adopt and Sign
button
Click to accept the terms of the contract document and sign the document
electronically.
?
?
If you have previously signed a document electronically, the Adopt Your Signature window will
not display.
?
251 / 393
Signatory input
items
If there are other items that need to be filled in, such as entering your title,
inserting your initials at various points in the document, and providing the
date the document was signed, the system will not only direct you to those
areas, but also provide onscreen instructions?
Confirm signing
button
Click to confirm your acceptance accept the terms of the contract document.
After the first signatory completes the electronic signature process, the second signatory
receives an email message and goes through the same process of electronically signing the
document. When the document signing is complete, all members of the document package
team receive a "Document Signing Completed" email message
.?
?
Reassigning a Signatory
During?the life of a document package, you may find it necessary to reassign the duty of
252 / 393
electronically signing a contract for your company.??This change is made quickly and easily from
the
Document Packages browse screen
, which is accessed by clicking on the
Document
Packages
link in a
Contract Profile
.
?
?
?
Submitted tab
Ensure the Submitted tab is selected. Locate the document package whose
signatory needs to be reassigned.
Reassign Signer
icon
Click the
?icon for a document package to display the Reassign
DocuSign Signer window.
Current Signer list
Select the original signer (either "their signer" or "our signer") who needs to
be relieved of the duty of signing the contract electronically.
New Signer list
Select the individual who is replacing the individual selected in the Current
Signer list.
This individual will receive an email message stating that his/her
signature is required
.
Save button
Click to reassign a signatory for the document package.
253 / 393
You can reassign the signatory for both
Their Signer
and
Our Signer
.
?
Contract Workflows
The Novâtus system has a powerful workflow management tool, which allows a variety of
business processes to be mapped to workflow?steps that are executed, tracked, and reported on
in the system.
?
Workflows guide you in applying your company's standard contract processes and procedures,
including monitoring and tracking approvals and determining the location of contract documents
at any point in the contract creation and negotiation processes.??The steps in a workflow include
assigning Workflow Teams (groups of users who process a specific set of steps) and
identifying?Routing Tables (list of the functions and people required for contract approvals).
You can perform the follow tasks related to a contract workflow:
·
Viewing the workflows for a contract
·
Create a workflow
·
Launch the workflow
·
View the workflow steps
·
Manage workflow documents
·
Send a message for a workflow step
·
Complete a workflow step
·
Approve or decline a workflow step
·
Reassign a workflow step
·
Close and re-open workflows
·
Edit and delete workflows
?
Viewing the Contract Workflows Browse Screen
The workflows associated with a contract are viewed from Workflows browse screen in the
Contract Profile. To access the Contract Workflows browse screen, click on the
Workflows
button in the
Action Bar
of the
Contract Profile
.
To view only the
workflow steps that you
"own" (i.e., you are responsible for completing the step), open the
Active Workflow Items
portlet
in your Dashboard.
254 / 393
Workflows tabs
Click on the
Active Workflows
tab to view the "in process" workflows.? Click
on the
Completed Workflows
tab to view all the workflows that have been
finalized. Click on the
Documen
ts tab to view the documents that have
been uploaded to the Contract Profile, and are available for use in the
workflow.
Workflow records
View the list of workflows associated with the contract.
To view additional
information for a workflow, click on a workflow record to display the Workflow
Profile
.
Edit Workflow
icon
Click on the
icon to launch the Workflow Wizard, which will allow you to
edit the name and description, select a different template for the workflow,
update the team members, select a different routing table, and change the
persons responsible for individual workflow steps.?
Delete Workflow
icon
Click on the
icon to delete the workflow.
New Workflow
button
Click to launch the Workflow Wizard, which will allow you to create a new
workflow.
Creating a Workflow
Novâtus employs a Workflow Wizard?to quickly and easily guide you through the process of
creating a workflow.??The wizard?uses templates designed by your System Administrator that
step you through different company procedures. A contract workflow is initiated from the
Action
Bar
of the
Contract Profile
.
??
255 / 393
?
Workflows button
Click to display the Workflows browse screen.?
New Workflow
button
Click to launch the Workflow Wizard.
Step 1: Read Introductory Screen
?
The Workflow Wizard is used to both create and edit workflows
.
?
?
Next button
Click to proceed to the next step of the Workflow Wizard.?
256 / 393
Cancel button
Click to exit the Workflow Wizard.
?
The Workflow Wizard can be moved onscreen by clicking on the top border and dragging-and-dropping
the wizard?to the desired location
.
?
Step 2: Select Workflow Template
?
Depending on the type of contract, one or more workflow templates may be available
.
?
?
Workflow
Template list
Select the appropriate workflow from the list of available options.?
Next button
Click to proceed to the next step of the Workflow Wizard.?
Previous button
Click if you want to return to the previous step of the Workflow Wizard.?
Step 3:??Review/edit Workflow Information
?
The default values in the Workflow Name and Workflow Description fields are set by your
System Administrator.
?
257 / 393
?
Workflow Name
and Description
fields
If desired, you can customize the workflow by editing its name and its
description.??Simply click in the Workflow Name or Workflow Description
field and then type over the existing text.?
Workflow Owner
list
If desired, assign the workflow to another user by selecting their name in the
list of available people.??By default, you are the Workflow Owner.
CC Workflow
Owner check box
Select if you want the Workflow Owner to receive an email message
whenever a change is made to the workflow.
Next button
Click to proceed to the next step of the Workflow Wizard.?
Step 4: Select Routing Table
?
A Routing Table is a set of approvers assigned to a workflow.??If there is more than one routing
table for your contract, you must select a routing table from a list of available tables that meet the
conditions for this contract, including value ranges.
?
258 / 393
?
Routing Table list
Select a routing table from the list.??
If there is only one routing table for this
type of contract, you do not have to make a selection
.?
Next button
Click to proceed to the next step of the Workflow Wizard.?
Step 5: Select Workflow Team
?
A Workflow Team is a list of users who can be assigned to complete the different steps in a
workflow.
?
?
?
259 / 393
?
Workflow Team
list
Select a workflow team from the list of available teams.??The team members
and their contact information displays at the bottom of the window.??If you
want to delete a member from the team, click the
?icon for that person.?
Add Team
Member button
Click to display the
Address Book
if you want to add additional members to
the workflow team
.
Address Book
records
Click on a record to add the user to the team. The selected users appear at
the top of the screen in the
Selected
text box. To remove a user from the
team, click the user's Delete
icon.
Submit button
Click to add the additional user(s) to the workflow team.
Next button
Click to proceed to the next step of the Workflow Wizard
?
Step 6: Select Owners for Steps
?
The wizard?displays a list of the steps in the workflow.??For each step, a team member must be
assigned to complete the task.??The list of people available for each step is based on the
functions that each person has been assigned in the Novâtus system
.
?
260 / 393
Owner list
Select an owner for each step in the workflow.?
Next button
Click to proceed to the next step of the Workflow Wizard.?
Step 7: Save Workflow
?
?
?
261 / 393
Finish button
Click to create the new workflow and exit the Workflow Wizard.?
?
?
Launching a Workflow
The Contract Workflows browse screen displays a list of the existing contract workflows and
their descriptions, as well as basic information on the contract.? From the browse screen, you
can launch a contract workflow.
To access the Contract Workflows browse screen,
click on
the
Workflows
button in the
Action Bar
of the
Contract Profile
.
?
?
?
Workflow tabs
Ensure the
Active Workflows
tab is selected.
Workflow record
Click to display a Workflow Profile showing the information for the workflow,
including the steps and the completion status of each step.
?
The first time you click on a workflow record, the workflow process will be launched.??The
person assigned to the first step of the workflow will receive an email message, notifying
him/her that action is required for the workflow.??The message includes hot links that direct
the user to the Novâtus system.???A sample email message is provided below.
262 / 393
Viewing Workflow Steps
Information for the individual steps in a contract workflow can be viewed from the Workflow
Profile.
To access a Workflow Profile from the Contract Profile, click on the
Workflows
button in the
Action Bar
of the
Contract Profile
, and then click on a workflow record in the
Workflows browse
screen
.??All of the steps in the workflow are displayed in the Workflow Profile. You can also view
all of the steps in a Workflow Profile by clicking on any of the steps you "own" in the
Active
Workflow Items
portlet
in your Dashboard.
?
?
263 / 393
?
?
Workflow step
From the Workflow Profile, view the current step(s) in the workflow and
information on each step. From the Active Workflow Items portlet, you can view
only the steps that you "own."
?
Documents
tab
Click to view the list of documents associated with the workflow.??Click on the
?icon to view or download a copy of any document.
Documents
button
Click to display a screen where you can manage all the company, contract, and
global documents available for this workflow.
Send
Message?
button
Click on the
??icon to display the Send Message button. In both the Workflow
Profile and Active Workflow Items portlet, this button is present only if the
workflow step requires communication between users or with an external party.
??Otherwise, clicking on the icon displays completion notes for the step.
Close
Workflow
toggle button
Click if you want to close the workflow. The button will redisplay with a "Reopen
Workflow" label so that the workflow can be re-opened at any time. The
workflow is moved from the
Active Workflows
to the
Completed Workflows
view
(tab).
Note:
Any member of the workflow team can close the workflow at any time,
even if all the steps have not been completed.
Browse
Workflows
button
Click to return to the Workflows browse screen.
264 / 393
Contract
Profile icon
Click on the
??icon to display the Contract Profile for the workflow.
Managing Workflow Documents
Documents can be uploaded to a contract workflow via the Documents tab. There are also
system documents that are available for use in a workflow. These system documents, which
are categorized as
company
,
contract
, and
global
documents, are managed from the Workflow
Profile.
To access a Workflow Profile from the Contract Profile, click on the
Workflows
button in the
Action Bar
of the
Contract Profile
, and then click on a workflow record in the
Workflows browse
screen
. You can also open the Workflow Profile for the step(s) you own from the
Active
Workflow Items
portlet
in your Dashboard.
Documents
button
Click to display a browse screen showing the system documents that have
already been added to workflow. Click on the
icon for any document if
you want to view it.
?
Edit Workflow
Documents
button
Click to display a screen that will allow you to manage (add or remove) the
documents for the workflow.
265 / 393
Contract,
Company, and
Global
Documents tab
Click on the
Contract Documents
,
Company Documents
, or
Global
Documents
tab to see a list of available documents in the selected
category.
Contract,
Company, or
Global
Documents
record
Locate the system document that you want to attach to the workflow. Click
on the document's Add
icon to copy the document to the
Attached
Documents
.
If you want to remove an attached document from the workflow, simply click
on that document's Delete
icon.
Save button
Click to save your updates to the system documents attached to the
workflow.
Sending a Message for a Workflow Step
The Novâtus system allows you to send messages from a workflow step and then stores the
messages as a historical record. Messages can be sent from the
Active Workflow Items
portlet
in the Dashboard or from the Workflow Profile. To access a Workflow Profile from the
Contract Profile, click on the
Workflows
button in the
Action Bar
of the
Contract Profile
, and then
click on a workflow record in the
Workflows browse screen
.
?
266 / 393
?
?
Expand icon
From the Workflow Profile or the Active Workflow Items portlet, click on the
icon to display the
Send Message
button. ?If the button is not present,
messaging is not needed for this step.?
Send Message??
button
Click to display a Messaging window that will allow you to send an email
message regarding the workflow or a workflow step.
267 / 393
Messaging fields
Select the recipients for the email message, as well as any people you want
to copy on the message.??Enter a subject for the email and type your
message in the Content field.
Attach Document
button
Click to display a window that will allow you to attach any workflow document
to the message.
Note:
To quickly locate a document, click on a column
heading (e.g., Document Type, Filename, Author) to sort the list of
documents in alphabetical order.
Send button
Click to send the email message.??A confirmation message displays to
indicate the message was successfully sent.
When recipients receive the email message, it not only contains the message and any attached
documents, but there are also hot links that can be used to quickly access the Novâtus system
.
?
268 / 393
?
?
Completing a Workflow Step
The owner of each contract workflow step must "complete" the step in the Novâtus system once
the task associated with the step has been performed. You can complete a workflow step from
the Contract Workflow Profile or from the
Active Workflow Items
portlet
in your Dashboard by
simply clicking on the Complete
icon.
To access a Workflow Profile from the Contract Profile, click on the
Workflows
button in the
Action Bar
of the
Contract Profile
, and then click on a workflow record in the
Workflows browse
screen
.
?
269 / 393
?
Workflow
step
Locate the step you want to complete in the Workflow Profile or your Active
Workflow Items portlet.
Complete
Workflow
Step icon
Click on the
??icon to display an Item Complete window.
?
?
?
270 / 393
Item Complete
text field
Type in a description of the actions taken to complete the step in the space
provided.
Submit button
Click to complete the workflow step.
?
Once all the steps in a workflow are completed, the workflow is automatically transferred
from the
Active Workflows
tab to the
Completed Workflows
tab.
Approving or Declining a Workflow Step
One or more steps in a contract workflow may need to be approved before the contract is
finalized.??Workflow steps can be approved (or declined) from the Workflow Profile or from the
Active Workflow Items
portlet
in your Dashboard by clicking on the approve
icon or the
decline
icon
To access a Workflow Profile from the Contract Profile, click on the
Workflows
button in the
Action Bar
of the
Contract Profile
, and then click on a workflow record in the
Workflows browse
screen
.
271 / 393
?
Workflow step
View the steps in the workflow.??Any step that contains the
?and
?icons
is a step that requires approval.
Approve icon
Click the
icon to approve the workflow step. An Item Complete window
displays containing a message that simply says "Approved." Click the
Submi
t button to approve the workflow step.
If you want to add comments
or notes, type your information in the messaging area before clicking the
Submit button
.
Decline icon
Click the
icon to decline approval of the workflow step.
An Item Complete
window displays. Enter your reason for declining to approve the workflow
step in the messaging area, and then click the
Submi
t button
.
Reassigning a Workflow Step
You can reassign a workflow step for which you are the owner to another user in the Novâtus
system.??If you are unavailable (e.g., vacation or sick leave), reassigning your workflow steps
guarantees that the workflow process continues, uninterrupted.??Your System Administrator
designates which steps in a workflow can be reassigned.
Your workflow steps can be viewed and reassigned from the
Active Workflow Items
portlet
in
your
Dashboard
.?
?
272 / 393
?
?
?
User icon
Click the
?icon to display the Reassign Step Owner window.??
If the icon is
not present, this step cannot be reassigned
.
Reassign Step list
Select the new owner of your workflow step.
Notes for
Reassignment
field
Enter a message for the person to whom you are reassigning your workflow
step.??This message will appear in the email that is sent.
273 / 393
Reassign button
Click to reassign the workflow step and send an email message to the new
step owner.
Closing and Re-opening Workflows
A user who is a member of a workflow team can close the workflow, even if all of the steps have
not been completed. This may be necessary if you want to stop email messages from being
sent to team members who no longer have any responsibility for the remaining steps, or in the
event no further steps need to be taken for a particular workflow. Conversely, a closed workflow
can easily be re-opened by any workflow team member.
A workflow is closed or re-opened from the Workflow Profile. To access the Workflow Profile
from the Contract Profile, click on the
Workflows
button in the
Action Bar
of the
Contract Profile
,
and then click on a workflow record in the
Workflows browse screen
to display the completed
and pending steps in the workflow.
Ensure the
Active Workflows
tab is selected in the Workflows browse screen
.
Close Workflow
toggle button
Click to close the workflow.
274 / 393
Reopen Workflow
toggle button
Click to re-open the workflow.
Editing and Deleting Workflows
A workflow can be edited or deleted from the Workflows browse screen.??To access this screen,
click on the
Workflows
button in the
Action Bar
of a
Contract Profile
.
?
?
Edit Workflow
icon
Click the
?icon to redisplay the Workflow Wizard where you can edit the
following: Workflow Name, Description, Owner, Team, and Step Owner.
Delete Workflow
icon
Click the
icon to display a prompt that confirms you want to delete the
workflow.?
Payments
In the Novâtus system, payments associated with a contract refer to both outgoing payments, or
monies your company pays in accordance with the terms of a contract, and incoming payments,
or monies your company receives for the contractual services it provides. You can create a
forecast of future payments for a payment stream or the system can automatically generate a
forecast based on the current data in the payment stream.? Payments are managed from the
Contract Profile
via the
Payments
link.
?
Payments?streams and forecasts are stored in the Payments browse screen in the Contract
Profile.??From the
Payments browse screen
, you can:
·
Add a payment stream
·
Edit a payment stream
·
Delete a payment stream
275 / 393
·
Create a payment forecast
·
View the payment forecast
?
Payments Browse Screen
The payments associated with a contract are viewed from Payments browse screen in the
Contract Profile
.
?
??
Payments link
Click to view the Payments browse screen.?
276 / 393
Expand icon
Click on the
?icon to display the individual payments in a payment
stream.??Click on the
?icon to hide the payments in the stream.
Payment record
View the list of payments in a payment stream.?
Payment record
totals
View the total number of payments and the total dollar value of the payments
in a stream.??Both of these values are automatically calculated by the
system.
View Forecast
button
Click to display a screen showing the number of future payments and the
total dollar value of the payments.
Adding a Payment Stream
Payment?streams are added from the Payments browse screen.??To access the
Payments
browse screen
, click on the
Payments
link in a
Contract Profile
.??From the browse screen, click
the
Add Stream
button to display a screen that will allow you to add a payment stream.
?
??
Stream Name
field
Enter a descriptive name for the payment stream.?
Stream Type list
Select Outgoing if you are tracking the payments made by your company
under the contract.??Select Incoming if you are tracking the payments due to
your company under the contract.
Add Payment
button
Click to display the fields that will allow you to add a payment record to the
payment stream.
277 / 393
Payment data
fields
Enter the required information for the payment record.
Delete Payment
icon
Click the
?icon to delete a payment record.
Save button
Click to save your information and add a payment record to the payment
stream.
To edit any data field while adding a payment record, simply double-click in the field to make
it editable.
Editing a Payment Stream
A
payment?stream is edited from the
Payments browse screen
.??To access the Payments
browse screen, click on the
Payments
link in a
Contract Profile
.
?
?
?
278 / 393
?
?
Edit Payment
Stream icon
Click to display a screen that will allow you to edit the payment stream.?
Stream Name field
and Stream Type
list
Change the name or the type of payment stream, as needed.??
Payment record
Double-click inside any payment record field to make it editable.??Update
the information, as needed.
Add Payment
button
Click to add another payment to the payment stream.
Delete Payment
icon
Click the
?icon to delete a payment record.
?
Deleting a Payment Stream
A payment?stream is deleted from the
Payments browse screen
.??To access the Payments
browse screen, click on the
Payments
link in a
Contract Profile
.
?
279 / 393
?
?
Delete Payment
Stream icon
Click the
?icon to display a Delete Stream confirmation prompt.?
Delete Stream
prompt
Click the Yes button to delete the payment stream.
?
Creating a Payment Forecast
The Novâtus system has a payment forecasting feature that calculates future amounts due/
received on a contract, including any percentage increment to the payment amount due/
received.??Payment forecasts are created from the
Payments browse screen
, which is
accessed by clicking on the
Payments
link in a
Contract Profile
.
??
280 / 393
?
Payment
forecasting icon
Click to display a screen that will allow you to create a payment forecast.?
?
?
Start Date field
Double-click in the field and enter the date the first payment will be made/
received.??You can also use the Calendar option.
No of Payments
field
Enter the total number of payments that will be made/received.
281 / 393
Frequency list
Select the frequency with which payments will be made or received.??The
options are Monthly, Annual, and Quarterly.
Amount field
Enter the dollar value of each payment.
Increment Interval
field
If applicable, select how often the payment will increase over time.??The
options are Monthly, Annual, and Quarterly.?
Increment
Percentage field
If applicable, enter the percentage (e.g., 5%, 10%) that the payment amount
will increase.
Generate Rows
button
Click to display the payment forecast records in the bottom half of the
screen.??Each payment record shows a Start Date, End Date, and the
Amount.??The number of records displayed is equal to the number of
payments times their frequency (monthly, annual, quarterly).
Save Payment
Forecast button
Click to save the payment forecast.??This forecast can now be viewed at any
time by clicking the
?icon from the Payments browse screen.
Remove All button
Click to remove the forecast.
Add Item button
Click to add a payment forecast record manually.
Viewing the Payment Forecast
There are two ways to view the payment forecast for a contract if the contract has only one
payment stream.??However, if there is more than one payment stream, the individual forecasts
can be viewed separately or all forecasts can be viewed from one location.??In either situation,
viewing payment forecasts is initiated from the
Payments browse screen
, which is accessed by
clicking on the
Payments
link in a
Contract Profile
.
?
Viewing Individual Payment Forecasts
282 / 393
?
?
?
Payment
forecasting icon
Click to display a screen showing the payment forecast for the payment
stream.?
Payment
Forecast records
View the payment amounts that will be made/received and their end (due)
date.??The difference between the start and end date is the amount of time
between payments.
283 / 393
Sort button
Click to sort the records in ascending or descending order.
Viewing All Payment Forecasts
The comprehensive view of payment forecasting provides a higher level of detail than the
individual views of a contract's payment streams.??In addition to the amounts due (or owed) and
the payment end (due) dates, the system also calculates any differences between what has
been paid (or received) and what is still due (or owed)
.?
?
?
?
284 / 393
View Forecast
button
Click to display a screen showing all the payment forecasts for the contract.?
Payment
Forecast records
View the payment records in all of the payment streams.
Number of
Payments field
Indicates the number of payments that have been made or received for the
payment stream.
Difference field
Displays the difference between the value in the Forecasted Amount field
and the value in the Total Payments field for each payment record.??This is
the balance due (or owed) for this scheduled payment.
Products
The products covered by a contract can be classified as either goods or services. The
information captured for the products associated with a contract include price, quantity,
classification, description, and product number. Products are managed from the
Contract
Profile
via the
Products
link.
The list of products for a contract can be viewed in the
Products browse screen
in the Contract
Profile.??From the Products browse screen, you can also:
·
Add a product
·
Use the product grid
The Product Profile stores additional information for each product. From the
Product Profile
, you
can also:
·
Edit product information
·
Delete a product
285 / 393
Products Browse Screen
The products associated with a contract are viewed from Products browse screen, which is
accessed by clicking on the
Products
link in the
Contract Profile
.
Additional information for a
product can be viewed in its
Product Profile
.
Products
link
Click to view the Products browse screen.
Product record
View the product records.
The information for each product includes its
name and a description of the product, its classification and product number,
and its quantity, price, and unit of measure
. Click on a product record to
display the
Product Profile
and view additional information for the product.
New Product
button
Click to
add a product
to the product grid.
Edit Product Grid
button
Click to
manage the products
associated with the contract.
Product Profile
The Product Profile stores additional information for each product, including a complete
description of the product and detailed information on its classification or product category
.
To
access a Product Profile, click on the
Products
link in a
Contract Profile
to display the
Products
browse screen
, and then click on a product record to display its Product Profile.
286 / 393
Product fields
View the information for the product, including a detailed description of the
product and the entire classification code.
Edit button
Click if you want to
edit the product information
.
Delete button
Click if you want to
delete the product
.
Back to Browse
button
Click if you want to return to the
Products browse screen
, showing a list of all
the products for the contract.
Adding a Product
Products are added from the
Products browse screen
.??To access the browse screen, click on
the
Products
link in a
Contract Profile
.??From the browse screen, click the
New Product
button
to display a screen that will allow you to add a product to the grid
.
287 / 393
Product Name
field
Enter the name of the product.
Product
Description field
Provide a description of the product.
Product Quantity
field
Enter the quantity of the product, as defined in the contract.
Product Price field
Enter the price of the product, as defined in the contract.
Do not enter a $
sign
.
Product Unit of
Measure field
Provide the way in which the product is quantified or measured (e.g., each,
pound, gallon, etc.).
Product Number
field
Provide the number assigned to the product.
This can be either the
manufacturer's product number or the number assigned to the product by
your company
.
Product
Classification list
Click the
arrow to display a list of product goods and services. Products
are classified using a five digit code (e.g., 204-48) with the first three numbers
assigned to a broader category of products and the last two numbers
288 / 393
assigned to a sub-category.
Note:
You can reverse the sort order of the
product codes by clicking on the
Classification Code
heading, and reverse
the alphabetical listing of the product classes by clicking on the
Classification Name
heading.
Search field
To quickly locate a product category, type in the
name of the product
or the
first three numbers of the
product
code
(if known). Click the
icon.
Save button
Click to add the product to the grid.
Editing Product Information
A product's information is edited from its Product Profile.??To access the Product Profile, click on
the
Products
link in the Contract Profile to access the
Products browse screen
.??From the
browse screen, locate the product you want to edit, and click on its product record to display its
Product Profile
.??Click on the
Edit
button in the Action Bar to display the Product?Profile in edit
mode.
289 / 393
Data fields
Update the information for the product name, description, quantity, price,
number, and unit of measure, as needed.
Product
Classification list
Use the classification names and codes list if you need to update the way
the product is classified.
Use the Search feature to quickly locate a product
by its classification code or name
.
Save button
Click to save your changes and edit the product information.
Deleting a Product
A product can easily be deleted if it is no longer covered by the contract or if it has depreciated to
a zero value before the contract expires.
A product is deleted from its Product Profile.??To access the Product Profile, click on the
Products
link in the Contract Profile to access the
Products browse screen
.??From the browse
screen, locate the product you want to delete, and click on its product record to display its
Product Profile
.
Delete button
Click to display a Delete Product confirmation prompt.
290 / 393
Yes button
Click to delete the product.
Product Grid
The product grid is a centralized, editable listing of all the products stored in a
Contract Profile
. It
is a highly useful tool since it allows you to add products to the grid, as well as make edits to all
the fields for existing products, while viewing all products in a single program screen.
From the product grid, you can:
·
Add a product to the grid
·
Edit and delete products from the grid
You can also
add a product
from the
Products browse screen
and
edit product information
and
delete products
from the
Product Profile
.
Adding a Product to the Grid
You can
add a product
to a Contract Profile from the
Products browse screen
, or from the
product grid. The browse screen is access by clicking on the
Products
link in a
Contract
Profile
.
The benefit of adding a product via the grid is that the information for all other products is
readily visible, making shared information (e.g., product classifications) easily obtainable.
Edit Product Grid
button
Click to display the Product grid.?
291 / 393
Add Product
button
Click to add a blank product record to the grid.
Product fields
Click inside the
Product Name
,
Product Description
,
Product Unit of
Measure
,
Product Quantity
,
Product Unit Price
, and
Product Number
fields, and enter the appropriate information.
Product
Classification list
Click the
arrow to display a list of product goods and services. You can
navigate the list using the navigation arrows or by typing a page number in
the
Page
field and hitting the
Enter
key on your keyboard. You can also
reverse the sort order of the product codes by clicking on the
Classification
Code
heading, and reverse the alphabetical listing of the product classes by
clicking on the
Classification Name
heading.
Save button
Click to save your information and add the product to the grid.
Editing and Deleting Products in the Grid
Information for several products can be updated from a central list using the product grid. This is
very useful if you have a lot of products with similar names, numbers, and/or product
classifications since you can sort the products, thereby grouping like items, and making updates
easier to apply. This is also true is you have a series of products with the same name, number,
or classification that have discontinued and need to be removed from the product list
.
Products are edited and deleted in the grid from the
Products browse screen
. To access the
browse screen, click on the
Products
link in a
Contract Profile
.
292 / 393
Edit Product Grid
button
Click to display the Product grid.?
Field heading
Click on the
Product Name
,
Product Description
,
Product Unit of
Measure
,
Product Quantity
,
Product Unit Price
, or
Product Number
heading to sort the information and make it easier to locate the product you
want to edit.
Note:
The Product Classifications field
cannot
be sorted.
Product field or list
Click inside a field to make it editable. Type over the existing text to edit the
information. To edit the selection in the
Product Classifications
list, click in
the field to enable it, click the
arrow to display the list, and then click on
an entry to update the product class. Navigate the list by using the navigation
arrows or by typing a number in the
Page
field and pressing the
Enter
key on
your keyboard.
293 / 393
Delete icon
Click on a product's
icon
if you want to delete the product.
Save button
Click to save your changes and edit the product information.
Addresses
The Addresses?feature is used to store and manage the addresses associated with a
company's individual contracts.??This feature is available in a
Contract Profile
, but addresses are
added using the
Locations
feature in the
Company Profile
so that when a contract is added to a
Company Profile, the company locations are available in the Contract Profile and a location can
be easily assigned to a contract
.
The addresses for a contract are managed from the Contract Profile, where you can:
·
View the addresses associated with a contract
·
Add an address
·
Edit a contract address
·
Delete a contract address
?
Contract Address Browse Screen
The addresses associated with a contract, such as the shipping and billing addresses, are
viewed from the
Contract Profile
using the Contract Addresses browse screen
.
?
294 / 393
?
Addresses
? link
Click to view the Contract Addresses?browse screen.?
Address records
View the addresses for the contract.
?
Adding a Contract Address
An address is added to a Contract Profile from the
Contract Address browse screen
. To access
the browse screen, on the
Addresses
link in a
Contract Profile.
Once you are in the Contracts browse screen, you can add an address by:
·
Using an existing company address from the Company Profile
·
Adding a new company address if the address is not listed in the Company Profile
?
?
Adding an Existing Company Address to a Contract
If the contract address you want to add is already stored in the
Company Profile
, you can quickly
and easily add it to the
Contract Profile
.
295 / 393
?
?
Edit
Addresses?button
Click to display a screen that will allow you to assign an existing company
address to a contract.
Show Company
Locations button
Click to display a list of the existing addresses for the company. ?This is a
toggle button that displays as Show or Hide Company Locations.
Add icon
Locate the correct company address and click on its
?icon to add it as a
contract address.
If none of the addresses are correct, you will have to
add a
new address
.
Address Type list
Click on the
icon to display a list of available address types, and then
click on an address type to select it.
296 / 393
Attention To field
Click in the field to enable it, and then enter the name of the person to be
contacted at the new address.
Save button
Click to save your information and add the contract address.
Adding a Company Address to a Contract
If the contract address you want to add is not stored in the
Company Profile
, you must add it to
the Contract Profile.
Before adding a new company address, ensure the address has not already been entered into
the Novâtus system.??See
Adding an Existing Company Address to a Contract
.
?
?
?
Edit Addresses?
button
Click to display a screen that will allow you to assign a new company
address to a contract.
297 / 393
New Company
Location button
Click to display a screen that will allow you to add a new company address.
?
Required fields
Enter the required information for the address:
Location Name
and
State/
Province
.
Optional fields
Enter the optional information for the location:
Address
,
Location Type
,
Phone Number
, and
Fax Number
. ?
In the phone and fax number fields, click on the
?icon to display a
Phone Number Entry
window where you can enter the area code, phone
number, as well as an extension number and country code.
Save button
Click to save your information and add the contract address.
?
Once you have added the company address, you now have to assign it to a contract.??Follow the
procedure outlined in
Adding an Existing Company Address to a Contract
.
?
?
Editing Contract Addresses
You can quickly and easily edit the contract addresses associated with a contract from the
Contract Addresses?browse screen
.??To access the browse screen, click the
Addresses
link in
a
Contract Profile
.?
?
298 / 393
Edit Addresses
button
Click to make the
Address Type
list and
Attention To
fields editable.??
The
other fields are not editable since the address and contact number
information are linked to the Company Profile.
?
?
Editable fields
Update the information in the editable fields, as needed. ??
Save button
Click to save your information and edit the information for the contract
address.
?
Deleting Contract Addresses
You can quickly and easily delete the contract addresses associated with a contract from the
Contract Addresses?browse screen
.??To access the browse screen, click the
Addresses
link in
a
Contract Profile
.
299 / 393
?
Edit Addresses
button
Click to display the addresses for the contract.
?
?
Delete icon
Click on the
?icon for the contract address you want to delete to display a
delete contract address confirmation prompt.?
300 / 393
Delete contract
address prompt
Click the
Yes
button to delete the contract address.
?
301 / 393
Additional Forms
Additional?Forms are available in a Contract Profile only if your Administrators have created
supplemental contract language for specific types of contracts.??For example, a contract may
contain an assignment clause, so one or more forms may be available containing different
language, depending on the conditions under which an assignment can be accomplished.??The
same is true for additional forms associated with specific types of companies, such as MWBE
(Minority and Women-owned Business Enterprise) forms that are used to validate eligibility.
If additional forms exist for a contract, you can:
·
View the forms in the Additional Forms browse screen
·
Access an Additional Form Profile
·
Add an additional form
·
Copy an additional forrm
·
Edit an additional form
·
View the history of an additional form
·
Delete an additional form
?
Additional Forms Browse Screen
The additional forms associated with a contract or company are viewed from the Additional
Forms browse screen for a
Contract Profile
or
Company Profile
.
302 / 393
?
?
Additional Forms
link
Click to view the Additional Forms browse screen for the contract or
company.??
The Links Menu will look different if you are viewing it from a
Company Profile.
Additional Form
Categories
Locate the category that contains the additional form you want to view, and
click on it to display a list of forms in this category.
?
The number of forms captured for an additional form type is displayed in the browse
screen.??When you click on an additional form type record that has two or more captured
forms, each form displays in the next screen.
?
?
Additional Form
record
Locate the additional form you want to view, and click on it to display its
Additional Form Profile
.
303 / 393
Additional Form Profile
An Additional?Form Profile contains additional information on the form.??The Action Bar in the
profile contains buttons that allow you to
edit
the information for the additional form, make a
copy
of the form, and view a
history
of the changes made to the form.?
?
An Additional Form Profile is accessed from the
Additional Forms browse screen
.??To access
the browse screen, click on the
Additional Forms
link in a
Contract Profile
or
Company Profile
,
locate the category for the additional form, and then click on it to view a list of the additional
forms in this category
.
?
Additional Form
category
Click to view a list of all the forms in this category.
?
?
304 / 393
Additional Form
record
Click to display the Additional Form Profile.
?
?
Additional Form
Profile fields
View the information captured for the additional form
.
Edit button
Click to edit the information for the additional form.
Copy button
Click to make a copy of the additional form.
The duplicate form will now
appear in the browse screen for this additional form category. Click the
Back
to Browse
button in the Action Bar to verify the form has been copied.
History button
Click to view a history of the changes made to the additional form.
?
Adding an Additional Form
You can add an additional form to a form category in a
Contract Profile
or
Company Profile
from
the
Additional Forms browse screen
.
?
305 / 393
Additional Forms
link
Click to view the Additional Forms browse screen.??
The Links Menu will look
different if you are viewing it from a Company Profile
.
Additional Form
categories
Locate the category for the new form, and click on it to display a screen
showing a list of the current forms in this category.
?
Additional Form
records
View the list of available forms for this form category.
Note:
If the form you
want to add is similar to an existing form, you can use the
Copy feature
and
then edit the form appropriately instead of creating a new form.
306 / 393
New [Form Type]
button
Click to display a screen that will allow you to create a new form in this
category.
?
Data fields
Enter the required and optional information for the form.
Save button
Click to save your information and add the additional form.
Editing an Additional Form
You can edit any of the additional forms in a
Contract Profile
or
Company Profile
?from the
Additional Forms browse screen
.
307 / 393
Additional Forms
link
Click to view the Additional Forms browse screen for the contract or
company.??
The Links Menu will look different if you are viewing it from a
Company Profile.
Additional Form
categories
Locate the category for the form you want to edit, and click on it to display a
list of the available forms in this category.
?
Additional Form
records
Locate the form you want to edit, and click on it to display its Additional Form
Profile.
?
308 / 393
Edit button
Click to display the Additional Form Profile in edit mode so you can update
the information.
?
Data fields
Update the information for the form, as needed.
Save button
Click to save your updates and edit the additional form.
Copying an Additional Form
You may choose to copy an additional form instead of adding a new form. This is recommended
if the form you want to add is very similar to an existing form. Once you copy the form, you can
309 / 393
edit
the new form, as needed
.
You can copy any of the additional forms in a
Contract Profile
or
Company Profile
?from the
Additional Forms browse screen
.
Additional Forms
link
Click to view the Additional Forms browse screen for the contract or
company.??
The Links Menu will look different if you are viewing it from a
Company Profile.
Additional Form
categories
Locate the category for the form you want to copy, and click on it to display
a list of the available forms in this category.
310 / 393
Additional Form
records
Locate the form you want to copy, and click on it to display its Additional
Form Profile.
Copy button
Click to display the Additional Form Profile in edit mode so you can update
the information.
Data fields
Update the information in the form fields, as needed.
311 / 393
Save button
Click to save your changes and make a copy of the additional form.
The
system returns you to the browse screen for the additional forms.
Additional Form
record
Verify that your revised copy of the additional form has been added to the list
of forms for this category.
Deleting an Additional Form
You can delete any of the additional forms in a
Contract Profile
or
Company Profile
from the
Additional Forms browse screen
.
?
?
Additional Forms
link
Click to view the Additional Forms browse screen.??
The Links Menu will look
different if you are viewing it from a Company Profile.
312 / 393
Additional Form
categories
Locate the category for the form you want to delete, and click on it to display
a list of the available forms in this category.
?
Additional Form
records
Locate the form you want to delete in the list of available forms, and then
click on it to display its Additional Form Profile.
Edit button
Click to display the Additional Form Profile in edit mode.
?
313 / 393
?
Delete button
Click to display a Delete Form confirmation prompt.?
Delete form
confirmation
prompt
Click the Yes button to delete the additional form.
?
Viewing the History of an Additional Form
You can view a history of the changes made to any of the additional forms in a
Contract Profile
or
Company Profile
?from the
Additional Forms browse screen
.
314 / 393
Additional Forms
link
Click to view the Additional Forms browse screen.??
The Links Menu will look
different if you are viewing it from a Company Profile.
Additional Form
categories
Locate the category for the form whose history you want to view, and click on
it to display a list of the available forms in this category.
Additional Form
records
Locate the form whose history you want to review, and click on it to display
its Additional Form Profile.
315 / 393
History button
Click to display a screen showing the changes that have been made to the
additional form.
316 / 393
Events
In the Novâtus system, an event is a key date in the life of a contract, such as the date on which
a contract is set to renew or expire.??Novâtus alerts you about these events by automatically
generating email messages?(event alerts) prior to the event date. The way in which
events are
managed
in the Novâtus system will help you in setting up your event alerts.
Event Alerts (email notifications) can be attached to a contract's Expiration Date or Notice
Date.??If there is no Notice Period specified, then the Alert will be based on the Current Expiration
Date.??If there is a Notice Period, which is the number of days prior to the contract expiration or
renewal date that notice of intent to renew (or not renew) must be given, then the Alert will be
based on the Notice Date.??In both cases, the number of Warn Days specified will be applied to
the Expiration Date or Notice Date and the Alert will be sent on the appropriate date.
Events are managed from the
Event Profile
screen, where you can:
·
View a list of events
for a company or contract
·
Create an event
·
Edit an event
·
Subscribe or unsubscribe to an event
·
Complete an event
·
Close an event series
·
Delete an event
·
View an event's completion history
?
Event Management
In the Novatus system, event alerts (email notifications) can be sent on a recurring basis, or a
single alert can be sent for a key contract or company date.
?
Single Event
In the example below, the contract expires on December 31 and the system sent out an event
317 / 393
alert on November 1, which is 60 days prior to the expiration?date.
Event With Notice
In the example below, the contract expires on September 1 and requires that a 30-day written
notice be given prior to the expiration date.???Therefore, an event alert is sent on June 1, providing
a 60-day notice that the contract is going to expire, and a second event alert is sent on August 1,
advising that a 30-day written notice is needed to either renew or terminate?the contract.
Event Status
318 / 393
?
Event Alerts?are assigned a status based on their relationship to key contract dates and can be
reported on:
·
Prior to the Alert Date (date an email is sent), the Alert Status is "Scheduled."???After the Alert
Date, the Alert is considered "Due."
·
If a Reminder (Escalation) email has been sent after the Reminder Date, the Alert Status is
"Escalated."??After the Event Date, the Alert is considered "Past Due."
·
All events are considered "open" until they are officially "closed."??Once an event is closed, it
no longer progresses through the above status path.
·
For a Recurring Event, you can "close" a single instance of the Alert, or close the entire
Series.
Weekly Event Notification Reports
On Sunday of each week, the Event Owner receives an email message listing all the alerts that
are Past Due, Due, or will Become Due in the next seven (7) days.??This email allows the Event
Owner to review the statuses of all the alerts for which they are responsible.??The left side of the
email lists all the key event alert fields from the Company and Contract Profiles.??Any text
messages sent with an Alert are also shown.??Between each Alert are "hot links" that take you
directly to the Contract (Go To Contract link) or the Event (Go To Event link) in the Novâtus
system, as long as you have a login ID and password, and access to the contract record.??The
right side of the email provides a summary of all the event alerts in the email message (under
Events in this report), as well as quick links to the system (i.e., More Info and View Contract)
.??Event alert dates in the email message are color-coded by status: Green = Scheduled, Yellow
= Due, and Red = Past Due
.
?
319 / 393
Daily Event Notification Reports
Each day, the Event Owner, as well as those individuals on the Notification List, receive an email
message listing all the Alerts that are due to be delivered to them on that day.??The email allows
the Event Owner to see all the alerts for that day in a single email message.?
?
The left side of the email lists all the key event alert fields from the Company and Contract
Profiles.??Any text messages sent with an Alert are also shown.??Between each Alert are "hot
links" that take you directly to the Contract (Go To Contract link) or the Event (Go To Event link)
in the Novâtus system, as long as you have a login ID and password, and access to the contract
record.??The right side of the email provides a summary of all the event alerts in the email
message (under Events in this report), as well as quick links to the system (i.e., More Info and
View Contract).
?
The event alert dates in the email message are color-coded by status: Green = Scheduled,
320 / 393
Yellow = Due, and Red = Past Due
.
?
Events Browse Screen
The events?associated with a company or contract are viewed from their
Contract Profile
or
Company Profile
using the Events browse screen.??The events for which you have some
measure of responsibility are viewed from your
My Place
menu
.
?
?
?
321 / 393
Events link
Click to view the Events browse screen.??The Links Menu will look different if
you are viewing it from a Company Profile.
Event record
Click on an event record to display the Event Profile where you can view
additional information for the event.??From the profile, you can also edit the
event, mark it as completed, close it, view the completion history, or delete
the event.??Events may also have attached documentation and these
documents can be viewed from the profile.
New Event Button
Click to
add a new event
.
Event Profile
The Event?Profile contains data for the scheduled event, as well as a list of attached document
associated with the event.??The Action Bar contains several buttons, which allow you to perform
various tasks:
editing
,
deleting
,
viewing completion history
,
subscribing (and unsubscribing)
,
marking an event as complete
,
closing an event series
, and
browsing events
.? You can also
create a new event
for a contract or company.
To access the Event Profile, click on the
Events
link in a
Contract Profile
or
Company Profile
to
display the
Events browse screen
, and then click on an event record to display its Event Profile.
?
?
?
Event data fields
View the information for the event.
322 / 393
Edit Event button
Click to display a screen that will allow you to edit the event.
Delete Event
button
Click to delete this event.
Completion
History button
Click to view a list of actions that have been taken to complete the event.
Subscribe button
Click to subscribe to this event.??Subscribers receive daily and weekly Event
Notification Reports via email.
Mark Completed
button
Click to mark this event as completed.
Close Event
Series button
Click to close the entire series for the event.??This button is only present if the
event is part of a series.
Browse Events
button
Click to return to the Event Browse screen
Attached
Documents
View the documents that are associated with the event.
Documents icon
Click on the
?icon to display a prompt that will allow you to view or
download the document.
Creating an Event
Any event?alert can be created by clicking on the
Events
link in a Contract or Company Profile.
An event alert for a contract's original expiration date can be created by clicking on the
Event
icon
?in the Contract Profile
.
?
Creating an Event using the Events Link
An event is created from the
Events browse screen
, which is accessed by clicking the
Events
link in the
Contract Profile
or
Company Profile
.??From the browse screen, click the
New Event
button to display a screen that will allow you to add an event
.
?
?
323 / 393
?
Required fields
Enter the required information for the event: Event Name, Event Date, and
Event Frequency.?
·
When you enter the event date, the
Notification Date
field is auto-
populated with this same date.?
This is the date the event (email) alert
will be sent out
.
·
The timeframe options for sending an event alert are limited to Single,
Monthly, and Yearly in the
Event Frequency
field, but you can refine
the timing of alerts by making selections in the
Frequency
and
Event
Repeat
fields. For example, if you want an event alert to go out twice a
year, select
Monthly
in the
Event Frequency
field, and enter
6
in the
Frequency
field. The
Event Repeat
column will display the text:
Event will repeat every 6 months.
Optional fields
Enter the optional information for the event: Event Description, End Date,
and Warn Days.???If there is an appropriate template for this event, select it
in the
Event Template
list.??
A selection in this list will auto-populate the
Event Description and Notification Message fields
.
If you do not use a
template, enter the text you want to display in the email message by
populating the
Event Description
and
Notification Message
fields
.
324 / 393
·
By default, you are the
Event Owner
and you will receive all Event
Notification Reports via email.
·
Enter a number in the
Warn Days
field if you want the email alert to be
sent out prior to the event date. For example, to send an event alert on
March 3 for an event occurring on March 7, enter "4" in the field.
To Field
Click on the
arrow to display the
Address Book.
Select the people you
want to receive the email message, informing them of the event.
Notification
Message field
If you
did not
make a selection in the
Event Templates
list, this field is
blank, and you will have to enter the message you want sent to the
selected recipients.
Set Reminder
check box
Select to display fields that will allow you to send out a reminder email
about the event.??
·
Click on the
arrow in the
Reminder List
field to select the
recipients for the email reminder using the
Address Book
. Then, enter
your message in the
Reminder Message
field.
Note:
If a template is
selected in the
Event Template
list, this field is automatically
populated with a message.
·
If you want to change the date of the reminder, which is set to the same
date as the one you set in the
Event Date
field, simply change the
number in the
Reminder Days
field.
Selecting a negative number will
allow you to send out the reminder prior to the event alert
.
Available
Documents section
Click on the
?icon for any of the documents in the
Available Documents
section to add the document as an email attachment to the event alert.
The
selected document moves to the Attached Documents section
.?
Note:
The default display is Contract Documents. Click on the
Company
Documents
or
Global Documents
button to display a list of the company
or global documents available. To quickly locate a document, click on a
column heading (e.g., Document Type, Filename, Author) to sort the list of
documents in alphabetical order.
Save button
Click to save your information and create the event.
?
Creating an Event using the Event Icon
The Event icon
?
provides a quick and easy way to create an event alert for the
original
expiration date
of a contract. This icon only displays when a Contract Profile is in edit mode.
Click on the
Edit Contract
button in the
Action Bar
of the
Contract Profile
to display a contract in
edit mode
.
?
325 / 393
?
?
Event Alert icon
Click on the
?icon in the Original Expiration Date field to display an Event
window that will allow you to create an event alert for this expiration date.
Create Event
checkbox
Select to create an event for the contract's original expiration date.
Event Owner list
Select the person who is responsible for the event.?
The Event Owner will
receive Event Notification Reports via email.
Notification List
Click on the
arrow to display the
Address Book
. Select all the people
you want to notify about the event.?
326 / 393
Warn Days field
Enter the number of days prior to the event date that you want the email
notification to be sent.
Template list
If applicable, select one of the templates in the list for the event.??
If a template
is selected, the Description field and the Notification Text field are
automatically populated with the messages that will display in the body of the
event alert email
. If you do not use a template, enter the text you want to
display in the body of the email in the
Description
and
Reminder Text
fields.
Use Reminder
check box
Select to display fields that will allow you to send out a reminder email about
the event.??
·
Click on the
arrow in the
Reminder List
field to select the recipients
for the email reminder using the
Address Book
. Then, enter your
message in the
Reminder Message
field.
Note:
If a template is
selected in the
Template
list, this field is automatically populated with a
message.
·
If you want to change the date of the reminder, which is set to the same
date in the
Original Expiration Date
field, simply change the number in
the
Reminder Days
field.
Selecting a negative number will allow you to
send out the reminder prior to the event alert.
Save button
Click to save the information and create the event.
Editing an Event
You can quickly and easily edit an event from the Event Profile.??To access the Event Profile,
click the
Events
link in a
Contract Profile
or
Company Profile
to display the
Events browse
screen
.??Locate the event you want to edit, and click on its event record to display the Event
Profile
.
Click the
Edit Event
button in the Action Bar to display the Event Profile in edit mode.
?
327 / 393
?
?
Event fields and
lists
Edit the event data, as needed.
Event Templates
list
Select a template or change the template selection, if appropriate.??
Selecting
a template auto-populates the
Event Description
and
Notification
Message
fields
.
Attached
Documents
section
Attach a document to the event by clicking on the document's
?icon in the
Available Documents
section.??Remove a document from the event by
clicking on the
?icon in the
Attached Documents
section.
Note:
The
default display is Contract Documents. Click on the
Company
Documents
or
Global Documents
button to display a list of the company or global
documents available. To quickly locate a document, click on a column
heading (e.g., Document Type, Filename, Author) to sort the list of
documents in alphabetical order.
328 / 393
Save button
Click to save the information and edit the event.
Subscribing and Unsubscribing to Events
When you subscribe to an event, you receive daily and weekly Event Notification Reports via
email.???When you elect to "unsubscribe" from an event, you no longer receive these email
notifications.??Both functions?are performed from the Event Profile, which is accessed by clicking
the
Events
link in a
Contract Profile
or
Company Profile
to display the
Events browse
screen
.??Locate the event you want to subscribe to (or unsubscribe from), and click on its event
record to display the Event Profile.
?
?
?
Subscribe toggle
button
Click to subscribe to the event.?
Unsubscribe
toggle button
Click to unsubscribe from the event.?
?
?
Completing an Event
An event?is marked as complete when you accomplish the task associated with the
event.??Completing an event is accomplished from the Event Profile.??
To access the Event Profile, click the
Events
link in a
Contract Profile
or
Company Profile
to
display the
Events browse screen
.??Locate the event you want to complete, and click on its event
record to display the Event Profile
.
?
329 / 393
?
?
Mark Completed
button
Click to mark the event as completed and display the Event Completion
window.?
Event Completion
Notes field
Enter information on how the event was completed in the Event Completion
window.
Note:
You can copy (and paste) the closing notes text so that it
can be used when closing other events in the series.
Submit button
Click to save your notes and complete the event.
?
Closing an Event Series
If the event is part of a series (i.e., the same task is performed at the same interval over time),
and the event has been completed for the last time, you can close the event series, instead of
just completing the last event.??
?
Closing an event series is accomplished from the Event Profile.??To access the Event Profile,
click the
Events
link in a
Contract Profile
or
Company Profile
to display the
Events browse
screen
.??Locate the event series you want to close, and click on its event record to display the
Event Profile.
?
330 / 393
?
?
Close Event
Series button
Click to display a Close Event Series prompt to confirm your intent to close
the event series.?
Yes button
Click to close the event series.
Viewing the Completion History
Once an event has been completed or a series has been closed, you can view the information
that was recorded for the completion or closure.??Viewing the completion history is accomplished
from the Event Profile.??
To access the Event Profile, click the
Events
link in a
Contract Profile
or
Company Profile
to
display the
Events browse screen
.??Locate the event whose completion (or closure) you want to
view, and click on its event record to display the Event Profile
.
?
331 / 393
??
Completion
History button
Click to display a screen that provides information on how and when the
event was completed, along with the name of the person who completed the
event.
Completion
History record
Review the information for accuracy and completeness.
Deleting an Event
You can quickly and easily delete an event from a Contract or Company Profile.??Once an event
is completed, you will probably want to delete it.??Prior to deleing an event, it is recommended
that you review the event's completion history, which provides information on how and when the
event was completed, as well as the name of the person who completed?it.?
?
Deleting an event is accomplished from the Event Profile.??To access the Event Profile, click the
Events
link in a
Contract Profile
or
Company Profile
to display the
Events browse
screen
.??Locate the event you want to delete, and click on its event record to display the Event
Profile
.
?
332 / 393
?
?
Delete Event
button
Click to display a Delete Event prompt to confirm your intent to delete the
event.?
Yes button
Click to delete the event.
333 / 393
Tasks
In the Novâtus system, tasks can be created and managed for both contracts and
companies.??Tasks can be set?up to mirror the steps in negotiating or enforcing a contract, and
can also be used to chart the responsibilities that a company has in performing its duties, such a
renewing its insurance certificates.
Tasks and task lists are stored in the Tasks browse screen in the Contract Profile or the
Company Profile.??From the
Tasks browse screen
, you can:
·
Add a task
·
Edit a task
·
Complete a task
·
View notes for a completed task
·
Create a task list
?
Tasks Browse Screen
The tasks?associated with a company or contract are viewed from the
Contract Profile
or
Company Profile
using the Tasks browse screen. The tasks that are assigned to you can be
viewed from your Tasks
portlet
in the
Dashboard
.
?
334 / 393
?
Tasks
link
Click to view the Tasks browse screen.??
The Links Menu will look different if
you are viewing it from a Company Profile
.
Task record
View the tasks for the contract (or company) profile.??Tasks are grouped by
due date.??
Tasks displayed in red text are past due.
Show Completed
button
Click to display the tasks that have been completed.??
Completed tasks are
displayed in strikethrough text.
Hide Completed
button
Click to view only the tasks that are open and have not been completed.
Add Task button
Click to
add a task
.
Add Task List
button
Click to
create a task list
.
Complete Task
icon
Click to
complete an open task
.
?
?
?
Adding a Task
335 / 393
Tasks are added from the
Tasks browse screen
.??To access the Tasks browse screen, click on
the
Tasks
link in a
Contract Profile
or
Company Profile
.
?
?
?
Add Task button
Click to display the Add Task window.
Subject field
Type in a descriptive name for the task so that it is readily understandable.
Due Date field
Enter the date on which the task must be completed.??You can also click on
the
?icon and use the calendar to quickly select the date.
Task Owner list
Select the person who is responsible for completing the task in the list of
available people.
Save button
Click to save your information and add the task.
?
Editing a Task
Tasks are edited from the
Tasks browse screen
.??To access the Tasks browse screen, click on
the
Tasks
link in a
Contract Profile
or
Company Profile
?
?
336 / 393
Task Subject field
Click inside the field to make it editable if you want to update the name of the
task.
Due Date field
Click inside the field to make it editable if you want to change the date the
task is due. You can also click on the
?icon and use the calendar to quickly
select the date.
Note:
You can even edit tasks that are past due, which
makes it easy to reschedule a task since all that is needed is a new due
date. Tasks that are past due are displayed in
red text
.
Add Task button
Click if you want to add a new task to the contract or company.
Add Task List
button
Click if you want to add a new task list to the contract or company.
The Task Owner field is not editable
.
Completing a Task
Once a task?is completed, the system allows you to store notes on how and when the task was
completed.??This provides a historical record of the tasks associated with contract and
company-related procedures
.
?
Tasks are completed from the
Tasks browse screen
.??To access the Tasks browse screen,
337 / 393
click on the
Tasks
link in a
Contract Profile
or
Company Profile
.
You can complete a task that has been assigned to you by clicking on its
icon in
your
Upcoming Tasks
portlet
in the
Dashboard
.
When you complete a task, it is removed from the browse screen so that only pending tasks
display, but you can easily view both completed and pending tasks by clicking the
Show
Completed
button in the Action Bar of the Tasks browse screen.
?
?
?
Complete Task
icon
Click on the
?icon to display a Task Completion window.
Notes field
Enter information on how and when the task was completed.??If you are
completing a task for the task owner, provide your name as the person who
completed the task.
Submit button
Click to save the information and complete the task.
?
When a task is completed, an email notification is sent out to the task owner.??This is especially
helpful when someone other than the task owner records the completion of the task in the
Novâtus system
.
338 / 393
Viewing Completed Task Notes
All of the completed tasks?for a contract or company, as well as the details relating to each
task's closure, can be viewed from the
Tasks browse screen
.??To access the browse screen,
click on the
Tasks
link in a
Contract Profile
or
Company Profile
.
?
Completed tasks are displayed in
strikethrough
text in the Tasks browse screen. Tasks that
are past due are displayed in
red text
.
?
?
Show Completed
button
Click to change the view in the browse screen from pending tasks to pending
and completed tasks.
Closure Notes
Review the notes provided by the task owner in completing the task.
339 / 393
Creating a Task List
The Task feature also has a Task List option that uses templates designed by your System
Administrator, which delineate the steps in a procedure, such as the actions that must be taken
after one of your company's contracts has been executed.??Since a Task?List a simplified version
of the Novâtus workflow, it is recommended that you review both the workflow and task list
templates to determine which option better suits your needs
.
A task list is added from the
Tasks browse screen
.??To access the Tasks browse screen, click
on the
Tasks
link in a
Contract Profile
or
Company Profile
.
??
Add Task List
button
Click to display the Add Task List window that will allow you to add a task list
to a contract (or company) profile.
Task List list
Locate the template that best describes the process or procedure you want
to accomplish.
Add button
Click to add the selected task list to the contract's (or company's) tasks.
?
340 / 393
?
Task List steps
Review the steps in the task list.
?
?
Task List step
If needed, edit the task list step by clicking in the field and typing over the
existing text.
Due Date field
Enter the due date for each step in the task list, or click on the
?icon and
use the calendar to quickly select the date.??
All due dates must be entered,
or you will not be able to save the task list.
341 / 393
Save button
Click to save your information and create the task list.
Task List entries
Ensure the task list has been added by locating the individual steps in the list
in the Tasks browse screen.
?
?
342 / 393
Documents
In the Novâtus system, documents can be stored and managed in both Contract and Company
Profiles.??The Company Profile can be used to house documents that need to be accessed by
multiple users in enforcing contracts, such as Purchase Orders and Insurance
Certificates.???The Contract Profile is typically used to house documents like the first draft of a
contract, the final version of the contract and all attending documents, as well as all of the
contract revisions.
Documents are stored and viewed in the Documents browse screen.??From the
Documents
browse screen
, you can also:
·
Add a document
to a
Contract Profile
or
Company Profile
·
Use the multi-print function
to print any of the documents listed in the browse screen
Documents are managed in their individual
Document Profiles
. From a Document Profile, you
can:
·
Edit a document
·
Delete a document
·
Download a document
·
Upload a document revision
·
Compare document revisions
Documents Browse Screen
The documents?associated with a company or contract are viewed from the
Contract Profile
or
Company Profile
using the Documents browse screen.
?
343 / 393
?
?
Documents
link
Click to view the Documents browse screen.??The Links Menu will look
different if you are viewing it from a Company Profile.
Document record
Click on a document record to display its Document Profile where you can
view additional information for the document.??From the profile, you can edit
the document and delete it.??You can also download the document to make
revisions and then upload your revised copy.??The profile also contains an
option to review the revisions made to the document.
Expand icon
Click on the
?icon to view previous versions of the document.
New Document
button
Click to add a new document to the profile.
Multi-Print button
Click to select multiple documents for printing.
?
The global documents that you can view and download can be accessed by clicking on the
Global
Documents
link in your
My Place
menu
.
Document Profile
The Document?Profile contains key data for the document, including file name and file size, as
well as its revision number.??The Action Bar contains several buttons that allow you to perform
various tasks related to the document, such as editing, deleting, downloading, uploading
revisions, and comparing revisions.
To access a Document Profile, click on the
Documents
link in a
Contract Profile
or
Company
344 / 393
Profile
to display the
Documents browse screen
, and then click on a document record to display
its Document Profile.
?
?
Document data
fields
View a summary of information for the document.
Edit Document
button
Click to display a screen that will allow you to edit the document.
Delete Document
button
Click to delete the document.
Download
Document button
Click to display a prompt that will allow you to view or download the
document.
Upload New
Revision button
Click to display a screen that will allow you to upload a revision to the
current document, and provide data on the revision.
Compare
Revisions button
Click to display a screen where you can select the revisions you want to
compare.??Once selected, you can then run a comparison, which displays
the document onscreen showing additions in highlighted text and deletions
as strikethrough text.
Back to Browse
button
Click to return to the Documents browse screen.
345 / 393
Adding a Document
Documents are added from the Documents?browse screen.??To access the
Documents browse
screen
, click on the
Documents
link in a
Contract Profile
or
Company Profile
.??From the browse
screen, click the
New Document
button to display a screen that will allow you to add a
document
.
?
?
?
Document Type
list
Click on the
icon to display a list of available document types, and then
select the type of document you are adding.?
Select button
Click to display a File Upload window that will allow you to locate and select
the document file to be added to the profile.
Optional fields
Enter the optional information for the new document:
Author
,
Effective
Date
,
Current Expiration Date
, and
Description
.
Click on the
icon in
the date fields to display a pop-up calendar to help you locate a date
.
Save button
Click to save your information and add the document.
?
The Document Profile for the new document displays with information about its file size and file
type.??In the File Revision field, the new document is designated as revision "1."
?
346 / 393
Using the Multi-Print Function
The Multi-Print?function allows you to print all of the documents that have been uploaded to a
Contract or a Company Profile at the same time.??This is a time-saving feature since you do
not?have to go through the process of opening and printing each document separately
.
?
Currently, the Multi-Print function is only available for PDF documents.??Since Multi-Print works
by combining documents into a single PDF file, this could result in a very large file being printed
if you combine several documents or a few large documents.
?
The Multi-Print function is available from the
Documents browse screen
.??To access this screen,
click on the
Documents
link in a
Contract Profile
or
Company Profile
. ?From the browse screen,
click the
Multi-Print
button to display a screen that will allow you to select the documents you
want printed
.
?
?
347 / 393
Documents
checkbox
Click inside the checkbox for a document to select it for printing. ?To quickly
select all documents, click the first checkbox.
Preview button
Click to display an Opening window that will allow you to view the document
in the program in which it was created or save the document to your
computer.??
Opening window
Select the
OK
button to open the combined documents file in PDF. ?Review
the document and then print it from Adobe Reader (or Adobe Acrobat).??
If
you want to save a copy of the PDF file, select the
Save File
radio button
and then click the
OK
button.??You can then save the file to your computer
and print it later.
?
Editing a Document
A document is edited from its Document Profile.??To access the Document Profile, click on the
Documents
link in a
Contract Profile
or
Company Profile
to access the
Documents browse
screen
.??From this screen, locate the document you want to edit, and click on the document
record to display its
Document Profile
.??Click on the
Edit Document
button in the Action Bar to
display the Document?Profile in edit mode
.
?
?
?
Document Type
list
Click on the
icon if you want to change the document type, and select a
different option.?
348 / 393
Data fields
Update the information in the editable fields, as needed:
Author
,
Effective
Date
,
Current Expiration Date
, and
Description
.??
The Filename, File Size,
and File Type fields are not editable.??
Save button
Click to save your information and edit the document.
?
Deleting a Document
A document is deleted from its Document Profile.??To access the Document Profile, click on the
Documents
link in a
Contract Profile
or
Company Profile
to access the
Documents browse
screen
.??From this screen, locate the document you want to delete, and click on the document
record to display its
Document Profile
.??
?
?
?
Delete Document
button
Click to display a confirmation prompt.??
If there are other revisions to the
document, only the selected document will be deleted.
Delete Document
prompt
Click the
Yes
button to delete the document.
?
?
Downloading a Document
A document stored in a Contract or Company Profile can be downloaded to your computer from
the Document Profile.??To access the
Document Profile
, click on the
Documents
link in a
Contract Profile
or
Company Profile
to access the
Documents browse screen
.??From this
screen, locate the document you want to download, and click on the document record to display
its Document Profile
.
?
349 / 393
?
?
Download
Document button
Click to display an Opening window that will allow you to view the document
or save it to your computer.??
Opening window
Select the
OK
button to open the document in the program in which it was
created. ?If you want to save a copy of the document to your computer,
select the
Save File
radio button and then click the
OK
button.
?
Uploading a Document Revision
During contract negotiations, many versions of a contract, as well as its attending documents,
may be created.??The Novâtus system allows you to upload several revisions to a document and
automatically numbers the revisions for easy identification.
?
A document revision is uploaded to a Contract or Company Profile from the Document
Profile.??To access the
Document Profile
, click on the
Documents
link in a
Contract Profile
or
Company Profile
to access the
Documents browse screen
.??From this screen, locate the
document that has the revision, and click on the document record to display its Document
Profile
.
350 / 393
Upload New
Revision button
Click to display a screen that will allow you to upload a revision to the
document.?
?
?
Select button
Click to display a File Upload window that will allow you to locate and select
the document revision.?
351 / 393
Optional fields
Enter the optional data for the document revision:
Author
,
Effective Date
,
Current Expiration Date
, and
Description
.??
The Document Type field is
automatically selected and not editable
.
Save button
Click to save your data and upload the document revision.
Comparing Document Revisions
Once a document has been revised, you will probably want to see what changes have been
made.??The Novâtus system has the functionality to compare versions of a document, using a
highlighting feature to identify additions to the document?and a strikethrough feature that identifies
information that has been deleted.
A documenty comparison is viewed from the Document Profile.??To access the
Document
Profile
, click on the
Documents
link in a
Contract Profile
or
Company Profile
to access the
Documents browse screen
.??From this screen, locate the document that has the revision, and
click on the document record to display its Document Profile
.
Compare
Revisions button
Click to display a screen that will allow you to select the two revisions you
want to compare.?
?
352 / 393
??
Revision
checkbox
Click inside the checkboxes for the two document revisions you want to
compare
.?Since only documents with the same format (e.g., DOC and PDF)
can be compared, any revisions with a different format will be unavailable for
selection and will appear in gray, strikethrough text.
Compare button
Click to generate the revision comparison.
?
The comparison between the selected revisions is displayed onscreen.??The differences
between the revisions are displayed as follows:
·
Added text – green highlight
·
Deleted text – pink highlight and strikethrough text
?
Print Document
Compare button
Click to print a copy of the document showing the comparisons between the
two document revisions
.?
353 / 393
Messaging
In the Novâtus system, messages can be sent from both Contract and Company Profiles.??All
the messages in a company or contract profile are viewed from the Messaging browse screen,
which is accessed by clicking on the
Messaging
link in the
Company Profile
or
Contract Profile
.
?
In addition, three other program features contain a messaging?option:
·
Events
·
Workflows
·
Document Packages
?
An example of a Messaging window in a Company Profile is shown below
.
?
?
Messages list
Locate the message you want to read, and click on it to display the contents
of the message at the bottom of the window.
354 / 393
Reply button
Click to display a screen that allows you to reply to the sender of the email
message by simply entering your message and clicking a Send button.
You
can also send an attachment and include additional recipients for your
message
.
Delete Thread
button
Click if you want to delete the email message from the company or contract
profile.
New Thread
button
Click to display a screen that allows you to create a new email message and
send it from this company or contract profile.
You can attach a file to your
message and send it to several recipients
.
The Messaging window is separate from the program screens and can be re-sized and
moved onscreen.??To exit the Messaging window, click the Close button
.
355 / 393
People
The Company Profile is used to store information on all the people associated with a
company.??The Contract Profile is used to store information for only those people who are
associated with the contract
.
The contact people for a company or contract are managed from their
Person Profile
screen,
where you can:
·
View a list of people
associated with the company or contract
·
Add a person
to a company or contract
·
Edit a person's information
·
Delete a person
from a company or contract profile
People Browse Screen
The people?associated with a company (or contract) are viewed from the
Company Profile
or
Contract Profile
using the People browse screen.
?
?
?
356 / 393
People
link
Click to view the People browse screen.??
The Links Menu will look different if
you are viewing it from a Contract Profile
.
Person record
Click on an individual's record to display their
Person Profile
with additional
information for that person.??From the Person Profile, you can edit a person's
information or delete the person.??You can also add a new person to the
Company Profile from this screen.
?
You cannot add people, edit a person's information, or delete a person from the Contract
Profile.??These tasks can only be accomplished from a Company Profile or from the
People
link in the
My Place
menu.
?
Person Profile
A Person?Profile contains key data for the person, including their name, title, and the functions
they can perform in the Novâtus system.??The Action Bar in the profile contains buttons that allow
you to
edit
the person's information,
delete
the person, as well as
add
a new person to the
Company Profile.? To access a Person Profile, click on the
People
link in the
Company Profile
to
display the
People browse screen
. Locate the person whose information you want to view, and
click on their record to display their Person Profile
.
?
?
Person data fields
View the person's information.
Edit Person
button
Click to display a screen that will allow you to edit the person's information.
357 / 393
Delete Person
button
Click to delete the person from the Company Profile.
Add Person
button
Click to display a screen that will allow you to add a new person to the
Company Profile.
Browse People
button
Click to return to the People browse screen.
?
Adding a Person
You can add a person to a Company Profile from the
People?browse screen
or from a
Person
Profile
.?To access the People browse screen, click on the
People
link in the Company Profile
.
To access a Person Profile, click on the
People
link in the
Company Profile
to display the People
browse screen, and then click on any person's record to display their Person Profile
.
Use the
Add Person
button in the Action Bar to add people to the Company Profile
In order to make a person available to participate in events, workflows, and document
packages and/or to receive email messages sent from a Contract Profile, you must first add
them to the contract's Company Profile.
?
?
Add Person
button
Click to display a screen that will allow you to add a person to the Company
Profile.
358 / 393
?
?
Required fields
Enter the required information for the person:
First Name
,
Last Name
,
Email Address
, and
Functions
.
Optional fields
Enter the optional information for the person: Middle Name, Title, Address,
contact numbers (Work, Mobile, Fax, Home), Mail Stop, and any Notes.
In the phone and fax number fields, click on the
?icon to display a
Phone
Number Entry
window where you can enter the area code, phone number,
as well as an extension number and country code.
Save button
Click to save your information and add the person to the Company Profile.
?
If you need to select more than one option in the Functions field, hold down the
Ctrl
key on
your keyboard and click on each function.
Editing a Person Profile
You can quickly and easily edit a person's information from their Person Profile.??To access their
Person Profile
, click the
People
link in
Company Profile
to display the
People?browse
screen
.??Locate the person whose information you want to edit, and click on their record.??Click
the
Edit Person
button in the Action Bar to display to display their Person Profile in edit mode
.
?
359 / 393
?
?
Data fields and
lists
Update the person's information, as needed.
In the phone and fax number fields, click on the
?icon to display a Phone
Number Entry window where you can update the contact numbers, as
needed.
?
Save button
Click to save your information and edit the person's information.
Deleting a Person Profile
A person is deleted from a Company Profile from their Person Profile.??To access a
Person
Profile
, click on the
People
link in a
Company Profile
to access the
People?browse
screen
.??From this screen, locate the person you want to delete, and click on this person's
record to display their Person Profile
.
?
360 / 393
?
?
Delete Person
button
Click to display a Delete Person confirmation prompt.?
Delete Person
prompt
Click the Yes button to delete the person from the Company Profile.
?
361 / 393
History
The History?feature in the Novâtus system records all of the changes made to the fields in a
program screen. This field is available in several program screens:
·
Company Profile
·
Contract Profile
·
Event Profile
·
Document Packages Profile
?
Company History Browse Screen
The changes made to a company's information are viewed from the
Company Profile
using the
History browse screen.??The first history record in a browse screen for all company profiles is
the creation date.
?
?
362 / 393
History
link
Click to view the History browse screen.??
History records
View the changes that has been made to the Company Profile.??The columns
that display are the
field
name in the profile, the
original value
input into the
field, the
updated value
showing the change made to the field, the name of
the
user
who made the change, and the
date
the change was made.
?
If the Original Value field is blank, the entry in the Updated Value field is the first entry made for
this field.
Contract History Browse Screen
The changes made to the information for a contract are viewed from the
Contract Profile
using
the History browse screen.??The first history record in a browse screen for all contract profiles is
the creation date.
?
?
?
History
link
Click to view the History browse screen.??
History records
View the changes that has been made to the Contract Profile.??The columns
that display are the
field
name in the profile, the
original value
input into the
field, the
updated value
showing the change made to the field, the name of
the
user
who made the change, and the
date
the change was made.
?
If the Original Value field is blank, the entry in the Updated Value field is the first entry made for
this field.
363 / 393
Reports
The Novâtus system allows you to create and run customized reports on both companies and
contracts.??There is also a wizard to assist you in generating a customized report, as well as two
system reports?that automatically generate basic information for a company or a contract.
The Reports feature is accessed from the
Navigation Pane
where you can perform the following
tasks:
·
Run the Report Wizard
·
Generate the Company One-Click Report
·
Generate the Contract One-Click report
·
Edit a report
·
Delete a report
·
Schedule a report for distribution
·
Edit a scheduled report
·
Delete a scheduled report
·
View the list of scheduled reports
?
?
Company One-Click Report
The Company One-Click Report is generated from a
Company Profile
and provides a summary
of the key data for the company.
?
364 / 393
?
One Click button
Click to display a summary report of the information stored in the Company
Profile.
?
The
Report
button in the tool bar is used to run a company report that you have created and
saved.
?
The following is a sample of a Company One-Click Report.??Only the headings (and not the data)
for the People, Locations, Documents, Tasks, Events, and License Information are
shown.??However, a sample of how contracts are displayed is provided in the Contracts section
.
?
365 / 393
?
Contract One-Click Report
The Contract One-Click?Report is generated from a
Contract Profile
and provides a summary of
the key data for the contract
.
?
366 / 393
?
One Click button
Click to display a summary report of the information stored in the
Contract?Profile.
?
The
Report
button in the tool bar is used to run a contract report that you have created and
saved.
The following is a sample of a Contract One-Click Report.??Only the headings (and not the data)
for the Responsibility, Incorporation data, Documents, Tasks, Events, Locations, Assignment
Language, Termination Information, Payment Terms, and Contract Value are shown
.?
?
367 / 393
?
Reports Browse Screen
The Reports?browse screen lists all the reports that you have created and saved in the Novâtus
system.??Reports in the browse screen are categorized by either company or contract
reports.??Reports that are created to show contract requests are categorized as "request"
reports
.
?
The Reports browse screen is accessed from the
Navigation Pane
.
?
?
Reports
link
Click to display the Reports browse screen.
368 / 393
User Reports
Click on the
icon to display a list of other program users. Select a user
in the list if you want to view the reports they have created and saved.
The
default selection is your reports.
Company
Reports category
View the saved company reports.?
Contract Reports
category
View the saved contract reports.
There is also a Company and Contract
Reports category that displays if you select both a Primary and Secondary
report type when creating a report in the
Report Wizard
.
Copy Report icon
Click the
??icon to save a copy of this report.
This feature is useful if you
want to make a copy of another user's report.
Preview Report
icon
Click the
??icon to preview the report in a Novâtus Preview Report window.
PDF icon
Click the
?icon to view the report as a PDF.
Excel icon
Click the
?icon to view the report as an Excel spreadsheet.
New Report
button
Click to launch the Report Wizard, which assists you in creatong a
customized report.
Edit Report button
Click to launch the Report Wizard, which allows you to make edits to an
existing report.
Delete Report
button
Click to delete a saved report.
?
Copying a Report
You can make a copy of any report listed in the
Reports?browse screen
.??It is recommended that
you use this feature if you want to make minor revisions to a report, without altering the original
report, since it is much quicker and easier than creating a new report using the
Report Wizard
. ?
?
369 / 393
Reports
link
Click to display the Reports browse screen.
Copy Report icon
Locate the report you want to copy, and click on its
icon to display a
Report Copy prompt.
To make a copy of another user's report, select their
name in the
User Reports
list
.
?
Data fields
Edit the Report Name and Report Description fields to distinguish this report
from the original.??
Change the selection in the Report Group list, if needed.
Submit button
Click to copy the report as a new report in your Reports browse screen.
?
Once the report is copied to the Reports browse screen, make any edits to the report content
and/or format using the
Report Wizard
.??The wizard?is launched by clicking the
Edit Report
button in the Action Bar of the
Reports?browse screen
.
370 / 393
Report Wizard
The Report Wizard?is an easy and fool-proof way to create a fully customized report since the
wizard?walks you through each step of the process.??The wizard generates a comprehensive
report and allows you to select both primary and secondary reporting options, group report
findings by categories, customize the display of reports, and print the report as either a PDF file
or Excel spreadsheet
The Report Wizard is launched from the
Reports?browse screen
, which is accessed by clicking
on the
Reports
section in the
Navigation Pane
and selecting the
Reports
link
.
?
?
?
New Report
button
Click to launch the Report Wizard.
?
Step 1: Read Welcome Screen
?
371 / 393
?
Next button
Click to proceed to the next step of the Report Wizard.?
Cancel button
Click to exit the Report Wizard.
Step 2: Select Report Type
?
372 / 393
?
Primary list
Select the primary type of report you want to create: Company, Contract, or
Request.??
Make a selection in the
Secondary
list only if you want to create a
very narrow report since the items in this list correspond to the key fields
and additional links in the contract (or company) profile
.
Report Name field
Type in a descriptive name for the report.
Report Group list
This field is automatically populated based on the selection you make in the
Primary
list.
The options in this list are Contract reports, Company Reports,
and Contract & Company Reports.
Report
Description
Provide a description of the report, if desired.
Next button
Click to proceed to the next step of the Report Wizard.?
Previous button
Click if you want to return to the previous step of the Report Wizard.?
373 / 393
?
Step 3: Select Report Fields
?
?
Field list
Select each field you want displayed in the report by
double-clicking
on the
field.??Use the scroll bar to navigate the list.??
Note:
The list is divided into three segments: Company fields (27 items),
Contract fields (30 items), and Contract Person fields (4 items).??All lists are
in alphabetical order. The order in which the fields display in the
Field
selection list box (top to bottom) reflect the way the fields will display in the
report (left to right).
Field selection list
box
A selected field displays in the selection list box with three icons.??Click the
?icon to remove a field from the list box.??If you want to rearrange the
order of the fields, click the
?icon to move the field up in the list, and the
?icon to move it down in the list.?
Next button
Click to proceed to the next step of the Report Wizard.?
?
374 / 393
Step 4:??Group Report Fields
?
?
Field list
Locate the field that you want "grouped" on the report (e.g., Company Name)
, and double-click on it.??Currently, you can only group by one field. ?
In the
PDF version of the report, the data for a grouped field appears once, as a
distinct header.??In the Excel version, data for a grouped field appears in
succession in the report.
Field selection list
box
The "group by" field displays in the selection list box.??Click the
?icon if
you want to remove the field from the list box.
Next button
Click to proceed to the next step of the Report Wizard.?
?
Step 5:??Select Order of Report Fields
?
375 / 393
?
Field list
Double-click on any fields you want "ordered" in the report.??
Ordering a field
means that data for the field is grouped so that identical items display
together
.??For example, in the PDF version of the report, all contracts with
the same expiration date display in succession and the date appears once,
as a secondary heading.??In the Excel version, the date appears once and
the successive fields are blank, indicating a repetition of the above
date.??Ordering is a way of grouping items at a secondary level, under the
main grouping, as defined in Step 4.
Field selection list
box
The order in which fields display in the selection list box corresponds to the
order in which they will appear in the report.??Click the
?icon to move a field
up in the list, and the
?icon to move it down in the list.??Click the
?icon to
remove the field from the list box.
Next button
Click to proceed to the next step of the Report Wizard.?
?
Step 6:??Edit Column Heading Size
?
The Novâtus system automatically makes the size of all your report columns equal by taking the
number of fields and dividing it into 100.??For example, if you select 10 fields to display in your
report, the system will allot 10 spaces (or 10%) to each column heading.??In this step, the Report
376 / 393
Wizard allows you to adjust the size of each column to accommodate either the heading or the
field value
.
?
?
Report Field
Width field
If you want to change the width of any report field, double-click inside the field
and simply type over the existing value.??
The total width of all fields must
equal 100.???
Next button
Click to proceed to the next step of the Report Wizard.?
?
Step 7:??Aggregate Values
?
377 / 393
?
Field list check
boxes
Identify the fields you want to run totals on by selecting the field's
Sum
check
box.??To calculate the average value of a field, select the
Avg.
check
box.??Select the
Min.
check box to display field values in ascending order
(minimum to maximum) and select the Max. check box to display field values
in descending order (maximum to minimum).??
Only the fields that can be
calculated will display.
Record Count
check box
Select if you want to display the total number of records in the report at the
end of the report.
Next button
Click to proceed to the next step of the Report Wizard.?
?
Step 8:??Add Data Filter
?
378 / 393
?
Show All Records
check box
Select if you want to show all the records and not use a filter.??Click the
Next
button to continue.
Add Filter button
Click if you want to add a filter to the report.??A filter will refine the data in your
report and provide only the information in which you are most
interested.??You can add more than one filter to a report.
Field list
Select the field you want to use as the filter.??
All of the fields in both the
Company and Contract Profiles are provided in the list.
Condition list
Select a condition for the field you selected.??
The conditions in the list will
vary, depending on the filter selected in the field list.
Value field list
Select the value for the field and condition.??
The value may be a date based
on your selections.
Next button
Click to proceed to the next step of the Report Wizard.?
?
379 / 393
Step 9:??Save Report
?
?
Finish button
Click to save the report.?
?
View the report in your Reports browse screen using any of the following options:
·
Novâtus Report Preview window – click on the
?icon
·
PDF file – click on the
?icon
·
Excel spreadsheet – click on the
?icon
Editing a Report
You can quickly and easily edit a report using the
Report Wizard
. Use the wizard to update the
content and/or format of the report. You can also edit the
Report Name
and
Report
Description
fields, as well as change the selection in the
Report Group
list.
?
380 / 393
Reports
link
Click to display the Reports browse screen.
Report record
Locate the report record you want to edit, and click on it to select it.
Edit Report button
Click to launch the Report Wizard.
?
Deleting a Report
You can delete any of the reports you have saved in the event they are no longer needed or
become obsolete. A report is deleted from the
Reports?browse screen.
?
381 / 393
?
Reports
link
Click to display the Reports browse screen.
Report record
Locate the report record you want to delete, and click on it to select it.
Delete Report
button
Click to display a Delete Report confirmation prompt.
Delete Report
confirmation
prompt
Click the
Yes
button to delete the report.
Scheduled Reports Browse Screen
The Scheduled Reports?browse screen lists all the reports that you have created and scheduled
for delivery to users of the Novâtus system.??The browse screen is accessed from the
Navigation Pane
.
?
?
Scheduled
Reports
link
Click to display the Scheduled Reports browse screen.
Scheduled Report
records
View the reports scheduled for delivery.??
The frequency of the report,
scheduled start/end dates, the format of the report, and the user who
scheduled the report are provided.
382 / 393
New Scheduled
Report button
Click to schedule a report for delivery.
Scheduling a Report
You can set up a delivery schedule for a report that you created so that it is automatically
emailed to a list of recipients.??The report can be scheduled to be delivered once, or as frequently
as you wish
.?
Reports are scheduled from the
Scheduled Reports?browse screen
.??
?
?
Scheduled
Reports
link
Click to display the Scheduled Reports browse screen.
New Scheduled
Report button
Click to display a screen that will allow you to schedule a report.
?
?
383 / 393
User list
Select the author of the report in the list.?
By default, you are the author of the
scheduled report.
Report Name list
Select the name of the report you want to schedule.??
The reports in the list
are those that are displayed in your
Reports browse screen
.
Scheduled Start
Date field
Enter the first date you want the report to be emailed.??
You can also use the
Calendar ?
??icon to select the date.
Scheduled End
Date field
Enter the last date you want the report to be emailed.?
?If you are scheduling
the report for a one-time delivery, leave this field blank.?
Scheduled
Frequency list
Select how often you want the report to be emailed.??The options are Single,
Weekly, Monthly, and Yearly.
Frequency
Interval field
Enter the number of times you want the report to be emailed during the
timeframe you selected in the Scheduled Frequency list.??
For example, if you
selected yearly and you want the report to be emailed every quarter, enter
"4" in this field
.
Export Type field
Select the format for the report.??
The options are PDF and XLS (Excel).
Notification List
icon
Click on the
?icon to display the
Address Book
.??Click on the names of all
the people you want to receive the report, and then click the
Submit
button to
close the Address Book and populate the Notification List.
Save button
Click to save your information and schedule the report.
Editing a Scheduled Report
You can easily update the delivery schedule or notification list for a scheduled report
.?
Scheduled
reports are edited from the
Scheduled Reports?browse screen.
?
384 / 393
Scheduled
Reports
link
Click to display the Scheduled Reports browse screen.
Scheduled Report
record
Locate the report you want to edit, and click on it to display the report's
information in edit mode.
?
?
?
Scheduled Report
data fields and
lists
Edit the
information for the scheduled report
, as needed.
Save button
Click to save your information and update the report.
Deleting a Scheduled Report
You can also cancel the delivery of a scheduled report so that recipients no longer receive the
report via email
.
Scheduled reports are deleted from the
Scheduled Reports?browse screen
.
?
385 / 393
Scheduled
Reports
link
Click to display the Scheduled Reports browse screen.
Scheduled Report
record
Locate the scheduled report you want to delete, and click on it to display the
report's information in edit mode.
?
?
?
386 / 393
Delete button
Click to display a delete confirmation prompt.
Delete
confirmation
prompt
Click the
Yes
button to delete the scheduled report.
?
387 / 393
Glossary
Term
Novâtus Definition
Acquisition Wizard
A Step-by-Step Wizard that walks an administrator through the process of having
one company acquire another company. The wizard?will assign all selected
information to the acquiring company (e.g., contracts, events, people, etc.).
Active (Contracts)
On the Contract Profile screen, one value of the Contract Status field is Active,
which generally means that the contract has been executed and is in force, as
opposed to being Inactive, Expired, or In Process.
Active (Company)
On the Company Profile screen, one value of the Company Status field is Active,
which generally means that the company is engaged in active business with one or
more legal entities, as opposed to being Inactive, or having no business currently.
Address book (People)
Window used to add users to various system tasks, such as email distribution
lists, document package team members, and workflow teams.
Administrator
A master user; a user who has been granted one or more administrative privileges
and is capable of making and configuring specific changes in the system.?
?
Agreement Type
Defines the “form” of the paper
(e.g., Master contract, Individual contract,
Schedule, Change Order, Statement of Work, or Amendment). Usually the
contract itself will identify the Agreement Type in the body of the document (e.g.,
“This Master agreement
. . .
” or “This Schedule
. . .
”
). Agreements that are
Individual contracts usually start with the words “This Agreement
. . .
“ and they do
not have incorporated agreements (e.g., Schedules, Work Orders, and
Statements of Work) attached at a later date.??Incorporated agreements are ones
that don't stand on their own.??Usually, an Incorporated agreement will start with the
words “This Schedule is incorporated into and is a part of Master Agreement
. . .
“
Archive Process
Provides System Administrators with the ability to archive documents into a secure
archival/storage.
Auto-advance
For an auto-renewing contract, one of the Term Type options for moving the
contract forward to the next expiration date.??This term type allows the system to
automatically advance the current contract expiration date to the next renewal date
and set up new event alerts.
Auto-Inactivate
For a fixed contract, one of the Term Type options for inactivating a contract
automatically when it reaches its expiration date.
Audit Trail
Provides an audit trail of all major changes and functions performed in the
system.??This is also known as the history file.
Automated Triggers
Changes in the system data that trigger action/notices from the system (e.g.,
volume triggers send a notice when a dollar threshold has been reached).
388 / 393
Breadcrumb
Navigation
Dynamic breadcrumbs that show the path that the user has taken to arrive at a
location in the system.
Browse Screen
System screen that lists records/data and can be filtered by any type of user-
defined criteria with no limitation on the number of filters and/or the number of
records displayed.??Users can drag and drop filters to reorganize the browse
screen on the fly.
Clause ?Library
Repository for alternative contract language clauses, which is available to all users
from their MyPlace menu.
Company
In general,
a company is “The Other Party” in the Novâtus system
.??The other party
to the contract is usually Vendors (buy-side contracts) or Customers (sell-side
contracts).??A company also refers to your company's Legal Entities for
organizations that do inter-company contracts (i.e., they sign contracts with or
among internal divisions or subsidiaries).?
Company Locations
Linked section in a Company Profile used to add additional company
locations.??Location information includes address and location type, such as a
Local Office, Regional Office, or Branch Office).
Company Group
Field in a Company Profile used to limit the view, create, modify, and document
permissions of data for both security and convenience.??The Company Group also
facilitates reporting (e.g., search for all companies in the Supplier group)
.??Company groups are defined first, and then users are given permission to view,
create, modify, and access documents in specific company groups. ?If a user does
not have access to a Company Group, they will not see any companies in that
group or any of the companies' contracts.??Company groups are assigned to User
Roles. ?
Company Profile
Primary data screen for company information, which contains key information
about the company.???The Profile also contains links to additional information,
including Contracts, Documents, Tasks, Events, Messaging, People, Locations,
History, Additional Names, and Additional Forms.
Contract
A document that legally binds a Legal Entity. ?A contract can include letters,
purchase orders, schedules, exhibits, attachments, and other documents.
Contract Addresses
Linked section in a Contract Profile that allows users to add additional contract
address to a contract and specify these by address type. ?Address types include
the Notice Address, Billing Address, and Shipping Address.
Contract Family
A group of incorporated and/or related contracts.
Contract Family Tree
An expandable/collapsible hierarchical tree of a contract family visible from any
Contract Profile.
Contract Group
Field in a Contract Profile used to limit the view, create, modify, and document
permissions of data for both security and convenience.??The Contract Group also
facilitates reporting (e.g., search for all contracts in the IT group).??Contract groups
are defined first, and then users are given permission to view, create, modify, and
access documents in specific contract groups. ?If a user does not have access to
389 / 393
a Contract Group, they will not see any contracts in that group.??Contract groups
are assigned to User Roles.
Contract Profile
Primary data screen for contract information, which contains key information about
the contract.???The Profile also contains links to additional information, including
Contract Family, Documents, Tasks, Events, Payments, Messaging, People,
Addresses, Document Packages, History, and Additional Forms.
Contract
Responsibilities
Contract Profile feature that allows people to be assigned to functions relating to
the negotiation, management, or enforcement of a contract. ?A contract
responsibility can be associated to one or more functions and to one or more
Person Type (Company Contact, External, Legal Entity Person, and User)
.??Functions that people are able to perform are defined in the Person Record. ?
Contract Type
Field in a Contract Profile that defines the type of deal being transacted (e.g.,
Lease, License, or Services).??Frequently, the agreement itself will identify the
Contract Type in the body of the document (e.g.,
“This Master Lease agreement
. .
.
“ or “This Master Software License Agreement
. . .
” with “Master” being the
Agreement Type and “Lease” or “Software License” being the Contract Type
)
.??Novâtus supports a five-level hierarchy, so a License might be further divided into
Software, Training Materials, and Our IP as Level 1.??For Software, Level 2 might
be Desktop, Server, Mainframe, etc.
Contract Templates
The user's MS Word or Adobe Reader or Acrobat (or other file type) form, which is
stored and retrievable.
Dashboard
User-customizable Home Page that displays user selected data.
Dashboard Portals
Windows of data selected by the user, which display on the Dashboard.
Document Package
One or more documents that are shared and edited by the members of a group,
which was formed for the express purpose of performing a specific contract-
related task.
Documents
Electronic files that are uploaded and linked to a Company or Contract Profile.??The
Documents link in a profile provides access to scanned files relevant to the
contract, including executed contracts.??Other documents can be letters,
correspondence, and sourcing documents.
Dynamic Data Forms
User- defined data forms (screens) used to collect additional information about a
company, contract, or project.
Event
A happening that occurs during the course of the business relationship and usually
has an ALERT or NOTICE tied to it. ??Events are always on a calendar and/or a
report.
Event Alerts
Email reminders that are linked to event dates.??In a Contract Profile, event alerts
are sent for contract Expiration and Notice dates, Provision dates (user-defined
dates), and unlinked dates.???Event alerts are sent out prior to the event, and the
number of days prior to the alert is user-defined.
Events
Important dates in the life of a contract.??These dates include contract expiration
390 / 393
dates, contract notice dates, certification renewals, and meetings.
External Person
One of the three groupings in the Address Book: (1) Users, or individuals with
logon IDs (2) Company People, or individuals that are linked to company profiles,
and (3) Externals, or individuals not associated with a specific company.
Field Content
The actual values in a particular field.??For example,
for the “State of Incorporation”
field in a Contract profile,
the field content might be “Georgia” or “Florida
.
”
Field Label
The name assigned to a field by the Deployment Team during the Startup
Workshop.??For example, the field that stores information on the state in which a
company is incorporated might have “State of Incorporation” as the field label
.
Forms Library
Provides for the storage and retrieval of forms (e.g., contracts, and all other
business related forms). ?Forms can be downloaded by the user and/or used in
connection with workflows.
Help
Information about Novâtus Contracts™ fields
, functions, and usage.
Help Tips (Quick Tips)
Superscript windows that pop-up with definitions or instructions when a user
“mouses
-
over” a field in a program screen
.
History
A system-captured audit trail of all changes made to data fields in a Contract or
Company Profile.
Inactive
One of the values in the Status field in a Contract Profile.??This generally means
that the contract is no longer in force, as opposed to "Active" or "In Process."??The
contract has either expired or been cancelled.
One of the values in the Status field in a Company Profile. ?This generally means
that the company is no longer "Active" or "On Hold," either having gone out of
business or been acquired.??Acquired companies are automatically given this
status when the Acquisition Wizard is run.
Incorporated Contract
Contract that is integrated with other contract documents into a single legal
document. Incorporated contracts have a parent/child relationship, which Novâtus
Contracts™ displays as a tree structure
.?
In Process
One of the values in the Status field in a Contract Profile. This generally means
that the contract is in draft form and has not yet been executed.
Legal Entity
Any entity that will be separately named during the contracting process. ?A legal
entity refers to companies that belong to the Business Organization that "owns"
the "system," including Corporate Headquarters and all office locations,
subsidiaries, divisions, etc. ?
After “marking a company as a legal entity” in the
Company Profile, each contract can be associated with one or more entities so
that reports can be run to list contracts by legal entity.
Location Name
User-defined name for a specific company location.
Manual Advance
For an auto-renewing contract, one of the options for moving the contract forward
to the next expiration date.??Manual advance is used to move the contract to an
391 / 393
“Expired” status
, which requires a user to manually process the renewal
information and review the event alerts.
Messaging
Email feature in Novâtus Contracts that stores all communications sent and
received in the system about a contract or company.
Mobile Notifications
Automated notices that are sent from Novâtus Contracts to users who have
handheld devices, enabling the users to take action.?
Mobile Slim Interface
A language and message format offered by Novâtus Contracts that allows users to
access the application via a mobile device.
Mobility
The ability to have access to company and contract data from a handheld device.
Multi-Party
Contracts that have more than two (2) parties bound to the terms, and these
parties have signed the contract.
My Calendar
Calendar for individual users, which displays on the user's Dashboard and shows
event and/or notice dates.
Notice Period
Number of days prior to the end of a contract's current term that your company is
required to provide notice of intent to renew or terminate the contract.
Notifications/Notice
A notice, reminder, or communication that gets sent out from the system via email
and is tied to an event or standalone action.
One Click Report
A Comprehensive Contract or Company Summary Report that includes all relevant
data for a company or contract.
One Step Search
Search across Novâtus Contracts for user-defined company or contract data.
Parent Contract
Contracts that are integrated with other contracts into a single legal document.
?Parent (root) contracts have a parent/child relationship with incorporated
contracts, which Novâtus Contracts displays as a tree structure.?
Payment Stream
Linked section in the Contract Profile that tracks the stipulations for the proposed
payment or receipt of monies in exchange for goods received or services
rendered, as defined in the contract.
People Profile
Data Profile used for internal and external Contacts to store personal information
(i.e., Vcard).
Portlet
Window that can be added to the Dashboard to provide a user with quick access
to the companies and contracts they recently visited, the search queries they
saved, and their assigned events, tasks, workflows, and document packages. A
charting portlet can be added to show a graphic representation of contract/
company data using a pie chart, bar chart, or time line.
Person Function
A designation or role that a person has in relationship to a company or contract
(i.e., Contract Manager, Attorney, Sales Rep, etc.).
392 / 393
Profile
The “Main Page” of information for a Company
, Contract, Person, Document,
Task, Event, Document Package, or Dynamic Form.
Project
A data record (profile) for project data, which can include links to multiple
companies and contracts, as well as any workflows, forms, and documents that
are specific to the project.
Recent Items
Links to recently visited Companies, Contracts, Event, Tasks, Workflows, and
Document Packages, which are displayed as Portlets on the Dashboard.
Renewal Wizard
A system-generated procedure that walks a user through the steps needed to
renew a contract.??User input is needed to renew the contract.
Reports
Data extracts configured using the Report Wizard. ?Reports can be viewed in the
Novâtus Report Viewer, as a PDF file, or as an Excel spreadsheet.
Roles
User security-based permissions. ?A user can have one or multiple roles.
Security Group
A company or contract group used to control access rights to a set of companies
or contracts.
Spreadsheet View
(Grid View)
Provides the ability to view and/or enter data in a spreadsheet view.??The grid view
is available for dynamic profiles.
Sub-Contract
Incorporated Contract
System Fields
Standard Novâtus fields that cannot be modified or re-named.
Template
Stored contract document or profile, or a wizard.
User Role
The system security function, which allows the assignment of access to Contract
and Company Groups and Administrative Permissions.
Wizard
A system-generated procedure that walks a user through the steps needed to
perform a task.??User input is needed to accomplish the task. For example, the
Contract Renewal Wizard prompts the user to renew (or expire) the contract and
set up new event notices.
Workflow
Series of user-definable mandatory and/or optional steps, which are process
controlled by the System Administrator's setup.??Workflows are generated by the
Workflow Wizard and are user-initiated and/or trigger driven.??Workflows
incorporate user actions and processes, both inside and outside the Novâtus
system, and they can be attached to a company or a contract.
Workflow Steps
"Major" steps in a workflow contain (sub) tasks. The Novâtus system contains
"standard workflow steps" that will drive system functionality, such as final contract
approval launching a contract activation workflow. ?The system also allows
administrators to create an unlimited number of workflow steps (i.e., a contract
workflow typically contains seven major steps, while a company workflow has only
six steps).
393 / 393
Workflow Tasks
Tasks within workflow steps that contain tasks, items, and checklists required to
complete a step.